E27 Companionway Hatch Rebuild DIY

opfrei

Junior Member
Thought I'd share a few photos of my hatch build for posterity's sake... It was a daunting project, which took about 2 weeks to complete, and I would have never attempted to do it myself if it weren't for the info I found on this invaluable forum!

My old sliding hatch was weathered, termite-infested, and eventually collapsed under my weight.. in other words, totally irreparable. However, I kept it as a template for the new one and was able to salvage the top slats. The most frustrating part of this project was framing and fitment, but as the centerpiece of the boat it was well worth the effort.

IMG_4060 - Version 2.jpg

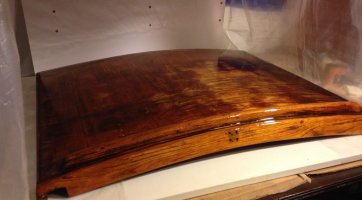
The base: I started by building a strong back frame/sandwich/mold, which followed the arch of the existing hatch. I then laid 2 overlapping pieces of 1/4" marine-grade plywood on top of the frame, which were glued together using epoxy with adhesive filler and then pressed to form with whatever heavy I had on hand. I made sure the base had at least 1" of overlap on all sides. Upon curing, it felt very strong under my weight and had very little spring-back, luckily.

IMG_7255.jpg

IMG_7257.jpg

IMG_7259.jpg
 
Last edited:

opfrei

Junior Member
The frame: I probably checked my measurements about 400 times before actually slicing into the teak to form rough frame members, which I modeled after the existing ones. The rail grooves were made using a circular saw at a ~15-degree angle. I then used bar clamps to hold the members together while I fiddled with fitment on the actual slider rails.

IMG_4845.jpg

IMG_8117.jpg

IMG_8131.jpg

IMG_8139.jpg

The base was then trimmed, fit and glued into the frame.

IMG_8124.jpg
 

opfrei

Junior Member
The slats from the old hatch were sanded clean, and then glued/screwed onto the top of the base.


IMG_8159.jpg


Once everything was flush, I caulked the slat gaps with black Life-Calk, knocked it down, and then used Cetol Natural to seal the deal.

IMG_8203.jpg

IMG_8204.jpg

IMG_8198.jpg

Et voila!

IMG_2066 - Version 2.jpg
 

Geoff W.

Makes Up For It With Enthusiasm
Blogs Author
Looks amazing. Nice work. Glad you were able to salvage the old planks.
 

Kevin A Wright

Member III
Excellent Job!

I replaced my E27 hatch many years ago but the original was just teak plywood rather than having teak slats on top. Wasn't able to salvage anything from the old one. So I rebuilt the frame out of solid teak like you did, then inset a piece of 3/4 inch teak plywood. To get the curve I simply ran kerf cuts on the inside every 2 inches or so to get the bend I needed out of the 3/4 inch sheet. No need for a mold or press. Filled the cuts with white caulk. Nobody ever noticed that I had a solid teak top on the outside but 'teak and holly' slats on the inside.

I did keep the old one to have something to cover the hatch with when I took the new one home to revarnish every year.

Kevin Wright
E35 Hydro Therapy
 

Gary Holford

Member II
Beautiful job and kudos to you for not taking the easy route. I've never seen the hatch with slats. Mine is plywood while my buddy's old boat was plexiglass. Over the years the plywood is thinning out so at some point I'll have to look into a rebuild.
 

Attachments

  • hatch.jpg
    hatch.jpg
    71.1 KB · Views: 149

Christian Williams

E381 - Los Angeles
Senior Moderator
Blogs Author
That hatch is a work of art, one I would be proud to be able to make. (This thread just popped up in my feed, dunno why)

An alternative is to use Plexiglass (acrylic) on that sturdy frame. Three-eights acrylic can be bent to the radius, probably even without the aid of a heat gun. Then bedded and screwed down.

This info comes from the plastic shop that helped me make my 1/2" acrylic hatch, which had to be heat formed ($400 for heat forming). He said 3/8 can be bent cold.

Acrylic isn't expensive, especially since such a piece is often found as scrap in a plastics fabrication shop. Color #2064, gray, is what Ericson used for hatches and often portlights.
 
Top