E-32-3 mast foot rain leaks

Filkee

Sustaining Member
This is my first ever post and it may be in the wrong place, but I have to start somewhere.

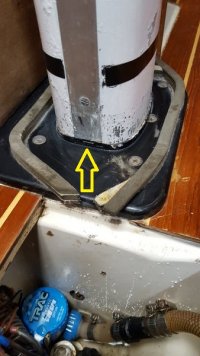
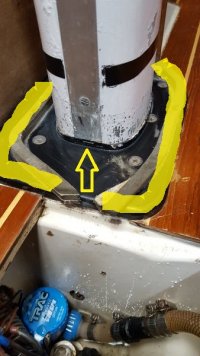
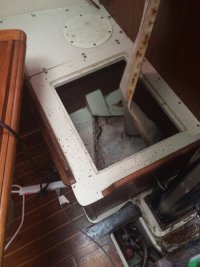
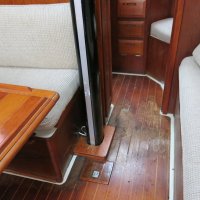
I recently bought a 1985 E32-3. She's been on the hard in plastic for at least three years and somewhat neglected. The result is a number of leaks that have done a number on the interior. I found the one that ate the teak around the port lights stopped it so I'm feeling pretty smart about that part, but water is coming down the mast (as it should, I know) but it's getting in places I wish it wouldn't. At first, I thought it was because she was sitting bow up a little in the cradle that the water wasn't flowing properly out the tray, but I had the yard shift her and now I'm thinking maybe it's wicking down the electric wire that comes out of the mast and goes into the settee. It's turning the wood there to wicker and threatening to do the same to the same to the bulkhead. You can see the wire in the photo below. You can also see the sawdust that was once the cabin sole.

My ambition for this winter is to stabilize her and actually enjoy a season of sailing before going deep on restoration. Ideas appreciated.


attachment.php
 

Attachments

  • IMG_2695.jpg
    IMG_2695.jpg
    64.2 KB · Views: 521

Rick R.

Contributing Partner
Filke,

Welcome to the group. That's a fine vessel you have there.

Check the weep hole at the bottom (under the sole). It may be clogged allowing water to build up an onto the floor.
Rick
 

Loren Beach

O34 - Portland, OR
Senior Moderator
Blogs Author
Guess I do not know enough about the E-32/3, but that raised piece of panel around the the base of the mast looks like an add-on.
I wonder what is under it? Perhaps a prior owner covered up some ugly sole in that little area due to water.

You will want to access the small hole where the rain water seeps out and then see where that water is supposed to go to get into the bilge.
There are pix of our mast base in this blog entry. http://www.ericsonyachts.org/infoexchange/blog.php?do=list&page=3

Our factory teak trims that normally fit around it were removed it when I had half the sole out, and you just barely can see the black aluminum base visible around the bottom of the spar section. There is a small weep hole on the back side, and my little epoxy "dam" is there to channel rain water forward/aft and down into the bilge.

I hope that owners of a sister ship can weigh in with more pertinent info.

Best,
Loren

ps: moved this to a new thread since it's a different type of spar than the thread it was appended to. Easier to search this way, too.
 
Last edited:

Christian Williams

E381 - Los Angeles
Senior Moderator
Blogs Author
There's a very small rectangular mast drain on the aft base. Barely big enough for a pipe cleaner.

I had a standing column of water two feet high in the mast before I cleaned it out.

Somehow, mast water needs to be directed to a bilge, but Ericson made no provision for that.

Some have drilled the mast base and run a tube, some have flow dams like Loren, some drill holes in the TAFG (those two holes in the photo, but not an effective solution).

1-1-e32-3 MAST DRAIN  - Copy.jpg

Sorry about the damage to the teak and holly. I don't see screws, so it may be that your sole is glued down. Some sanding, bleaching, experimental match-staining and new varnish overall may improve the local situation. Because of the likelihood of rainwater it is important to keep the sole sealed with varnish, or in the case of a new sole, entirely impregnated with CPES.
 
Last edited:

Kenneth K

1985 32-3, Puget Sound
Blogs Author
I just dealt this with problem when I got my boat in August. Many of these ideas and some of the pics were gleaned here from EYO:
You should lift off that wooden box surrounding your mast step and see what's underneath. It should look like this:


attachment.php
The small rectangular drain Christian referred to is indicated by the arrow. I clean mine out with a small pick. Every time it rains, a small bit of water leaks out of the slot. The foam strip stuck to the mast base was another member's idea of how to force the water into the bilge rather than have it ruin the sole.

attachment.php
I just ran a thick bead of clear silicone all around the base of my mast, like this. It serves the same purpose. You'll need a soda straw or caulk tube extension to get to the front & port sides of the mast.

attachment.php
Here is what the mast and step look like when separated. If you wanted to inlarge the drain slot with a drill bit, it would probably be safe to do so and might help drainage if there is a lot of debris inside the base of your mast. I was able to clean this area before I re-stepped the mast so I have not enlarged the drain slot/hole.


attachment.php


And, yes, water will run along the wires that protrude from the lower mast area. My VHF coax cable was in a straight down-hill run from the mast to the port settee cabinet, so the interior of the cabinet was deeply stained from water running down this wire. The simple correction (if you have enough slack in the wire) is to just bend it in a "U" shape so the low point is next to or touching the mast. That way, water won't be able to "climb" back up the wire to ruin your cabinetry.

Ken
 

Attachments

  • weep hole.jpg
    weep hole.jpg
    72.4 KB · Views: 296
  • weep hole 2.jpg
    weep hole 2.jpg
    75 KB · Views: 249
  • mast step.gif
    mast step.gif
    17.5 KB · Views: 244
  • 20160730_174448.jpg
    20160730_174448.jpg
    79.2 KB · Views: 287

Cory B

Sustaining Member
Drip Ring?

..

And, yes, water will run along the wires that protrude from the lower mast area. My VHF coax cable was in a straight down-hill run from the mast to the port settee cabinet, so the interior of the cabinet was deeply stained from water running down this wire. The simple correction (if you have enough slack in the wire) is to just bend it in a "U" shape so the low point is next to or touching the mast. That way, water won't be able to "climb" back up the wire to ruin your cabinetry.

I just dealt with a similar situation after restepping our mast and changing how we ran our VHF coax. I stuffed what wire I could back into the mast to get a "drip loop" as Ken described, but I wasn't sure if I had enough wire for it to actually work, so I ran a grommet which tightly fit around the coax into the mast to divert drips downward to the base instead of out of the mast along the coax - I got the idea from the drip rings on kayak paddles.
 
Last edited:

Filkee

Sustaining Member
Mystery Water

Wow, this reminds me of when my Volkswagen caught fire and suddenly there were a bunch of other bugs around me with fire extinguishers.

So, this is my current state:

attachment.php


There is a channel around the mast step that theoretically directs the water forward and down a hole (about 1/2" high and black). She was pitched aft on the cradle for a couple of years and the water overflowed onto the sole. I think the sole is essentially totaled forward of the settee. I was concerned about putting a foot through it so I painted epoxy over the sawdust to stabilize it and now that she's been adjusted, the water in the channel is heading for the hole. I'll be reading all your stories about replacing soles for next year's big project.

But the idea about putting a "U" in the coax may be the killer app of the whole discussion. If I can use a little grace and a little gravity to coax the coax to give up its moisture rather than take it through the plywood, I could be on to something.

Again, I'm fairly overwhelmed by the response. Glad to be here and looking forward to continuing this game.
 

Attachments

  • channel.jpg
    channel.jpg
    50.5 KB · Views: 452

bgary

Advanced Beginner
Blogs Author
There are, in my experience (so far) at least four ways that water ends up at the base of the mast on a 32-III

-- water comes down the mast and out that drain channel. As ken mentioned, it basically dumps the water out onto the wood unless you channel it somewhere else.

-- water comes down the coax and drips out in the same area of the mast step. My mast has an exit plate (much like a halyard exit), rather than a round hole, so a grommet hasn't been viable. Making a drip loop inside the mast solves most of the problem, but you may still get a few drips.

-- the third one, I've discovered, thanks to a lot of rain in November, is where the electrical wires come out of the mast just under the deck. Water will run down the wires and follow their curve as they exit the mast. The problem was masked for a while because I didn't notice the drips down the port side of the mast, I only noticed the puddle at the step and assumed (!) it was from the coax. Mostly my fault - originally the mast had a tight-fitting rubber grommet around the wires, I didn't put it back on when I re-wired the mast electrical as the grommet was too small for the larger wires. Easy to fix, though - in my case I used some leftover household "foam sealant" - maybe not the most nautical of solutions but it seems to be working.

http://www.homedepot.com/p/Loctite-12-fl-oz-Tite-Foam-Insulating-Foam-2045981/206310510

-- last, and most obvious, is the boot where the mast comes through the deck. It is amazing how much water can find its way through even a small gap in the boot. I made my original boot last year by re-using the PVC split-collar that was on the boat (hose-clamps top and bottom), then wrapping it with self-amalgamating tape, and covering it with the cloth cover (UV protection). Worked pretty well, but I'm pondering whether "spar-tite" would be better.

_/)_
Bruce
 

Geoff Johnson

Fellow Ericson Owner
I have the same boat. The mast leaking rotted the sole causing me to replace it (there is a thread on that somewhere on this site). Now I have a silicone channel from the weep hole to the bilge and have routed out an edge of the bilge of the cover to allow the water to pass through (I also remove the cover when I leave the boat). Because the mast fills the bilge with water in the winter, I had the yard drill a hole at the turn of the bilge so that water can drain from the bilge. Obviously, it is critical to remember to insert the threaded plug before spring launch!
 
Top