E-25 Port Leaking.

Lakenormanbill

New Member
I recently purchased my first Ericson 25 from a longtime owner that due to age has not been able to keep up the maintenance. I have a long list of repairs, and the first is to get the rain water stopped from getting inside. I have identified the issue as the portlets on the port side. A couple of photos are attached. Any ideas from owners with similar problems with successful repairs is appreciated.
 

Attachments

  • IMG_0899[1].jpg
    IMG_0899[1].jpg
    58.3 KB · Views: 66
  • IMG_0904[1].jpg
    IMG_0904[1].jpg
    74.7 KB · Views: 92
  • IMG_0905[1].jpg
    IMG_0905[1].jpg
    46.2 KB · Views: 73
  • IMG_0906[1].jpg
    IMG_0906[1].jpg
    39.5 KB · Views: 67
Last edited by a moderator:

Don Smith

Member II
I recently purchased my first Ericson 25 from a longtime owner that due to age has not been able to keep up the maintenance. I have a long list of repairs, and the first is to get the rain water stopped from getting inside. I have identified the issue as the portlets on the port side. A couple of photos are attached. Any ideas from owners with similar problems with successful repairs is appreciated.

I have a boat with similiar windows and I fixed one portal that was leaking.

The first thing you need to do is determine exactly where the leak is, keeping in mind that the wet spot inside does not necessarily correspond with where the water is entering. Have someone run water on the outside while you're in the cabin.

On my boat the leak was around the aluminum window frame. I removed the window frame, scrapped off the old caulking and then reinstalled he window with new caulking. The hardest part of the job was getting the window out. After many years the caulking tends to dry out and become brittle.

Captain Don
Gitan E26
 

Rocinante33

Contributing Partner
1. Remove the port. This may be the toughest part of the whole job. Remove the inner frame and the cosmetic spacer, then use a utility knife to cut the sealant. It was #%*+# 3M 5200 on my boat. Terrible stuff to remove. Cut all around the circumference.
2. Use a couple of putty knives to work around the outside, under the flange of the frame. Be careful to not bend the frame. Work on it inside then outside then inside, etc. until you can free it and pull it out.
3. Pull the frame and window out and cover the hole with heavy plastic sheet and tape all around after you cleaned up the opening.
4 you can dis-assemble the window and frame yourself, but I wouldn't bother. Just take the whole thing to an auto glass shop and have them re-bed the glass in the frame. It costs on the order of $25-40 here where I am located.
5. Get some butyl tape either at an RV supply house or better yet from Maine Sail. See his excellent tutorials on re-bedding using butyl tape reference on this site.
6. Apply the butyl tape in 1-2 layers (I used 2) around the inner side of the outer flange. Stick the port carefully back into place. Go back inside and screw the inner flange into place. Trim off the excess butyl that squeezes out. Let it sit a couple of days and re-tighten it and trim off the excess that squeezes out once again.

That should do it. Good luck
 

G Kiba

Sustaining Member
Bill,
This topic is huge on the site. The leaky ports on earlier Ericson boats have multiple causes and sometimes are not even the source - yet.
The butyl tape worked for me also! Although I have yet to apply it to all of the ports. Turns out that the cutouts the ports fit into are roughly cut too large in some places. I tried -with some success- sticking high density foam tape to the back of the flange but over time the leak returned when the foam lost its spring.
The next point of failure was the 40 year old rubber seals - sealing the glass to the frame. After many unsuccessful trips to local glass shops to find the seals, I noticed that a Catalina 25 had the exact same ports.

You can buy a new seal kit from Catalina direct. It comes with enough inner and outer seal material to do the 6 ports on my E27.
http://www.catalinadirect.com/index.cfm/product/1055_374/aluminum-window-reseal-kit-c-25-c-27.cfm

God luck.
 

Rick R.

Contributing Partner
Maybe you can save them, but if you can't....

We had all four made custom by Boman in Quebec. They made them to fit the cutouts we expanded. They aren't cheap but its a boat....

Good luck
Rick
 

Philip

Member I
I purchased a whole roll of the gasket that goes between the glass and the frame. If you are puling the ports out and going to reuse them, it is worth replacing the gasket. Send me your address and how much you need. Will be happy to send you some. You can send me a check after it arrives to just cover the shipping .

Make sure you seal the joint where the to parts fit together to for the ring around the glass-- pretty appairent after you pull it out. I second the vote to use butal tape for the outside seal between the flange and the fiberglass

Phil
 

carroll

Member II
leaking fixed port

I have a 1973 e-27. with a leaking fixed port. I want to reseal the port but also need to replace the hard rubber square gasket between the inner glass and the inner aluminum frame. Does anyone know where i can get this gasket?
Carroll
 

Gregoryulrich

Member III
Is there balsa core?

Grant and I had a discussion back channels about his experience rebedding the portlights. Is there supposed to be balsa core between the headliner and the vertical cabin top? I had nothing but a gap between which seems to mean either there was nothing there to begin with or it was completely rotted away which seems unlikely.
 

paul culver

Member III
Grant and I had a discussion back channels about his experience rebedding the portlights. Is there supposed to be balsa core between the headliner and the vertical cabin top? I had nothing but a gap between which seems to mean either there was nothing there to begin with or it was completely rotted away which seems unlikely.

In the two portlights I rebedded on my E29 there was an empty gap in that area.

--Paul
E29 "Bear"
 

frick

Member III
rebedding my port lights

12 years ago I rebedded every port on my 1971 Ericson 29.
I unscrewed the inner trim ring and popped the out. They still had the original double sided foam tap gaskets. Cleaned everything real well, and rebedded with GE Silly-cone. It worked reall well.

The I discoved the next year that the rubber gasket that held the glass was leaking. I put in some Capt. Tolleys creaping crack cure.... after a few application all those leaks were stopped.

I just did one port at a time over a week of evening.

Rick
 

gregjp

Junior Member
Main cabin fixed port leak

On my E30+ one of the cabin ports is showing teak veneer discoloration at the lower edge. Probably needs to be re-bedded and possibly a new rubber gasket, but I'm wondering if anyone has an exploded diagram of these ports. I'm not really sure how the rubber gasket is incorporated in the port design and if it truly acts as a seal. Also, has anyone used Capt. Tolley creeping crack cure and would that possibly work for this application?
 

Christian Williams

E381 - Los Angeles
Senior Moderator
Blogs Author
The fixed lights are a complete unit in which the gasket seals the glass in the frame.

Any 1984 boat is in need of rebedding the portlights, which is quite an easy job and well documented on the forum.

You can probably determine if the leak is from the bedding of the frame to cabin house, or from the gasket, by testing with a hose.

Mysterious veneer damage is likely to be caused by failed bedding. Water enters between the veneer and the fiberglass, damaging it from behind. Drips may not appear on the visible bulkhead because they are absorbed within. Or they may appear under the headliner some distance below.

Bedding was my problem, the gaskets proved to be fine. As I recall there are threads here suggesting an automotive glass shop can replace the gasket material.
\
The bedding around all our fixed lights and portlights is very important. The frames must float in their openings with at least an eighth-inch clearance , since the boat flexs and the frames cannot. The original bedding, invisible to the eye, simply dries out and becomes brittle. The issue cannot be solved by any external application of goo.
 
Last edited:

mkollerjr

Member III
Blogs Author
Hi,

I agree that the exterior seal is the most likely cause of water intrusion. But there are few other areas to look:

(1) There is a design flaw in the older style Lewmar opening ports that we found during our research before re-bedding all our ports. The older style Lewmars have two horizontal seems on the exterior of the frame. If these seems fail, they will let water into the inside of the frame, and into the inside of the boat. This seemed to be a common failure point on these older style Lewmars, based on our research. Fortunately, all of our frame seems were ok.

(2) We also looked at and replaced the perimeter gasket (between the window and frame) of one of our opening portlights. These can get brittle and let water in if not seated properly. Also, if the gaskets have dirt or grime on them, they will not seat properly and can let water in. This happened on a couple of our portlights, so we wiped them down good.

(3) The latch hardware penetrating through the lenses is another potential source of leakage. There are tiny little O-rings that may need to be replaced, and/or lubed with silicone lubricant. We did this on one or our latch handles which stopped a slow drip.

(4) Condensation. We ended up removing the tacky looking interior plastic trim pieces. They trapped condensation, and caused mold behind them (see previous photo below, moldy factory 5200 slopped on). We like the utilitarian minimalistic look of the exposed aluminum frames anyways. With the new butyl tape, you can't see any of the old 5200 goop and it looks pretty clean now. We also removed the curtains (who needs curtains on a boat anyways?).
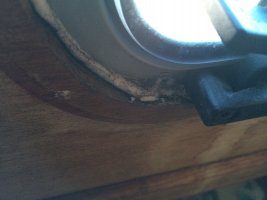
IMG_1086.jpg

In the end, we just re-bedded everything with the Bet-It butyl tape. Over 20 inches of rain so far and not a drop of a leak to be reported.

Below are a couple of photos with the fixed portlight removed. It was scary how sloppy the factory cut the opening. In some spots the opening was almost too large for the window seal to make complete contact with the fiberglass…
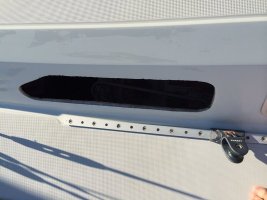
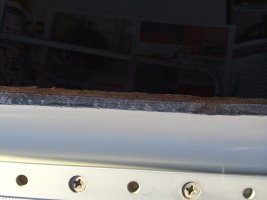
IMG_0074.jpg

IMG_0075.jpg

Below is a photo applying the butyl tape...which took maybe 3 minutes per portlight...
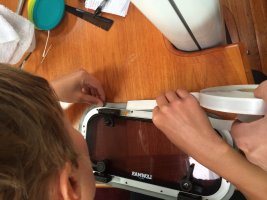
IMG_1013.jpg

I’d budget at least 1.5 hours per portlight to re-bed. 1 hour to remove and THOUROUGHLY clean all mating surfaces, and 30 minutes to re-install.

Also, don’t forget the anti-seize lube (e.g. Lanocote) on those stainless screws holding the aluminum frame in! I had to drill a couple of seized screws out when removing my portlights.

Mark
 

Tom Metzger

Sustaining Partner
(1) There is a design flaw in the older style Lewmar opening ports that we found during our research before re-bedding all our ports. The older style Lewmars have two horizontal seems on the exterior of the frame. If these seems fail, they will let water into the inside of the frame, and into the inside of the boat. This seemed to be a common failure point on these older style Lewmars, based on our research. Fortunately, all of our frame seems were ok.

A bead of silicone covering the black plastic insert seals this common cause of Lewmar portlight leaks.

I put a strip of masking tape above and below the plastic and on the coach top before sealing all of the portlights. Twenty minutes for the whole job.
 

Christian Williams

E381 - Los Angeles
Senior Moderator
Blogs Author
For rebedding ports, allow me to make a lonely pitch for Life-Calk. Butyl tape is fine, but after a year it is still oozing out around the lights on my boat. I now restrict use to small fittings, rather than large applications.

A heavy bead of Life-Calk into the right angle of the port mating surface really fills gaps around the frame, and if the exterior hole is lined with painters tape beforehand, cleanup is instantaneous.
 

Tom Metzger

Sustaining Partner
...Butyl tape is fine, but after a year it is still oozing out around the lights on my boat. I now restrict use to small fittings, rather than large applications.

A year? I helped my son fix a leak on his C+C 29's genny track and it restarted the clock for oozing after 20 some odd years. Tightening the bolts cured the problem, but made a mess. He said it was a common problem on C+Cs.

Not long after that he got smarter and bought an PS/E-333 similar to your boat.
 
Top