Deck stress cracks underneath upper, and forward lower

mjsouleman

Sustaining Member
Moderator
Mark can you see the extent of the wet core from under the side deck? Hopefully it’s a limited area. It might be easier to just add a square of 1/2” G10 to the shroud area in place of the foam core material. No compression or leaking into the core worries then. Good luck with the project.

The decks were re-corded 4 years ago but the areas around the shrouds and stanchions were not done. This left wet core in these areas. Since I am retired and have the time I thought I would do these areas and the inner jib tracts that were not done.

Any advice from the community is appreciated.
 

Loren Beach

O34 - Portland, OR
Senior Moderator
Blogs Author
FWIW, we did the over drill / epoxy/ redrill procedure on all of the shroud base penetrations on our boat during the refit. Getting at the underside by pulling out a bunch of staples is the more challenging part of the process. :(
Our existing coring (balsa) was dry, so luckily we did not have to address that separate problem. Ouch.
How large is the "wet" area?
If the adjacent coring is solid, and not mushy, you might be able to, once you have access to the underside, drill a series of small holes from the bottom. (like a little grid on half inch centers) . Just enough to get into the balsa, but not up thru the deck. Then dry out the coring with warmth and a fan -- or apply a vacuum to the underside and suck out the moisture. Then glass up a layer of additional cloth over it.
 

Alan Gomes

Sustaining Partner
Our deck did have balsa coring visible where the large bolts penetrated the deck, on their way to the aluminum block inside that houses the Navtec headed rod.
I sure hope that I DON'T find balsa coring in that area when I attempt some exploratory surgery later this week. Balsa is exactly the wrong material to use where compressive strength is required. That would be some serious boat building malpractice if that's what Ericson used.
 

Loren Beach

O34 - Portland, OR
Senior Moderator
Blogs Author
I sure hope that I DON'T find balsa coring in that area when I attempt some exploratory surgery later this week. Balsa is exactly the wrong material to use where compressive strength is required. That would be some serious boat building malpractice if that's what Ericson used.
Well, true for many other boats, but remember that the deck fittings in the rigging in use on our boats does not put any compressive load on the deck at all. The large Navtec SS threaded rod inside carries the shroud load down to the aluminum tie-bar in the upper part of the TAFG. Our deck does have to be rigid enough enough to keep from bending due to the angle of the rod inside transferring the load "vector" down and slightly inwards. Our concern is keeping moisture out of the bolt holes, and that's why (even tho our core was still dry) we epoxy filled and re-drilled those holes. No way do I want water to corrode the thick aluminum plate underneath or to get into the coring some day in the future.
 
Last edited:

Alan Gomes

Sustaining Partner
Well, true for many other boats, but remember that the deck fittings in the rigging in use on our boats does not put any compressive load on the deck at all. The large Navtec SS threaded rod inside carries the shroud load down to the aluminum tie-bar in the upper part of the TAFG. Our deck does have to be rigid enough enough to keep from bending due to the angle of the rod inside transferring the load "vector" down and slightly inwards. Our concern is keeping moisture out of the bolt holes, and that's why (even tho our core was still dry) we epoxy filled and re-drilled those holes. No way do I want water to corrode the big aluminum plate underneath or go get into the coring some day in the future.
I see your point, Loren. But the U-bolt, just as any through-bolted fitting--be it a stanchion, cleat, or whatever--will compress the deck when tightened. At the very least I'd say plywood is called for. Plus, on my boat I've got the rod only on the port side with a conventional bulkhead/chain plate to starboard, which would be an especially bad candidate for balsa.

But then, I won't know what Ericson actually did until I remove one of the U-bolts and explore it with a dental pick. (My concerns may be for naught. But then, worrying about such stuff is kind of a hobby of mine.)

My plan is to remove the U-bolt for the upper and leave the one for the lower in place, to hold the aluminum block in place. Once I know what I am dealing with, I'll decide on the fix. If the core is dry, the fix may just be the overdrill and fill approach, followed by some cosmetic remediation of the gelcoat cracks. But again, we shall see.

In any case, I plan to back off the tie rod. The rigger did me no favors by going ape on that rod. I'm not sure when these cracks showed up initially and why I would not have noticed them before now, but there you are.
 

cdesopo

Member II
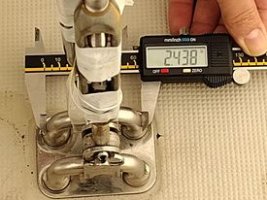
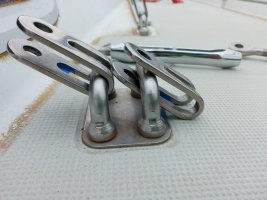
Just a thought as we replaced a suspect u-bolt last month. Upon finding one stress-cracked, we had 8 made up by Garhauer during the winter assuming I'd eventually get to replacing all ($85 ea). Mike was great/very helpful and mentioned they fabricate the bolts in such a way that the ss plate is welded to the bolt while the OEM bolts and plates are separate. Unfortunately, with the boat in one place and me in another it didn't really click. In this area where two u-bolts pass through, Ericson used a single plate with 4 holes (at least on our 89 32-3) & I see you have two Garhauer singles side-by-side. My concern was/is that there could be some flexing with two plates where there should be none & likely would be none with the single plate. Not sure if this contributed to the cracking you have.

The doubled up plate with two side-by-side u-bolts is $200 ea & I'll go that route when the time comes. If you replace these again, you may want to consider it as well.

Btw, I have 4 brand new u-bolts from Garhauer for anyone who has a stressed out one! Happy to make a deal to get you safe.

Chris
Double U-bolt.jpg
 

mjsouleman

Sustaining Member
Moderator
It has been 9 months since my last post on this subject and just getting around to removing the shroud base connectors and lower shroud U-Bolts.

An inspection of the port side looks dry and I have not noticed any water intrusion. The Starboard side however, has been dripping on my head for awhile. The other day I removed the head liner and removed the shroud base and lower shroud U-bolt nuts. I then tried to pull the shroud base connector and lower shroud U-bolt out while standing on the side deck. From below the aluminum blocks appear to be covered in a white crust which I assume caused by bi-metal corrosion.

Issue: After several attempts with a wooden block and hammer, I am not able to pull the shroud connector or lower shroud U-bolt.
Any and all advice is appreciated.
 

Loren Beach

O34 - Portland, OR
Senior Moderator
Blogs Author
The Starboard side however, has been dripping on my head for awhile. The other day I removed the head liner and removed the shroud base and lower shroud U-bolt nuts. I then tried to pull the shroud base connector and lower shroud U-bolt out while standing on the side deck. From below the aluminum blocks appear to be covered in a white crust which I assume caused by bi-metal corrosion.
I believe that you are seeing normal oxidized aluminum. Salt water exacerbates this, to the max.
Is there any way you can inject/apply some sort of lubricating fluid into that joint?
The gritty corrosion really jams up with the other parts, like those U bolt legs.
There should be an aluminum block with a machined recess in the top for the formed head of the Navtec rod that carries the load down to some aluminum round bar embedded in a heavy FRP molding.
There are some pix of this part of our boat here: https://ericsonyachts.org/ie/ubs/gear-removal-progress.786/
We had no water intrusion but you can see the residue of the 5200 sealant on the parts after I pried them all loose. There were difficult to take apart.
 

cdesopo

Member II
It has been 9 months since my last post on this subject and just getting around to removing the shroud base connectors and lower shroud U-Bolts.

An inspection of the port side looks dry and I have not noticed any water intrusion. The Starboard side however, has been dripping on my head for awhile. The other day I removed the head liner and removed the shroud base and lower shroud U-bolt nuts. I then tried to pull the shroud base connector and lower shroud U-bolt out while standing on the side deck. From below the aluminum blocks appear to be covered in a white crust which I assume caused by bi-metal corrosion.

Issue: After several attempts with a wooden block and hammer, I am not able to pull the shroud connector or lower shroud U-bolt.
Any and all advice is appreciated.
I think someone suggested applying constant tension with the main halyard/winch while you try the wooden block & hammer treatment.
 

mjsouleman

Sustaining Member
Moderator
I believe that you are seeing normal oxidized aluminum. Salt water exacerbates this, to the max.
Is there any way you can inject/apply some sort of lubricating fluid into that joint?
The gritty corrosion really jams up with the other parts, like those U bolt legs.
There should be an aluminum block with a machined recess in the top for the formed head of the Navtec rod that carries the load down to some aluminum round bar embedded in a heavy FRP molding.
There are some pix of this part of our boat here: https://ericsonyachts.org/ie/ubs/gear-removal-progress.786/
We had no water intrusion but you can see the residue of the 5200 sealant on the parts after I pried them all loose. There were difficult to take apart.
Loren,
I will try some PB Blaster Penetrant Rust Remover. The aluminum block, aside from the oxidation, is in good condition. I have not loosened and removed the Navtec rods but will do that next trip to the boat.

Note: the mast is down and stored during this project.

I wonder if applying a heat gun to the aluminum block (while trying not to set the boat on fire) might give enough expansion to break the corrosion.

P.S, Thank you for your blog entry, it has been read and read several times.
 
Top