Need a little help. We recently purchased a 25 plus which we've been cleaning and restoring. There are a few sun faded areas on the upper deck that I maybe interested in repainting; these are within the molded nonslip areas. Much of this is in great shape and I don't want repaint the entire deck. The color of the non-slip area is beige and where it's faded has turned grayish. Does anyone know the best color match for lets say Petit or Interlux? Or would this entail having to repaint all those non-slip areas? If so, I'll just leave them alone. Any help would be great.
You are using an out of date browser. It may not display this or other websites correctly.
You should upgrade or use an alternative browser.
You should upgrade or use an alternative browser.
Deck Paint
- Thread starter donnie10f
- Start date
Here's my two cents with a caveat - don't paint it. Here's why. You wont get a match, and you're going to start a new maintenance routine. A good deck repaint is possible, but it's a lot of work, and it will require maintenance to include possible future repaints. So, scrub it, compound it, make it clean and nice, but go sailing and invest your time/energy/money in to stuff like new sails that give you real bang for the buck. 
Just my .02 on a Sunday night
Just my .02 on a Sunday night
welcome! - but remember, it's just my opinion, but I will say that the smile on my face for dollars invested in new sails (after taking care of safety items), is bigger than anything else I've done on Emerald. She was in very nice physical shape when I became her custodian in 2004, but the sails were the original 1979 set. As I worked through replacing them, I suddenly had a "new" boat. 
Mort Fligelman
Member III
Way back when.........I bought a three year old used boat from an original owner......he had the non skid painted blue by the factory. Within three years the paint started to flake off in spots, so I decided to take a wire brush to the rest of it.......and low and behold......most did not come off....all I had was a mess......I am sure that the newer coatings would do a better job, but would not bet the farm on it.......
The next boat I bought I kept for 26 years.....color started to get pretty thin, but I just let it be......and my 35-3 has a shade of blue coming through the tan non skid.....and it is going to stay that way.....27 years old and will never be new.....on an antique car they would call it "PATINA"......
Heed Emeralds advice.....leave it alone....invest in what makes sailing more fun, and safer......
My .02 worth
Good Luck
Not to hammer the point one iota, but just in case anyone else has trudged this dusty road, the deck of my boat up close looks like hell in my opinion. When I took 'er over, it had been painted previously as mentioned, and it had so many little spider cracks in it, it looked like some sort of acid junkies road map nightmare. The difference now? It is shinier, with aforementioned cracks........sorta. I know where my strengths are, I'll tear inta yer diesel blindfolded and drunk, (which is the way I prefer), but deck paints etc. ain't them. I taped it off fairly well, and here is another instance where I was working on someone elses boat while paying someone to work on mine. Sigh....
Anyways, I hoped the new Interlux Brightsides paint would help fill up some of the cracks. Well it helped somewhat. I actually did take a little time to spot putty some of the worse areas where it was more line of sight, but from three feet away it makes me cringe. Everyone oohs and whatever when they approach, but upon closer inspection, ......
And the gist is; I think it would take a very expensive, and/or time consuming project of an unthinkable magnitude to rectify the problem properly. I think I'm just gonna sail the thing. Please send all of your money to me for the 'Help the OCD foundation'..
Please send all of your money to me for the 'Help the OCD foundation'..
money is on the way just as soon as I get it released from the Procrastination Foundation that I apparently chair
pass the Goslings
tenders
Innocent Bystander
I'll take the other side of this argument and say that painting nonskid in poor condition is not very difficult. If you have a miscolored patch or two then it probably isn't worth it, but if the general state is ugly, take off the hardware, clean and sand what you can with SoftScrub, bronze wool or a copper Chore-Boy pad, and 120 grit paper, fill the cracks, and prime with tinted primer. I used one-part Brightsides and it lasted a solid 10 years in Northeastern climes. The primer fills very small cracks but the Brightsides fills absolutely nothing. After two coats and many years the valleys of the nonskid get filled in, losing its nonskiddedness, and it's time to add grit to the paint, which is not as bad as I thought it would be, cosmetically or comfortly.
If the areas you're looking at are finite (ie, just in the cockpit or just on the foredeck) you could just paint symmetric sections on both sides of the boat and it might look like the boat were designed that way.
I'm living proof that one person can do an entire cockpit of a 32 from a standing start in two-thirds of a day. Seats, deck, and outer deck - cleaning, sanding, masking, priming, and painting. Most of it was done sitting down.
Grizz
Grizz
An alternate 2¢
When acquired in 2010, the non-skid on the 'String appeared as though it would provide traction, but didn't, even in harbor in completely dry conditions. Wet + heeled + sailing = treacherous. So a 'fix' was researched, intended to be an economic/aesthetic/functional solution. These goals were achieved, but not without a lot of time and effort over a period of 2+ months inside a cold, unheated boatyard beginning in February, completed late April. It was fortunate the winter was mild and wasn't as blistering cold as this winter was.
Approximate 4 gallons of color matched thickened gelcoat, the consistency of mashed potatoes, was mixed by Chicago Yacht Yard's Fiberglass guru, with full instructions for how much activator to use per 'batch'.
Then it was a tedious march through the 20+ sections the deck was divided into, with 90% of the time & effort in the preparation for each section. The application procedure(s) went quickly, applied to 2 (perhaps 3) sections per application. Then it was on to the next sections. Repeat to completion, with an estimated 270 man-hours invested. It's good to have 'sweat equity' partners when embarking on a project like this!
There was less than 3" of the thickened gelcoat remaining in the 5-gallon bucket, so the 'material estimate' was accurate.
The 'non-repeating repeating' pattern of the Olson's non-skid helped, imparted via a textured roller, cut down to 3".
The reward to this effort occurred in late May of '12, when the new nonskid proved itself functional in wet, pitching and rolling conditions. Stable underfoot = a good thing.
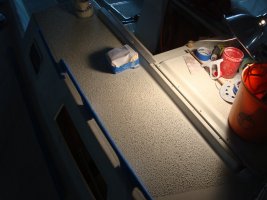
The picture is of 1 of the sections just after application.
When acquired in 2010, the non-skid on the 'String appeared as though it would provide traction, but didn't, even in harbor in completely dry conditions. Wet + heeled + sailing = treacherous. So a 'fix' was researched, intended to be an economic/aesthetic/functional solution. These goals were achieved, but not without a lot of time and effort over a period of 2+ months inside a cold, unheated boatyard beginning in February, completed late April. It was fortunate the winter was mild and wasn't as blistering cold as this winter was.
Approximate 4 gallons of color matched thickened gelcoat, the consistency of mashed potatoes, was mixed by Chicago Yacht Yard's Fiberglass guru, with full instructions for how much activator to use per 'batch'.
Then it was a tedious march through the 20+ sections the deck was divided into, with 90% of the time & effort in the preparation for each section. The application procedure(s) went quickly, applied to 2 (perhaps 3) sections per application. Then it was on to the next sections. Repeat to completion, with an estimated 270 man-hours invested. It's good to have 'sweat equity' partners when embarking on a project like this!
There was less than 3" of the thickened gelcoat remaining in the 5-gallon bucket, so the 'material estimate' was accurate.
The 'non-repeating repeating' pattern of the Olson's non-skid helped, imparted via a textured roller, cut down to 3".
The reward to this effort occurred in late May of '12, when the new nonskid proved itself functional in wet, pitching and rolling conditions. Stable underfoot = a good thing.
The picture is of 1 of the sections just after application.
Attachments
-
 46% Sunday 3-18-2012.jpg94.6 KB · Views: 339
Rick R.
Contributing Partner
I am thankful for this thread as we have been thinking about repainting the non skid on our boat. It doesn't look terrible but a redo would really be an improvement. Recently, I spoke with a guy who had just finished repainting the non skid on his Tartan 40. It looked wonderful! He said taping off the areas was the time consuming part. I don't think his boat had the same type Ericsons do.
Rick
Rick
Last edited:
tenders
Innocent Bystander
Got a PM question from another member on this topic so I'll post my response for general information.
My nonskid had been previously painted by a PO when I bought my '69 E32 in 1991. I think it was 2-part polyurethane, and it was starting to look tired. I stripped most of the hardware off the boat in 1995 when I moved from San Diego to the Great Lakes, so I took the opportunity to sand and repaint it as I mentioned: abrasive cleaning, 120-grit sanding, masking, self-tinted Brightside primer, 2 coats of Brightside 1-part paint. The results exceeded my expectations in appearance and durability. (I also stripped and re-painted the mast, which has since been touched up once from the deck.)
Fast forward 15 years and another move to Long Island Sound, and I've had some incidents of balsa core rot. In replacing sections of that (see this website for annotated photos of that process) I repainted much of the nonskid (cockpit, side decks). Same process, but this time I added Interlux grit to the wet paint with a salt shaker, since the pattern on the nonskid was getting filled in.
Prepping and painting nonskid is not difficult or expensive as boat projects go, and it makes a big cosmetic difference. But, the work UNDER the paint might be...!
(disclaimer: I say "I" but I should say "we," as in LIS I have a very handy and patient boat partner. He is a much better painter than I am and actually did most of the painting. Not to mention the goading to get the boat into the water instead of working on it all the time.)
Did you go with Interlux Brightside again? Fifteen years on the deck, that's quite a testimonial....
tenders
Innocent Bystander
Heck yes, Brightside all the way. I've heard good things about Kiwi Grip, which is a combination of paint and stucco-like nonskid, but have no reason to abandon what already exceeded my expectations.
Now towards the end of that 15 years it's true, where the finish has not been renewed does not look new - it's a bit chalky and chipped here and there. But it still looks fine.
Got another question from a PM, would prefer to have the discussion where anybody can see it.
Sanding: with "grid"-patterened nonskid, there are a couple of interesting yins and yangs:
* yin: you can't get sandpaper in the grid valleys
* yang: the grid valleys don't experience much abrasion in use, so the paint doesn't wear much even if the underlying preparation isn't perfect
* yin: when you sand the grid, only the peaks get touched with the sandpaper
* yang: the peaks are what contact your shoes in use, so they're what needs to be best-prepped for paint
* yin: repeatedly sanding the peaks and putting paint in the valleys reduces the degree of nonskid "relief," and reduces the grab of the nonskid
* yang: after two rounds of painting and many years, you're going to need to add an abrasive to the paint. A smoother surface on which to put the abrasive-laden paint is preferable, so less "relief" is fine
The lack of contact between the valleys and the sandpaper is why being aggressive with the Chore Boy pad when cleaning makes sense. Hit 'em hard with what will hit 'em: SoftScrub with bleach, and copper Chore Boys. Bronze wool is even better but very hard to find.
My tools for sanding are a Makita disk sander (a versatile tool infinitely preferable to the palm sander which uses rectangular pieces of sandpaper), 120 grit extended-use paper, and a $30 face dustmask. Deck fiberglass turns out to be surprisingly soft, so I don't press too hard with the sander - just a little more pressure than the simple weight of the sander. In practice it's easy to see when you've hit the point of diminishing returns.
In terms of deck hardware removal, I suggest removing stanchions as they're simple to access and their bases cover a large area. You can certainly mask around any other stuff you don't want to remove, that's a trivial process. But having discovered the simplicity and effectiveness of butyl tape (search the forum for this too), epoxy "plugs" to seal the core around holes that penetrate the deck, and slightly-countersunk deck holes to enhance the sealant effect, I have never regretted taking something off the deck to more thoroughly rebed it.
Masking: regular blue painter's tape. Yep, it's a pain to tape around the curves and corners.
Paint application: small roller and brush. Brightside is very forgiving. A quart of their Special Thinner #216 is also useful.
Primer application: buy a tube of tint and tint the primer to a first-order approximation by eye, it is not rocket science and makes the paint cover much more quickly and easily. (I learned this trick from a blind guy, believe it or not.)
Abrasive application: I use a saltshaker on top of the first coat of wet paint. You can do it that way or you can mix the abrasive into the second coat. I suggest erring on the side of "more abrasive."
Last edited:
tenders
Innocent Bystander
I think this has been covered fairly thoroughly in the rest of the thread: it is unequivocally possible to paint decks without grinding everything down, and if you do the work yourself, you could do it this way. But the boatyard may feel that if they are going to warranty their work, then they need to do a very complete job and remove all the waffle pattern nonskid.