Cockpit/coaming board refinish project continued

saildad

Member II
Hello VIkings
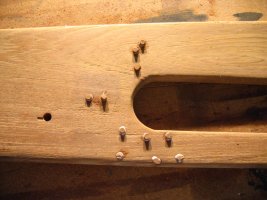
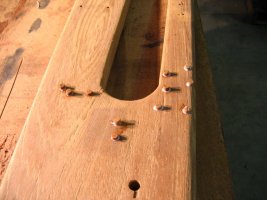
A day of sanding with 80 to 100 then finally 220 grit.The wood is finally as smooth as it is going to get.
I spoke with a buddy of mine ,who refinishes boats for a living, as to what to do with the various screw holes left from the PO. Simple answer: fix them!!5/16 bungs should do the trick.
stay tuned
Capt Bill
On Porpoise
74 E35
Channel Islands Harbor
 

Attachments

  • plugs1.jpg
    plugs1.jpg
    89.8 KB · Views: 75
  • plugs.jpg
    plugs.jpg
    81.5 KB · Views: 80

treilley

Sustaining Partner
Nice work. I am presently refinishing my entire cabin so I am no stranger to sanding. Although yesterday I was sanding/buffing/polishing the cabin top before I install my new portlights.

I agree. Bungs are the way to go. Looks like the holes were meant to be there. Wood putty is a disaster
 

Glyn Judson

Moderator
Moderator
Flattening plugs.

Bill & all, The easy way to make those plugs flush with the coaming boards is to use a well sharpened wood chisel in the inverted position. That is to say that the shoulder of the blade rests on the surrounding wood. By holding it that way you can attack the plugs with a back and fourth motion a lot like the way one uses a vacuum cleaner on carpet. And with the tool turned over, you can regulate the depth of the side cut and pretty near get it reduced in height to match the surrounding wood with little if any sanding required. I picked up this trick by watching a shipwright do it that way on my bowsprit years ago. He did close to two dozen of them in just a few minutes while he and I chatted. Once you get the hang of it, it's a pretty cool method. Good luck, Glyn Judson, E31 hull #55, Marina del Rey, CA
 

treilley

Sustaining Partner
Glyn, how do you prevent splits? I find using this method, the bung splits before it cuts leaving a it either too high(which is easy to go over again) or too low in which case I have to remove and try again.
 

Glyn Judson

Moderator
Moderator
Preventing plug splits.

Tim, Yes I know of what you speak. The first cut needs to be pretty high, a test cut to see which way the grain leads, up or down. Once you know that, you can simply attack the rest of the plug in the direction that will result in the split leaving more, not less than you want. Clear or did I make it more confusing? Not all of the plugs will end up being attacked from the same direction. Keeping the grain the same as the surrounding wood is also a plus. In some cases it almost makes the plug disappear, waaay cool. Glyn
 

Martin King

Sustaining Member
Blogs Author
The problem with chiseling off bungs is that it's too easy for the
wood to chip off below the surrounding surface as it follows the grain.
The preferred method is to use a Japanese flush cut saw which will
cut them slightly proud, and then sand down the remainder flush.
 

Loren Beach

O34 - Portland, OR
Senior Moderator
Blogs Author
Just pluggin' away...

Having loped off some bungs the wrong way, I would try the Japanese pull saw next time. In defense of the chisel, though, too many of us amateurs do not keep it nearly sharp enough for this duty.
When I have one chisel (protected and used only for serious wood shaving) honed to a razor's edge...
the plug gently splits off when the blade gets close to it, in mortal fear!
:cool:

Whatever you do, do not use a belt sander to speed up the process. It is really really difficlut to hold the machine steady enough to avoid creating a low place in the surface of the plank. Do not ask me how I came by this wisdom, either...
:esad:

Loren
 

NateHanson

Sustaining Member
Having loped off some bungs the wrong way, I would try the Japanese pull saw next time. In defense of the chisel, though, too many of us amateurs do not keep it nearly sharp enough for this duty.
Bingo Bingo Bingo!! :)

As a professional furnituremaker I cringe at the idea of sanding down a proud bung. First, sanding is an unpleasant, uncivilized task, to be avoided whenever possible. Second, sanding tends to always leave the bung a little proud of the surface, because the sanding block has just enough give to it to conform to the high bung and sand it at the same time as it sands down the surrounding wood a bit.

You need to start with a properly sharpened chisel, polished (both sides!) on a fine oil or water stone, and honed on a leather strop. Do a test-split a 1/4" off the surface, to see which way the grain goes, then, working from the low side of the grain, holding the bevel of the chisel parallel to the board, slide it in just a 1/16" above the surface to shave off the bung. Put the bevel right down on the wood, and shave off the remaining wood. If you have to muscle the chisel through the wood, it's too dull. You should be able to roll off a paper thin shaving of wood with light hand pressure on the chisel. This will leave the bung perfectly flush with the wood, and won't scratch the surface of the wood or require sanding the way a flush-cut saw usually does.
 
Last edited:

treilley

Sustaining Partner
Nice tips guys. Now I just have to do that abour 100 times! I will count how many bungs are in the interior of my 35 when I reinstall the trim.
 
Top