You are using an out of date browser. It may not display this or other websites correctly.
You should upgrade or use an alternative browser.
You should upgrade or use an alternative browser.
CNG to propane conversion
- Thread starter unidiver
- Start date
peaman
Sustaining Member
A proper propane installation will have a solenoid, pressure regulator, and pressure gauge, all installed within a gasketed propane tank locker with a drain fitting which exits outside of the hull and above the waterline. It will include a continuous copper tube, or a hose which is UL listed for use with propane. The hose fittings and threads on CNG hose are incompatible with approved propane components.
The galley range should have automatic shut-off of the gas valve upon flame failure, which older appliances do not have. One or more propane leak detectors are also required in the area(s) where a leak of the heavier-than-air propane vapors are likely to settle.
I am presently in the middle of installing a new (and proper) propane system including a new range, in my 1987 E32-3.
Teranodon
Member III
I had the same idea a few years ago, when the local supply of CNG tanks dried up. I was unable to locate a source of conversion jets: liability issues had spooked all the vendors. So I just bit the bullet and bought a nice Force 10 propane stove, and did everything that peaman enumerates above. Luckily, I was able to sell the old stove on Craigslist for about $300. I think the buyer was a survivalist. I put in a Dickinson Newport cabin heater as well. It needed a completely separate hose, going all the way back into a manifold inside the locker. You don't want to mess with propane.
So, looks like I need a new stove and a whole lot of other stuff. I would house the propane tank(s?) in the vented wells on the stern. I hope that reduces the installation complexity. Can you send a schematic (cartoon is okay) of your installation so I can order parts and copy your work? Better yet, come to North County San Diego and do it for me? I'm not real smart but can write big checks!A proper propane installation will have a solenoid, pressure regulator, and pressure gauge, all installed within a gasketed propane tank locker with a drain fitting which exits outside of the hull and above the waterline. It will include a continuous copper tube, or a hose which is UL listed for use with propane. The hose fittings and threads on CNG hose are incompatible with approved propane components.
The galley range should have automatic shut-off of the gas valve upon flame failure, which older appliances do not have. One or more propane leak detectors are also required in the area(s) where a leak of the heavier-than-air propane vapors are likely to settle.
I am presently in the middle of installing a new (and proper) propane system including a new range, in my 1987 E32-3.
peaman
Sustaining Member
Very tempting, but I kinda like being here at the opposite corner of the country. (No offense.)come to North County San Diego and do it for me? I'm not real smart but can write big checks!
That's a surprisingly big ask, but since you seem like a nice guy...Can you send a schematic (cartoon is okay) of your installation so I can order parts and copy your work?
1. I removed my CNG tank (tank valve closed) and cut the hose, leaving the hose from there to the stove, in place. Local fire depts would not take the tank, so not sure what I'll do with the awesome energy stored within.
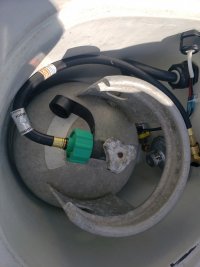
2. Installed a new propane tank, regulator, solenoid arrangement in the propane locker which was built into my boat originally. Here's a photo of the installation so far:


3. The original GSI CNG stove was removed and abandoned at the head of our dock, where stuff is commonly left by those who don't need it, and collected by those who (presumably) do. Great system. Best way of recycling, ever.
4. In preparation for installation of the new Force 10 2-burner NA Standard gimbaled stove, I used the remains of the original CNG hose to pull through a messenger line to aid in installing other stuff. After careful consideration, and consultation of a certain world-wide network of experts, I decided that that "stuff" should include not only the gas hose, but also the specialized cable which connects a propane leak detector to a new propane control panel. The completed (today) installation is shown here:


5. As said, I used the original CNG hose to install a messenger line into the conduit originally installed for the CNG hose. I then pulled through (forward-to-aft) the aforementioned sensor cable AND another messenger line, the latter of which allowed me to return the first messenger line back (forward) to the galley stove area. I then used the messenger line to pull through the new 3/8" 15' long LPG hose. For that, I used a 3/8" flare x 1/4" MPT fitting drilled and wired to provide a strong anchor for pulling, as shown in the following:


Work remaining before the Admiral can make me a nice lasagna Bolognese while swinging on the hook mostly includes installation of the propane control panel, which also includes finding where the builders hid the wiring from the electrical panel circuit breaker marked "stove".
More to follow, after I review my invoices from Defender, Ace Hardware, and others.
peaman
Sustaining Member
Following is a list of most of the things I bought for installation of the complete LPG stove system:
LPG regulator Defender #400916 $76.44
Includes HP test gauge and tank pigtail
LPG solenoid valve Defender #400454 $100.76
LPG supply hose, 3/8”x15’ Defender #401764LPG15- $60.10
Propane vapor detector Defender #552594 $161.49
“Propane control panel” with sensor, annunciator, solenoid control
Vapor-tight straight-thru fitting West Marine Model # 183600 | Msg # 1438-8876 $16.49
LPG tank, choose one:
Steel, 11# capacity West Marine Model # 196043 | Mfg # 296964 $119.99
Aluminum, 10# capacity West Marine Model # 196092 | Mfg # 299889 $219.99
Force 10 2-burner NA Standard range Defender #401796 $1379.25
Some other supplies and components were needed, most acquired from my local small-box Ace Hardware.
3/8” flare x 1/4” MPT drilled and wired for pulling-through of new LPG hose.
YELLOW teflon pipe sealing tape, as opposed to the more common white teflon tape. The former is “double thickness” and is approved for use with LPG installations.
Fittings to get from regulator to LPG hose as shown in my photos:
1/4”MPTx1/4”MPT street elbow at top/inlet to pressure regulator
3/8”MPTx3/8”male flare at outlet of regulator
3/8”female flare x 3/8” female flare “union”
3/8” male flare x 3/8”MPT elbow
3/8” MPT street elbow
(3/8” FPT x 3/8” FPT solenoid goes here)
(3/8” MPT x 3/8” male flare elbow fitting provided with solenoid)
There is other stuff needed to complete the CNG-to-LPG conversion, including hole saws for the vapor-tight straight-thru fitting, and the propane control panel, as well as miscellaneous bits to support wires and hose, but the list above is the the major stuff.
I hope that's useful.
Good luck, be safe, have fun.
Guinness38
Junior Member
Thanks for your details. We are in the same situation with zero CNG available within 3 hours of Charleston. Looks like this conversion is on our list... Great info!
Leigh & Mike Cladakis
1982 Ericson 38
"Guinness"
Leigh & Mike Cladakis
1982 Ericson 38
"Guinness"
peaman
Sustaining Member
Yes, it looks tight and it holds the hose tightly. I found a similar, but much smaller gland for the solenoid wires.Does the large packing gland fit around the fittings and seal around the hose when installed?
I finally installed the new system and followed your instructions / material list almost to a T (minus the new stove) . Everything worked out well. Thank you for taking the time to write this out. It saved me countless hours.Yes, it looks tight and it holds the hose tightly. I found a similar, but much smaller gland for the solenoid wires.
Attachments
-
 20210808_162617.jpg99.9 KB · Views: 49
 -
 20210808_162614.jpg83.6 KB · Views: 49
peaman
Sustaining Member
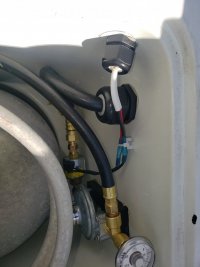
There should be a stainless safety rail running in front of the stove. I installed the panel just to the right of the right end of that rail, where shown in the attached picture. The factory wiring diagram shows a gray wire (maybe with white stripe?) for the "Stove" circuit from the DC panel. I found two coils of wire fitting that description, one near the factory propane locker at the stern, and another in the area of the tilt-out plate cabinet, so it was just a matter of making connections with new stuff in those two areas. The stove circuit breaker can energize the Xintex panel, and that panel controls the solenoid valve.Where did you mount the control panel for the Xintex fume detector on the 32-3?
If you install your panel is that same location, be sure and allow space for the large diameter "nut" to go onto the rear of the Xintrex. The ice box is very close by.

Thanks @peaman - that location worked out perfectly. Never mind that I thought I could get away with a 2 1/8" hole saw for the Fireboy Xintex LPG control panel (when the box and instructions clearly said 2 1/16"). Let's just say that my control panel is more of a flush mount into the cabinetry of the 32-3. And, wait, where does one even buy a 2 1/16" hole saw?! Don't answer that... more important question below
I've been trying to avoid buying a few more parts and I staged this configuration today. I can't find anything in the manual for the solenoid valve about mounting position. There's clearance at the top for the pressure gauge and enough room at the bottom to join the appliance LPG hose at the bottom. Can anyone see anything wrong with this setup?

I've been trying to avoid buying a few more parts and I staged this configuration today. I can't find anything in the manual for the solenoid valve about mounting position. There's clearance at the top for the pressure gauge and enough room at the bottom to join the appliance LPG hose at the bottom. Can anyone see anything wrong with this setup?
peaman
Sustaining Member
I do not, as long as the tank will easily fit without interference with the regulator. My combination of fittings, and the resulting layout, were influenced by the available fittings at my local store, and maybe I could have simplified it. I do like the simplicity of your rig. Fewer joints means fewer possible leak-points. I am not aware of any restrictions on orientation of the solenoid or other parts, and I read everything I could find on installation regulations and guidelines.Can anyone see anything wrong with this setup?
I used a 2" hole saw, and then a half-round rasp to enlarge the hole the extra 1/16".
I endeavor to be more like thisI used a 2" hole saw, and then a half-round rasp to enlarge the hole the extra 1/16".
This review is pretty comical: https://a.co/d/aYBU8f1
Amazon review:
The geniuses at Fireboy Xintrex decided in their omnipotence to require a 2 1/16" hole saw to install these. Not a 2" or even a 2 1/8" hole saw which is readily available. The retention lip on the "control gauge" is less than 1/8" so there is little to no room for error. This is an example of an engineer who has zero experience with installing the product he is tasked with designing ...... Very few hardware stores will carry this size hole saw.
bsangs
E35-3 - New Jersey
I've been trying to avoid buying a few more parts and I staged this configuration today. I can't find anything in the manual for the solenoid valve about mounting position. There's clearance at the top for the pressure gauge and enough room at the bottom to join the appliance LPG hose at the bottom. Can anyone see anything wrong with this setup?
Looks almost exactly like my setup. The 5-pound Gas Growler LP tanks I use fit perfectly, with plenty of room and no obstructions.
peaman
Sustaining Member
5 pounds is not much. For more capacity, the following two tanks should work as well:The 5-pound Gas Growler LP tanks I use fit perfectly,
-Steel, 11# capacity West Marine Model # 196043 | Mfg # 296964 $119.99
-Aluminum, 10# capacity West Marine Model # 196092 | Mfg # 299889 $219.99
bsangs
E35-3 - New Jersey
Gotcha. I have two tanks though. And between the outdoor grill (with converter hose) and the indoor stove, haven't run through them yet this year.5 pounds is not much. For more capacity, the following two tanks should work as well:
-Steel, 11# capacity West Marine Model # 196043 | Mfg # 296964 $119.99
-Aluminum, 10# capacity West Marine Model # 196092 | Mfg # 299889 $219.99
jtsai
Member III
What are the differences between Trident pigtail hose sold in marine chandlers and those sold in hardware stores for outdoor bbq grills? I did notice the orifice on the Trident hose has a smaller diameter, does it matter?
 www.westmarine.com
QCC Pigtail Hose For Type I Cylinder Valves | West Marine
Check out our QCC Pigtail Hose For Type I Cylinder Valves and more from West Marine!
www.westmarine.com