Best way to locate source of leaking

bsangs

E35-3 - New Jersey
But I would prioritize the seahood. I had lots of water getting in for the reasons you mentioned.
Before I go tearing things apart, I'd like to touch on this seahood issue again. As you can - hopefully - tell from the photo here, the sliding hatch is always covered on my boat. That dodger doesn't get removed. The window is always down when not sailing, unless of course there's no rain. So the sliding hatch never takes on any water, and where it slides back into the sea hood is always covered as well. The sea hood displays no cracks or damage. Can I rule that out as a potential ingress area with this being the case? (And yes, I'm aware those hatch boards need some work done. :) )

IMG_1898.jpeg
 

Loren Beach

O34 - Portland, OR
Senior Moderator
Blogs Author
The sliding hatch itself, when closed, may well be covered by canvas, but the whole front 2/3 of the sea hood aka "hatch garage" is exposed to the elements. So, all of the old screw penetrations thru it can leak and seep water into the cabin top beneath. Pull the sea hood, and ovedrill/epoxy/re-drill for those screws. Unless your dodger actually covers the whole sea hood clear to the front of it, but I have not seen one like that.
 

bigd14

Contributing Partner
Blogs Author
I have the same setup with dodger. It's the portion in front of the dodger that the hatch slides under that is the problem area. These blogs document the removal and rebedding:


bsangs

E35-3 - New Jersey
I have the same setup with dodger. It's the portion in front of the dodger that the hatch slides under that is the problem area. These blogs document the removal and rebedding:


Ugh. Since I'm already planning to do the grab rails and the SS mast plate, I might try your Gorilla Tape approach on the "hatch garage" - nice one @Loren Beach - for the upcoming season. I have multiple cruising treks planned starting in late May and going through September, so I can't have her out of commission too long. You just slap the tape over the holes, or run it down the entire length of the hood? Thanks for the links. Great job fixing her up, btw.
 

bigd14

Contributing Partner
Blogs Author
Yeah the gorilla tape worked for awhile. We put long pieces over all the exposed seams and screws. The rebedding was a bit of a chore, and took place over three days.
 

Prairie Schooner

Jeff & Donna, E35-3 purchased 7/21
Hi Brian,
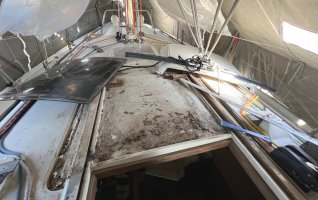
This is another look inside an E35-3 sea hood, to supplement Nick's. About half the screws holding the hood down were self-tapping and half were machine screws. As I recall, the long machine screws holding the traveler to those towers were kind of a pain to get out.
sea hood_E35-3 Kismet sm.jpg
I took it out to swap out fuel tanks and put it back in with butyl tape because I think it's going to need to come off again in a few years to replace the traveler.
There are some more comments and pics around this as part of this project:
- https://ericsonyachts.org/ie/threads/e35-3-replacing-fuel-tank.17731/page-2

Tape sounds like a good plan to get you through the 2024 season.
Bonne chance,
Jeff
 

bsangs

E35-3 - New Jersey
Hi Brian,
This is another look inside an E35-3 sea hood, to supplement Nick's. About half the screws holding the hood down were self-tapping and half were machine screws. As I recall, the long machine screws holding the traveler to those towers were kind of a pain to get out.

I took it out to swap out fuel tanks and put it back in with butyl tape because I think it's going to need to come off again in a few years to replace the traveler.
There are some more comments and pics around this as part of this project:
- https://ericsonyachts.org/ie/threads/e35-3-replacing-fuel-tank.17731/page-2

Tape sounds like a good plan to get you through the 2024 season.
Bonne chance,
Jeff
Thanks Jeff. You know, none of these pictures and descriptions you've all been nice enough to share are making me want to do it! ;)
 
Top