B&G Transducer/Speed

Chschaus

"Voila"
I am finally stepping out of the dark ages and installing a new nav system.
Can anyone tell me if the B&G DST810 Transducer will fit in the old Datamarine Knotmeter thruhull sleeve?
The launch date is fast approaching and ai am not sure if replacing the entire thruhull is doable.
I might need to just use the new wind speed/ direction and hold off on the new depth and boat speed till next season.
The old Datamarine units do still work. BTW They came with the boat new in 1986
 

windblown

Member III
I replaced an old Nexus transducer with the B&G DST810. I didn't have the correct specs for the old transducer: what I thought would fit, didn't. Of course, I had already re-wired all of the new B&G equipment and saved the installation of the DST for last. . .
It's not too bad if the new transducer is bigger than the last. It is a bear to drill the larger hole through the very strong fiberglass hull (since it was my first thru hull, it was a bit daunting to put a hole in the boat, and I launched with trepidation!). Once I had the right hole saw size (three hardware stores later), I drilled from the outside in, and it took way longer than I thought to get through (almost 45 minutes), perhaps because I was intimidated by the idea of cutting a bigger hole in the boat and stopped often, and also because I was using a cordless hand drill and drilling up, without the assistance of gravity. But the DST comes with the thru-hull housing. On my boat, the old nexus transducer had "ears" that held it in the housing differently than the new design, so even if the transducers had been exactly the same size, I would still have needed to change out the thru hull. As I drilled from below, I cut through the hull and old plastic thru hull, which seemed to be permanently glued in place, but then I still had to cut off part of the old thru hull housing from the inside with a rotary tool, which took some contortion, some patience, and well more than an hour. It was my first date with the rotary tool, but we were old friends by the time I was finished. Happy to report that the thru-hull stays dry as a bone after 3 years, and the DST data is great.
 

Loren Beach

O34 - Portland, OR
Senior Moderator
Blogs Author
One technique that boatyards use for slightly enlarging a hole is to first wedge in a round filler piece of wood. Grind a circle of wood that is a smidge larger than the old hole. Pound it in, flush, Mark the center of that plug for your hole saw drill bit. Drill the new hole.

If the new transducer is smaller, use standard glassng practices to fill in the old hole, and start over with the hole saw.
 

Chschaus

"Voila"
Thanks, Deborah, looking at photos of the old Nexus transducer it looks very similar to the datamarine held in with a pin and the thru hull does have the "Ears" on the tightening bolt.
 
Last edited:

peaman

Sustaining Member
Can anyone tell me if the B&G DST810 Transducer will fit in the old Datamarine Knotmeter thruhull sleeve?
I recently replaced my (original?) speed sensor with a DST810. I do not know if the prior one was Datamarine or some other. Once I realized that the DST would not fit in the existing through-hull, I dreaded removal of the through-hull. When I decided to get the job done, I prepared for battle to get the old fitting out, but it turned out to be very easy. I fabricated a wrench for removal of the "nut" on the interior, using a PVC fitting, with slots, and that was the hardest part. Fortunately for me, once the nut was removed, the through-hull sleeve came out fairly easily.

If interested, I can post pictures of the PVC wrench, and the battle-ready through-hull extraction rig I prepared in case things got difficult.
 

Slick470

Member III
A friend had a similar question a while back and I think he found that the sizes were close, but not close enough to risk it. Most likely the Datamarine transducer was originally made by the same company that the B&G one is. Airmar. That said, since it is below the waterline and less than a perfect fit will result in a leak, I don't think it's worth it. When I went from older ST50 instruments to newer B&G ones, I was doing a full bottom job so didn't even consider reusing the old transducer housings. In my case the speed transducer hole matched the size the new triducer needed, but had to fill in the old separate depth transducer hole.

If you do need to enlarge the hole, I came across this handy "oops" arbor that allows you to use a smaller hole saw as the guide for a larger one. I don't own one, but it's on the list to buy. https://www.starrett.com/metrology/product-detail/KA19-N
 
Last edited:

peaman

Sustaining Member
I'd be very interested in seeing that.

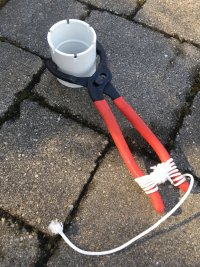
The wrench for removing the interior nut is simply a coupling for 2" PVC pipe which was notched to fit with the tabs on the nut. The plier shown happens to be for use on oil filters and is available at automotive outlets. I lashed it closed as shown because of the "tight" working room on an E32-3. (You can touch the through-hull, or you can look at the through-hull, but you cannot do both at once! LOL)
IMG_2905.JPG

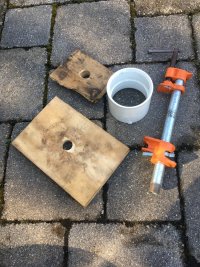
Below shows the components for extracting the through-hull fitting. The clamp is the key to it. This is brand name "Pony" which consists of the two orange parts attached to an arbitrary length of 1/2" iron pipe. Other clamps might serve as well. Even a short piece of all-thread rod, or a very long bolt could be used. Other parts here are a couple pieces of plywood drilled out to accommodate the clamp, and a coupling for 3" PVC pipe.

IMG_2906.JPG


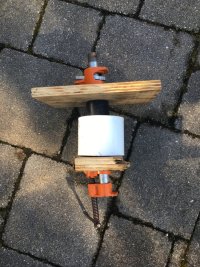
The extraction rig is assembled as shown below, showing (from top to bottom) the fixed part of the clamp and one plywood plate inside the hull, while the PVC coupling, second plywood plate, and business end of the clamp are outside of the hull. Note the actual through-hull from my boat is included here.
IMG_2907.JPG

Setting up the rig can be done single-handed (small cord like 1/8" nylon is helpful), but a helper might expedite the process.

Hopefully, once the nut is removed, your through-hull will come out as easily as mine did, but if not, I hope this rig description can be useful. Install the new through-hull with 3M 4200 or other preferred caulk, as long as it is NOT 5200.
 

Chschaus

"Voila"
The wrench for removing the interior nut is simply a coupling for 2" PVC pipe which was notched to fit with the tabs on the nut. The plier shown happens to be for use on oil filters and is available at automotive outlets. I lashed it closed as shown because of the "tight" working room on an E32-3. (You can touch the through-hull, or you can look at the through-hull, but you cannot do both at once! LOL)
View attachment 42470

Below shows the components for extracting the through-hull fitting. The clamp is the key to it. This is brand name "Pony" which consists of the two orange parts attached to an arbitrary length of 1/2" iron pipe. Other clamps might serve as well. Even a short piece of all-thread rod, or a very long bolt could be used. Other parts here are a couple pieces of plywood drilled out to accommodate the clamp, and a coupling for 3" PVC pipe.

View attachment 42471


The extraction rig is assembled as shown below, showing (from top to bottom) the fixed part of the clamp and one plywood plate inside the hull, while the PVC coupling, second plywood plate, and business end of the clamp are outside of the hull. Note the actual through-hull from my boat is included here.
View attachment 42472

Setting up the rig can be done single-handed (small cord like 1/8" nylon is helpful), but a helper might expedite the process.

Hopefully, once the nut is removed, your through-hull will come out as easily as mine did, but if not, I hope this rig description can be useful. Install the new through-hull with 3M 4200 or other preferred caulk, as long as it is NOT 5200.
Thank you!
 

KS Dave

Dastardly Villain
Blogs Author
Why have I never seen one of these before!? I am the king of OOPS! Definitely on my list now whether I need it on this project or not.
I own this exact arbor (Amazon - $14) and it's valuable for the intended use. The caveat is that your "guide" hole saw has to fit the smaller arbor threads and your "new" larger hole saw has to fit the larger threads.
 

Tin Kicker

Sustaining Member
Moderator
I am finally stepping out of the dark ages and installing a new nav system.
Can anyone tell me if the B&G DST810 Transducer will fit in the old Datamarine Knotmeter thruhull sleeve?
The launch date is fast approaching and ai am not sure if replacing the entire thruhull is doable.
I might need to just use the new wind speed/ direction and hold off on the new depth and boat speed till next season.
The old Datamarine units do still work. BTW They came with the boat new in 1986

Have a Datamarine and just tried for you. (If they are the same model then...) The DST810 will slide into the sleeve but that's about it. It's ever so slightly loose, the sleeve doesn't have the keyway, and most important is that the cap threads are different.
 

Chschaus

"Voila"
Have a Datamarine and just tried for you. (If they are the same model then...) The DST810 will slide into the sleeve but that's about it. It's ever so slightly loose, the sleeve doesn't have the keyway, and most important is that the cap threads are different.
Thank you.
Thanks everyone for the replies.
 

Tin Kicker

Sustaining Member
Moderator
There are a number of easy ways to make a thru-hull hole larger. I just enlarged a thru-hull from 3/4" to 1" to slow the flow of cooling water and that meant increasing the hole in the hull (iirc) to 1 7/8"diameter. I simply put a piece of scrap wood on the inside and weighted it in place so it wouldn't move, went outside and drilled a pilot hole, then put the centering drill of the hole saw into that pilot.

But there are other ways:
 

windblown

Member III
The wrench for removing the interior nut is simply a coupling for 2" PVC pipe which was notched to fit with the tabs on the nut. The plier shown happens to be for use on oil filters and is available at automotive outlets. I lashed it closed as shown because of the "tight" working room on an E32-3. (You can touch the through-hull, or you can look at the through-hull, but you cannot do both at once! LOL)
View attachment 42470

Below shows the components for extracting the through-hull fitting. The clamp is the key to it. This is brand name "Pony" which consists of the two orange parts attached to an arbitrary length of 1/2" iron pipe. Other clamps might serve as well. Even a short piece of all-thread rod, or a very long bolt could be used. Other parts here are a couple pieces of plywood drilled out to accommodate the clamp, and a coupling for 3" PVC pipe.

View attachment 42471


The extraction rig is assembled as shown below, showing (from top to bottom) the fixed part of the clamp and one plywood plate inside the hull, while the PVC coupling, second plywood plate, and business end of the clamp are outside of the hull. Note the actual through-hull from my boat is included here.
View attachment 42472

Setting up the rig can be done single-handed (small cord like 1/8" nylon is helpful), but a helper might expedite the process.

Hopefully, once the nut is removed, your through-hull will come out as easily as mine did, but if not, I hope this rig description can be useful. Install the new through-hull with 3M 4200 or other preferred caulk, as long as it is NOT 5200.
Well, this is genius, and would have made the job so much easier! Unfortunately, my old thru-hull was definitely installed with 5200, or something like it. When I installed the DST800, it replaced the depth transducer. I abandoned the old speed transducer, which was in a separate thru-hull, and also no longer sent data. Thanks to this jig, pulling the old speed transducer will go back on the project list.
 

peaman

Sustaining Member
Why have I never seen one of these before!? I am the king of OOPS! Definitely on my list now whether I need it on this project or not.
Thank You
Reading here about re-drilling the hole, I realized I should have noted that I did NOT need to do that. While the original through-hull fitting would not accept my new DST810, the new through-hull fitting for the DST did fit into the SAME hole as the original. So it was simply a matter of removing the old, and installing the new through-hull, with no change needed to the hull itself.
 
Top