• Untitled Document

    Join us on April 26th, 7pm EST

    for the CBEC Virtual Meeting

    All EYO members and followers are welcome to join the fun and get to know the guest speaker!

    See the link below for login credentials and join us!

    April Meeting Info

    (dismiss this notice by hitting 'X', upper right)

New Holding Tank, Piping & Valves

Loren Beach

O34 - Portland, OR
Senior Moderator
Blogs Author
Tank News

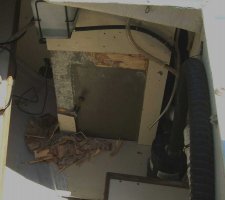
Here is a short update now that I have photos available. One with the demolition started and the other with new tank in place. The Rotozip and an old chisel were involved, along with some swearing.

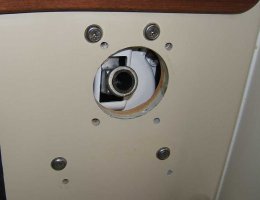
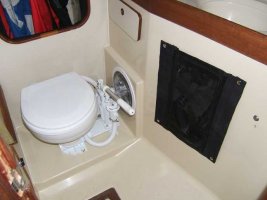
There will be more posted later to show the pump-out manual option being restored inside the head counter area.
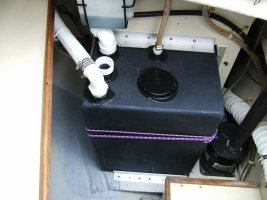
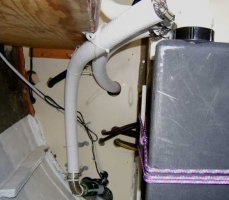
This shows the new 20 gallon holding tank in place, where the former Ronco 15 gallon tank lived for 20 years. This one is taller and a few inches wider. I replaced the factory wood cleats that blocked it in place at the base and sides with some alum. angle I had on hand. The new dip tubes at the top required that the coolant expansion tank be raised/moved. The new nipple for the vent line is on top and leads to the left (port) out of the picture, which was taken facing forward. The old tank was additionally secured by a band of "plumbers tape" around it and I used low-stretch line for the new one. Actually, the cleats hold it very securely in place.

The other vent line visible on the right side is totally separate, being for the #2 fresh water tank, partly visible at bottom of the picture.
The hose in place is from the head Y valve just forward, under the head counter.
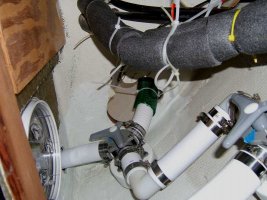
Note the "before" picture of the old holding tank and original (?) green hoses. Not a pretty sight.

Cheers,
Loren
 

Attachments

  • new hold tankMidRez.jpg
    new hold tankMidRez.jpg
    58 KB · Views: 184
  • Making Room, midrezJPG.jpg
    Making Room, midrezJPG.jpg
    38.5 KB · Views: 185
  • O34 Laz, old hold tank.JPG
    O34 Laz, old hold tank.JPG
    27.3 KB · Views: 148
Last edited:

Loren Beach

O34 - Portland, OR
Senior Moderator
Blogs Author
A few more photos and narrative

Finally, some pics of the head compartment. You can see the screw-out access plate I installed beside the head to better get at the Y-valves being installed in the cramped space under the counter.
I took one picture with the camera held under the counter, showing the plumbing... (either I can get my head, shoulder and one arm in there or the camera...). One change is that now the exit hose from the tank to the Mk 5 hand pump in the head compartment runs right under the front lip of the counter, just above the drawer on the left.
:nerd:
Finally, a finished look from aft of that compartment, showing the hose and ss 90 degree tubing to bring it to the top of the tank. At the top of the tank are the two dip tube 90-degree connections -- one to the deck pump out fitting and the other back under the head counter to the new Mk5 hand pump, and thence to the other Y valve that would be turned to allow pump out thru the thru-hull fitting when in international waters. The composite Mk 5 pump replaces the factory Gusher 10 with the corroded aluminum body and other metal parts that did not like exposure to waste.

The reason that the Y valves are on short pvc risers is that I knew that they would "float" above the hull, and this lets them have added support from the base resting against the hull.

When complete, this re-formatting of the waste hose path used about six less feet of hose than the way Ericson did it originally. The Mk 5 pump, with its ability to orient the inlet and outlet thru 360 degrees, eliminated a couple of hard 90 degree turns, too.

While all the Ericsons are different in their hose and tank layouts, I hope that my changes might help others to visualize how to make subtle (and not so subtle) changes to improve this system in other boats.

I would also like to thank Sean for his excellent DIY holding tank and head area rebuild article on this site ! :cool:

Best,
Loren
 

Attachments

  • newPump in place.jpg
    newPump in place.jpg
    29.4 KB · Views: 146
  • head compartment-after.JPG
    head compartment-after.JPG
    22.6 KB · Views: 164
  • insidecounter view.jpg
    insidecounter view.jpg
    83.1 KB · Views: 189
  • New hoses from aft.JPG
    New hoses from aft.JPG
    35 KB · Views: 177

Loren Beach

O34 - Portland, OR
Senior Moderator
Blogs Author
DIY and cost savings

This thread is not about money, per se... But Time and Money are sorta interchangeable in boat projects. :rolleyes:
(As the stage coach robber always sez in those old novels, whilst pointing a pistol at the folks in the coach: "Your money or your Life!" )
;)
In talking over upgrades with a friend that had a lot of work done by a boat yard this year one of the numbers caught my attention.
Among the many projects done to upgrade/fix stuff on his 30 year old boat was the complete refit of the holding tank layout, design and install a new larger tank, and replace all hoses and valves, etc.

(Bad pun alert) I "wasted" weeks of time on this project on our boat, many of those hours being very very unproductive... Lots of time making measurements and sketches and just pondering how to work in darned-near-inaccessible spaces.

For us owners of "average means" -- doncha just love that old phrase --
doing our own work is the only way we can even afford a boat.

Bottom line for my sailing buddy: the part of his cost-out for the holding tank and all associated parts redesign and install came to over $4400.
Considering that all the local boat yards have a labor rate of around $70/hour, this is equal to one guy working about a week and half, full time on that one job.

Bottom Line #2: there is no way in heck I could pay anyone to do all the detail work that I put into a very similar job on our boat, even without all the cleanup and fill-in glass work I did to smooth out the areas under the head counter and the aft lazerette where the old plumbing was removed.

So, it looks like, someday, I may have to downsize boats or get out of boating NOT when I get too old to safely leave the dock and set sail... but when I am no longer physically able to do my own maint. work!
:esad:

Philosophy dispensed occasionally, deposit one cent please. No guarantees.
:unsure:

Loren
 
Last edited:

treilley

Sustaining Partner
Don't forget the training Loren. Your buddy likely has no idea how his system is laid out or what to do in case of a failure. You do. You self trained by doing the work yourself. May not be life threatning if the head breaks down(depeneding on the admiral's attitude and resourcefulness) but what about more critical items; steering, electronics, engine, etc.

I have seen lots of boatyard projects and repairs that do not meet my standards. A friend of mine is even worse. We both very much enjoy doing our own work and we take pride in doing things right. Hopefully it shows. I know the yard manager at my haulout yard is always asking what I did over the winter to improve my boat so he can check it out.

I like your reasoning for when to quit sailing.
 

jreddington

Member III
The diagram posted earlier in this string illustrates why I like two discharges out the bottom of the tank instead of a T. With a T you have a total of 5 connections in the vicinity of the tank. With two bottom discharges you have just two. Less places for a leak and less fittings to have to try and fiddle with if you have to.

Plus, on my E-28 there is not that much room behind the tank to make all the bends needed to fit in a T. So it saves space. If Ericson had fitted a T there the holding tank would have had to been smaller.

Since this space arrangement is different on each boat, a T fitting could be an option in a retrofit, but I'd still prefer the two outlets.
 

Loren Beach

O34 - Portland, OR
Senior Moderator
Blogs Author
Hose choices

After talking to another owner today about his head plumbing rebuild project, I decided to look up the reference to the Trident #148 hose that we used successfully. It seems that their site now lists an even "better" #140 sanitation hose.
http://www.tridentmarine.com/stage/sanitation.htm

External Links are uncertain, so attached is a pdf of that page.

Best,
Loren
 

Attachments

  • TridentHose screenshot.pdf
    259.7 KB · Views: 189

Tom Metzger

Sustaining Partner
Loren - I noticed that the #101 & #102 hoses have a 5 year warranty where the ones you mentioned, #140 & #148, have only 3 years.

Trident points out that the #101 &#102 hoses are their premium products and are easier to install. Not wanting to do the job again, I went with #101 when I did the job a couple of years ago.

http://www.tridentmarine.com/stage/about_hose.htm#sanitation

NOTE: overtight fittings & clamping can do damage to hose ends, causing leaks and odors. Sewage allowed to set in the hose develops acids and gas that shorten its odor free life. This is especially the case with our most popular white (vinyl) XHD Sanitation Hose (#148 series), where petroleum based lubricants, excessive heat softening, and fluids containing alcohol, petrochemicals or solvents can damage this hose and shorten its "odor free" life. This is a good and cost effective sanitation hose, but for maximum "odor free" performance, and long &/or non self-draining installations, we recommend our Premium Sanitation Hose (#101 series). It’s heavy wall, 2 ply with wire helix construction is more forgiving, flexible, installation friendly and odor resistant.
 

Loren Beach

O34 - Portland, OR
Senior Moderator
Blogs Author
You're Right

Good point Tom.
To augment the usual "YMMV", it is worth noting that my decisions are equally: an example to emulate -- and -- a warning to others! ;)

I recall that when I was comparing hose types, I inspected some of the "best" hose at a local WM. It may well have been one of those two part #, but I do not recall.
This was the (approx) $10./foot hose. It was SO stiff that bending it more than 20 or 30 degrees was extremely difficult. Since these type of projects are kind of a "20 year cycle" thing, the cost, per se, was not the main factor, although important.
The ease of install was a big factor, tho.

Aditionally, and be assured that it did double the time for that project, I reformatted the whole layout and made it a lot easier in some distant future to replace any hose section when/if needed.
The original factory stuff was really crammed in tight with too-tight radius turns in some places and large portions were not accessible without tearing out some other parts or assemblies. :rolleyes:


Regards,
Loren
 
Last edited:

jarnold67

Member II
Trident 101 hoses

It seems to be that time of year for head projects - maybe 'cus it's less smelly at 36F:egrin:.
Anyways, I can attest to the install of the Trident 101 hoses. They bend, almost not enough to make it fit inside an E26 bulkhead, but they certainly went on the fittings with a whole lot less effort than I thought it was going to take. In hind sight the thermos that I filled with hot soapy water should have been filled with coffee.

Best regards,
John
 

gabosifat

Member III
Regarding the two fittings vs one fitting on the bottom of the tanks, we ordered ours from Ronco (B192) and I'm guessing they make them up to order because they asked if we wanted one or two outlets on the bottom. We chose one which required a wye to go deck or to whale pump and overboard. Seems to work well.

Cheers,
Steve
E35/3
Silent Dancer
 

Loren Beach

O34 - Portland, OR
Senior Moderator
Blogs Author
Giving this a 'bump'....
Not because I had original input and pix in this thread, but rather because this subject comes up repeatedly.
Also, options for handling waste on boats evolves, as well.
I note that Peggy Hall's advice about self-contained systems has moved towards favoring them for boats up to 30'. She's the real expert on the subject, and I am content to disagree slightly with her, occasionally. :)
I did buy her book, and highly recommend it.
 
Top