You are using an out of date browser. It may not display this or other websites correctly.
You should upgrade or use an alternative browser.
You should upgrade or use an alternative browser.
Hauling my Universal 5416 this weekend
- Thread starter WhiteNoise
- Start date
erobitaille
Member II
Chris,
just happens I'm having a tank fabed for our E-38 for $475I found the guy in Costa Mesa,CA that made the tanks for Ericison and has all the prints and plans to do the job. Contact Cliff at Berry Sheet Metal 949-548-3613.
just happens I'm having a tank fabed for our E-38 for $475I found the guy in Costa Mesa,CA that made the tanks for Ericison and has all the prints and plans to do the job. Contact Cliff at Berry Sheet Metal 949-548-3613.
mherrcat
Contributing Partner
The project is coming along well.
I am pondering one question though ... is the motor a 5416? From everything I have read I have come to the conclusion that my motor is a 5416. I ordered the service and parts manuals and they say for model 20/5416. I had noticed a label the valve cover that said (from what I could make out) Model 18...
That looks like the M-18 that is in our 1985 30+
WhiteNoise
Member III
It's an M-18
Thanks so much clayton! Really appreciate it.
It took me a bit but under some old paint I was able to locate the block number.
Z600 it is! I also downloaded the service manual and the picture of the M-18 looks just like mine.
Thanks all for helping me confirm. Boy would I have been pissed if I ordered the wrong parts.
I was finally able to convince the manifold to separate from the head after some very harsh and extended negotiations. I will post some more pics soon.
Engine rebuild.
I have been thinking about your project, and I am very jealous. If I could easily have my diesel transported to my garage, I would love to rebuild it.
Have you considered:
1. Rebuilding the alternator and starter? Doesn't cost much.
2. Upsizing the diameter of the heat exchanger?
3. Replacing the wiring harness, and possibly the control panel to include a tachometer? I have no tachometer. This may have been corrected by 1984.
WhiteNoise
Member III
Fuel Tank
I hauled out my fuel tank yesterday. It came out very easily, in fact it fit right through the lazarette. Based on the shape of the tank and the space down there I have decided to stick with an aluminum tank. I was considering replacing with a cross-linked poly tank but none of the stock shapes will fit to my satisfaction.
That being said, I was pleasantly surprised to find that the tank seems to be in fairly good condition. Just a little minor corrosion on the outside and no leaks that I can see.
Because it came out so easily (it still would even if the motor was in) I am considering cleaning it out and doing a pressure test with the hope of keeping in and saving myself a chunk of change.
I was considering threading a pressure guage into one of the fittings, some kind of one way valve to put in air on another, and to seal up the others. Bring the tank to 2 lbs or so of pressure and watching to see if the pressure drops.
Has anybody done something similar themselves? Any suggestions?
WhiteNoise
Member III
Considerations
Tilwinter
Don't be jealous. Be happy. Just think of all the crap I will go though and figure out that you won't have to because you can ask this idiot.
I have considered all of the above and came to these conclusions:
I am looking to rebuild the alternator but am having the internal regulator removed because I am adding and external regulator. I am also staying with the 55amp on a recommendation from a professional that the M-18 needs all it can get for our boat. It is fine as is but adding even an 80 amp would make a noticeable difference.
I considered upsizing the heat exchanger but I am hoping the rebuild and the fact that I am actually removing the hot water tank will be enough to improve the cooling (my hot water heater was not plumbed through the bypass hose as I have seen recommended.) Believe it or not my wife couldn't care about hot water on the boat (we still use the Sun Shower - no water in the boat) and I could use the space in the lazarette for motor maintenance. I am 6' and need what I can get. The 3" exchanger is another chunk of money I'd like to spend otherwise. Plus it is on the back of the motor, fairly easy to remove, and therefore could be done easily at a later date.
I probably will replace the wire harness and get the harness extension. Mine looks pretty ugly. The panel is not made anymore so I will clean mine up and replace the gauges. I have a fuel gauge mounted below the panel in the fiberglass (done by PO) and will probably add a tach above.
Last edited:
rebuild
You didn't mention if you were rebuilding the starter.
Also, there is a control panel sold by Westerbeke, I believe, that includes a tachometer. It apparantly can be fitted to the new wiring harness, as I recall. I looked into this with an Annapolis diesel mechanic some years ago.
You didn't mention if you were rebuilding the starter.
Also, there is a control panel sold by Westerbeke, I believe, that includes a tachometer. It apparantly can be fitted to the new wiring harness, as I recall. I looked into this with an Annapolis diesel mechanic some years ago.
WhiteNoise
Member III
Starter/Panel
I never had an issue with the starter. Didn't think of it to be quite honest. I will probably hold off because that is another part that can be removed fairly easily. Maybe next year.
That panel is interesting. I will think about it.
Thanks for all you input.
I never had an issue with the starter. Didn't think of it to be quite honest. I will probably hold off because that is another part that can be removed fairly easily. Maybe next year.
That panel is interesting. I will think about it.
Thanks for all you input.
better starting
We had our starter rebuilt as a P.M. idea, after getting to over a thousand hours on the Universal.
It had worked OK, but... it's nice to take off on a multi-week vacation and have one less part of the boat to hand over to "Murphy."
Fact: after reinstalling the rebuilt starter, it turned over much faster and started the engine noticeably quicker!
Observation: I guess that it will always be hard to guage an incremental reduction in performance of systems that wear out slowly...
so my mechanic buddies that preach about P.M. (preventative maintenance) must be right.")
Some parts were involved, like the solenoid (not easily rebuildable) but the cost is mostly labor. It was about $135. total, a few years ago.
If you do this with the engine out, it will save having to remove the alternator and then use a wobble-joint socket extension for the upper starter bolt. Occasional swearing was involved, as there is not much room to work on the port side of our engine. YMMV.
Food for thought.
Regards,
LB
We had our starter rebuilt as a P.M. idea, after getting to over a thousand hours on the Universal.
It had worked OK, but... it's nice to take off on a multi-week vacation and have one less part of the boat to hand over to "Murphy."
Fact: after reinstalling the rebuilt starter, it turned over much faster and started the engine noticeably quicker!
Observation: I guess that it will always be hard to guage an incremental reduction in performance of systems that wear out slowly...
so my mechanic buddies that preach about P.M. (preventative maintenance) must be right.
Some parts were involved, like the solenoid (not easily rebuildable) but the cost is mostly labor. It was about $135. total, a few years ago.
If you do this with the engine out, it will save having to remove the alternator and then use a wobble-joint socket extension for the upper starter bolt. Occasional swearing was involved, as there is not much room to work on the port side of our engine. YMMV.
Food for thought.
Regards,
LB
Last edited:
WhiteNoise
Member III
Coupler issues
I was able to get the two set screws out but the coupler will not come off. I have tried PB Blaster, Yield (best stuff ever but VERY expensive). Torched the heck out of if. Used a bearing puller, beat it with a small sledge, and I even threw numerous obscenities at it that I wasn't aware I even knew ... and nothing.
Darn thing won't budge. I want to remove and clean up the stuffing box, replace the stuffing box hose, and clean up or replace the coupler. I don't want to remove the shaft the other way, out the back, because that would require dropping the rudder.
Any suggestions?
I was able to get the two set screws out but the coupler will not come off. I have tried PB Blaster, Yield (best stuff ever but VERY expensive). Torched the heck out of if. Used a bearing puller, beat it with a small sledge, and I even threw numerous obscenities at it that I wasn't aware I even knew ... and nothing.
Darn thing won't budge.
I want to remove and clean up the stuffing box, replace the stuffing box hose, and clean up or replace the coupler. I don't want to remove the shaft the other way, out the back, because that would require dropping the rudder.Any suggestions?
Does the coupling have a split or is it solid?
Does the coupling have a split or is it the solid type?
If it has a split, you should use a set of steel wedges to open the coupling just a tiny bit, this normally will let you get it off.
If there is no split, you may have to resort to a more aggressive program involving making a slit, and replacing the coupling. Dremmel or a mini grinder and safety glasses.
Guy
WhiteNoise
Member III
To split or not to split...
That's what I was afraid of. I don't see a split so I have to assume it's solid unfortunately. See below:


That's what I was afraid of. I don't see a split so I have to assume it's solid unfortunately. See below:
Last edited:
treilley
Sustaining Partner
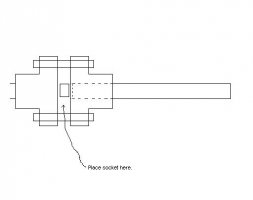
Poor man's coupling press. Chris, get some bolts that are 1/2 inch longer than the ones you have. separate the shaft coupling from the tranny coupling and place a small socket on the end of the shaft. Now tighten the nuts on the longer bolts and the socket will act like a press slowly pushing the shaft out of the coupling.
Attachments
-
 press.JPG10.3 KB · Views: 112
Last edited:
WhiteNoise
Member III
head/manifold removal
If the M25 is the same as the M18 there will the 4 studs originating from the head. One in particular was so jammed with what seemed to be carbon it would not budge. I used a variety of lubricants and a crowbar that I could wedge between the head and the manifold and tap with a small sledge. Just beware that you don't damage the machined faces where the head and the manifold meet.
If yours is as bad as mine was (and it turns out mine wasn't very bad at all) you may be better off removing the head and manifold, inspecting/cleaning up all of the above, and thereby allowing your self to work on a bench. The head came off the block with much ease comparatively. You would need to replace the head gasket and maybe a couple others depending on how far you go but I think it would be well worth it.
I will post some more pics soon.
Last edited:
Rocinante33
Contributing Partner
Chris,
Your picture shows only one hose clamp on what you call the stuffing box hose. That was a big problem, IMHO. There should have been four clamps there - two for the stuffing box end and two for the fiberglass tube* (hull) end. You may want to try some naval jelly on the coupling to remove some of the rust so you can work on it. Be careful with that stuff, though. Fumes are bad & it's so corrosive I don't know what it would do to the stainless prop shaft (test on a piece of scrap first), nor on the bronze packing nut or aluminum trans case. Wear gloves & eye protection.
You have very little room there to slide the prop shaft back, also. Have you been able to slide it back at all? If you can, then try Tim's suggestion, which is a good one.
I need to do this soon, too, to pull my tranny. Good luck.
* I have heard this called the "Pedro tube," though I am not sure if it refers to the fiberglass tube or to the hose joining it to the stuffing box
WhiteNoise
Member III
Hose clamp
You're very right. There should be four hose clamps there. I realized that too and plan to address that upon reinstall.
I can slide the shaft. I have to see if I can remove the tranny coupling from the tranny as it is in my garage right now. If I can I will be sure to try Tim's suggestion.
Thanks.
You're very right. There should be four hose clamps there. I realized that too and plan to address that upon reinstall.
I can slide the shaft. I have to see if I can remove the tranny coupling from the tranny as it is in my garage right now. If I can I will be sure to try Tim's suggestion.
Thanks.
WhiteNoise
Member III
Dripless shaft seal
That was the original plan but unfortunately the budget got in the way. There are some other things I am eager to complete before the start of the season so I will be putting that on hold for now and plan to stick with the flax for now. Tried and true.
That was the original plan but unfortunately the budget got in the way. There are some other things I am eager to complete before the start of the season so I will be putting that on hold for now and plan to stick with the flax for now. Tried and true.