• Untitled Document

    Join us on April 26th, 7pm EST

    for the CBEC Virtual Meeting

    All EYO members and followers are welcome to join the fun and get to know the guest speaker!

    See the link below for login credentials and join us!

    April Meeting Info

    (dismiss this notice by hitting 'X', upper right)

E38 Keel Bolt Project

rwthomas1

Sustaining Partner
Hello All,
Well, my E38 is on the hard and the keel bolt/keel rebedding project is underway. So far the 12 nuts and washers have been removed but the keel will not drop. The yard will try again on Thursday and I have asked that it sit over the weekend in the Travelift hoping gravity will do the job.

There is corrosion on 4-5 of the keel bolts where the threads are missing right where the nuts engage or directly below. There is one with diameter reduced by about 25%. I couldn't see very well as it was night and cold too. When the keel comes off and I can see more then I can make a decision on what to do.

I have been in contact with Don Huseman, apparently the former owner of Keelco? Since the bolts in my E38 are marked Keelco I assume he made the keel. He claims that it is possible to melt out the damaged bolts and weld in new ones. Seems like a reasonable idea if not dangerous and requiring some skill. He will come to my location and do this work if needed. Any feedback on this would be appreciated.

I am prepared entertain all repair possibilities that will return my boat to its original condition, or better. I am not interested in sistering, or adding extra keel bolts. The TAFG grid is cramped enough and I really don't want surveyors asking questions when they see extra bolts at resale time.

So far the options for repair are:
1 Sleeve the damaged bolts and use spacers, etc.
2 Drill out bolts and install new threaded rod and toggles through keel
3 Burn out old bolts, weld in new.
4 Cut off and weld on new material?
5 Clean thoroughly, weld up damaged area, recut threads?
6 Pull out credit card and order new keel from Mars. (really)

If anyone knows pros/cons/cost of any or all of these..... I have done the searches and read the threads already, more details if possible.

Comments and input welcome, TIA

RT
 

Maine Sail

Member III
Rob!!!

Rob!!

Don't let the gravity rip the keel free. That keel was most likely put on with 5200 and it will literally rip the fiberglass right off the boat if you let gravity do the work. Take some pressure off the keel by jacking the boat then carefully saw the joint with a hand saw or sawzall, but only use a sawzall if your very good at it. I made this mistake on my C-30 and it literally tore away glass that then needed to be re-laminated.
 

JohnK

Member II
RT,
Sorry to hear about your keel bolts - no easy solution there. I'd probably vote for new keel bolts since that option would offer most peace of mind and negatively affect resale value the least but cost/benefit has to come in to play. Hopefully the keel will come off easily without further damage. This sort of underscores why 5200 may not be the best keel bedding compound out there if you ever have to drop the keel again while you're still the owner...
 

rwthomas1

Sustaining Partner
Thanks for the input so far! They are supposed to try again on the keel tomorrow and I am only working in the morning so I plan on attending and passing on the wisdom imparted above.

I heard back from Mr. Huseman and the price is reasonable for him to replace keel bolts by melting and welding. Should be good or better than new as the new bolts will be 316 not the original non-passivated 304. Again, any input on Don Huseman and this technique would be very appreciated. This method sounds good but what do I know.....

Thanks, RT
 

Gary Peterson

Marine Guy
Rob,
We are following your posts with interest!!!!!!
What does your insurance company say about the technique Mr. Huseman proposes? I would imagine there would alot of lead melting to do and one would have to be very careful to position the new bolts in the correct location.

Gary Peterson
E381 QUIXOTIC # 507
:egrin:
 

rwthomas1

Sustaining Partner
Yep Loren, not only do I have them, they have been printed and handed to the yard manager where Ruby is.

Gary, yes I have the same type of concerns about locating and installing the new bolts. I am hoping that someone here like Guy or Martin King will know of Mr. Husemans work and chime in.

I have insurance with BoatUS and I have not asked them about this technique. I don't want to either. The last time I had to deal with them they wanted to have me install a vented locker to house my CNG cylinder. Even though it meets ALL ABYC standards as is. Had to quote it to them line and verse to get them off my back. My thinking is that it would be a large, prolonged wrangling process to get them to approve anything much less make a claim. I am not about to make a claim to fix what amounts to deferred maintenance. Yes it sucks that I am stuck with the issue while previous owners walked away but that is water under the bridge now.

RT
 

Martin King

Sustaining Member
Blogs Author
Rob,
Spoke to my father on your behalf as I don't have an answer for
you. He wasn't sure about welding in new bolts either. I think
you had better get all the details from Mr. Huseman about how
they are going to do it. He's the expert here, I really don't
know too much about it. Your other option would be to cut off
the old bolts, then bore and tap new locations for threaded
rod. Keep us posted.

Martin
 
Last edited:

Cory B

Sustaining Member
Sleeving Update


Quick update- our sleeved keelbolts survived some moderately nasty sailing conditions last summer, as well as a few soft groundings without problem.

Also, on our boat at least, the original sealant was not 5200, but some latex stuff. Even so, it took some wiggling to get the keel to break loose but didn't damage the fiberglass on the keel shoe one bit.

- Cory
E-35III "Balancing Act"
Portland, OR
 

rwthomas1

Sustaining Partner
Update:

The boat has been supported with 16 stands so that the keel is hanging just 1/2" above blocks. This was done last Thursday. There was a slight gap at the aft and forward parting line, just a hairline. It had not opened up any more so today I sanded down to fiberglass/lead at the parting line and started chipping out bedding compound where I could and then used a combination of box saw and hacksaw to cut through the bedding compound approx. 8-9" and 3" at the aft and forward areas respectively. The bedding compound is extremely brittle much like fiberglass resin left over in a mixing pot. I don't know what is was but there is no way it has any flexibility left now. The sections I cut through the bedding compound came out in thin slices once I cut through an area showing that it was no longer adhering to the keel or hull. Definitely overdue. Given the keel is still attached apparently some of it is still doing its job.

The next step is to take a sawzall to the parting line as carefully as I can down each side. I'm a contractor and somewhat of an "expert" with a sawzall so I don't think it will be too difficult. That said, no one should ever have as much time as I do with a sawzall, nasty little bugger, and if I never used one again I would be alright with it.

I have contacted Mars Metal in Canada and found out they do keel repair work. The nice thing is they deliver to RI weekly due to the boatbuilding business so shipping is not a deal breaker. It will likely be less expensive and less hassle to do it this way than hiring Don Huseman and make all the arrangements so he can do the job. Mars will simply issue a pickup order for the keel and take my CC info, three week turnaround. Check out www.marsmetal.com The operation looks pretty cool.

Wish me luck! RT
 
Last edited:

Maine Sail

Member III
Rob..

That's exactly what I found with the 5200 in my keel stub dry and brittle! This stuff does NOT last as long as some seem to think it does. Once it looses elasticity the flexing, between keel and hull, allows cracks and then water to get in causing crevice corrosion of the keel bolts.

Mars is a great company. Please let us know their fee schedule when you find out..
 

JohnK

Member II
That's exactly what I found with the 5200 in my keel stub dry and brittle! This stuff does NOT last as long as some seem to think it does. Once it looses elasticity the flexing, between keel and hull, allows cracks and then water to get in causing crevice corrosion of the keel bolts. <snip>
Rob, I know we beat this issue to death in another thread, but I will re-suggest two-part polysulfide which is what I used last year on my keel rebed project. Polysulfide is a better sealant, as in keeping the water out, being more flexible longer. Polyurethane, like 5200, is an adhesive, first and foremost. We don't need to stick our keels to the hull with glue - that's what the bolts are there for! ;)
 
Last edited:

rwthomas1

Sustaining Partner
Well, I'm coming around to NOT using 5200 for bedding the keel this time. Today I did the sazall thing until I ran out of light. Got the length of the keel on the starboard side bedding compound cut to 1 1/2" deep and then cut the forward and aft sections to 8"-9" and 9" or so respectively. Keel is still hanging on! The bedding compound continues to flake out in brittle pieces that are fairly large. The amount of effort required to make the sawzall cut is hard to maintain for more than an hour. The bedding compound also eats blades. This is not fun. I am hoping to cut the port side tomorrow if the weather cooperates. Then its oak wedge and sledgehammer time.... RT
 

Loren Beach

O34 - Portland, OR
Senior Moderator
Blogs Author
That's a lot o' heavy lead to really be glued on only by elderly sealant... Besides, if the sealant is really "brittle" then it could not be sealing or acting as an adhesive. :confused:

Check again -- way forward -- or way aft inside for a missed keel nut.
:rolleyes:

Good luck,

Loren
 

Kerry Kukucha

Member II
FYI, our 1988, 38-200 had a total of 13 keel bolts. The majority were 1.5" but there were 4 or 5 - 1" bolts aft (had to cut an access hatch into the galley sink's gable-end to expose a few of them.

good luck!
 

rwthomas1

Sustaining Partner
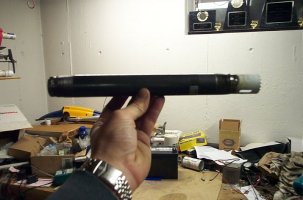
I have measured and double checked, all keel nuts have been removed. I completed the sawzall work today and tried a chisel/wedge setup at the forward area. No movement, I just succeeded in bulging the lead and chipping fiberglass a bit. I spoke with the service manager and he suggested that the bedding compound that is up around the keel bolts themselves inside the keel stub shoe holes may be what is holding it up. I have purchased a 1 1/4" hole saw and section of black pipe to make a custom extra deep hole saw. The idea is to cut down around each keel bolt to the keel so that the shank of the keel bolts are no longer adhering to anything. I'll post a pic when I complete the tool.

Edit: Presenting "frankensaw" Its a 1 1/4" hole saw that I cut the base off and then welded a section of black pipe into the center to make it super deep. I just hope it lasts for ALL the keel bolts. If it dulls out then I will have to grind the cutting end off, cut another hole saw and weld it on again. Hope it works! RT
 

Attachments

  • deep saw.jpg
    deep saw.jpg
    63.4 KB · Views: 495
Last edited:

Maine Sail

Member III
Rob..

Rob,

If the goop around the bolts is all that's holding the keel you might try buying a bunch of De-Bond and letting it do it's thing. I would personally be very uncomfortable "widening" the tolerance of those bolt holes by the O.D. of that hole saw.

Before you drill you might want to make a test bore in a piece of wood then find a dowel or pipe the same diameter as the O.D of the keel bolts threads and stick it in that hole. I think you be amazed in the "slop" you'll create using that method. Just like a thru-hull you want a tight tolerance for your keel bolts and the hole in the hull.

In the bilge dig some 5200 out by hand with a pick to create a "dish" for the De-Bond to sit in then fill and let sit. As the De-Bond soaks in add more.. Another approach is to heat the keel bolts them selves until they melt and soften the 5200....
 

treilley

Sustaining Partner
Rob, if you must use the hole saw, make sure you support the keel. You may find that as you drill down, the weight of the keel may make it move slightly and pinching your saw in place. Also start with the center most bolts as the keel may come loose before you oversize all the holes. Especially the fore and aft ones. That way at least they still fit tight.

On the other hand, maybe you can break the keel loose by torqing the nuts. If you can create a gap between the keel stub and keel, you should be able to use the weight of the boat(down on the supported keel) and the torqing of the nuts to draw the two together enough to break the bond.
 

Dferr

Member II
Rob, do you think the bedding compound is 5200, or do you think someone used something like west systems epoxy? You said it was coming out in brittle chunks, I wouldn't think that sounds like old 5200.

Anyway, I'm sure you probably thought of this already but, what if you have the boat lifted up off the blocks a little again if not already, put the nuts on the keel bolts so they're flush with the top of the bolt, get a nice big 2" dia. solid steel rod to use as a big drift, use a little heat on the bolts and whale away with a sledgehammer to see if you can knock the bolts free.

Just something I would probably try.

I will be dropping my keel in a few weeks or so. I hope the hell I don't have to go through what you're going through!

Hope all works out well for you!!

Don

PS. while looking at the tool you made I noticed what looks to be the tail rotor of a Blade CP, Funny, I have two of them.
 
Last edited:
Top