You are using an out of date browser. It may not display this or other websites correctly.
You should upgrade or use an alternative browser.
You should upgrade or use an alternative browser.
new hatch
Hi all
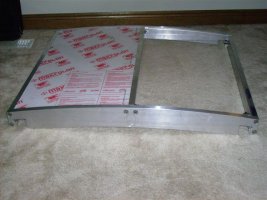
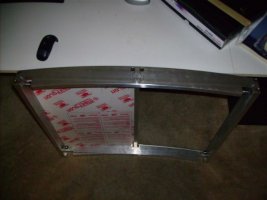
This is the new companionway hatch I just finished in the last couple of weeks for my E29 it is cnc machined billit aluminum that I will get polished and then clear anodized it slides on 4 bearings and will have smoked lexan inserts.
seeya dave
Hi all
This is the new companionway hatch I just finished in the last couple of weeks for my E29 it is cnc machined billit aluminum that I will get polished and then clear anodized it slides on 4 bearings and will have smoked lexan inserts.
seeya dave
Attachments
-
 e29_hatch 001.jpg50.2 KB · Views: 122
 -
 e29_hatch 002.jpg33.5 KB · Views: 134
Nestor - Would gladly talk with about your hatch, and I did receive your e-mail. I will contact you back channel, and we can go from there.
Dave- Great idea on the hatch, and it looks superb so far. Please let us know how it works out.
Hope everyone is starting the new year well...
Best,
Dave- Great idea on the hatch, and it looks superb so far. Please let us know how it works out.
Hope everyone is starting the new year well...
Best,
Richard Caruso
Junior Member
Ericson 29 1977 Sliding Hatch
I have a teak hatch for my Ericson 29 in very good condition made by Ericson just before theyclosed down.I plan to sell the boat and this newer hatch could be available for sale to you this spring.If you are still looking then get back to me with an offer.
I have a teak hatch for my Ericson 29 in very good condition made by Ericson just before theyclosed down.I plan to sell the boat and this newer hatch could be available for sale to you this spring.If you are still looking then get back to me with an offer.
NateHanson
Sustaining Member
Great work everyone!!! I love the curved teak companionways, and especially like the holly accents in the last one. The machined aluminum hatch is very impressive, and probably (quite literally) bulletproof! 
In jkenan's design, is Baltic Birch plywood assembled with waterproof glue? I'd think using 1/8" or 1/4" marine ply would be longer lasting, and less prone to delamination. After all, it's not a matter of IF water will get into anything on a boat, it's a matter of WHEN. I'm a big fan of baltic birch or appleply type hardwood plywoods, but I've never used them in exterior applications.
In jkenan's design, is Baltic Birch plywood assembled with waterproof glue? I'd think using 1/8" or 1/4" marine ply would be longer lasting, and less prone to delamination. After all, it's not a matter of IF water will get into anything on a boat, it's a matter of WHEN. I'm a big fan of baltic birch or appleply type hardwood plywoods, but I've never used them in exterior applications.
CWM
Chuck
Mark:
If that is the Uniden depth sounder in the photo of your E27, where did you place the transducer, and how did you seal it to the hull?
Also, those c-way doors are beautiful. Do you have any comments on them and more photos of them?
TIA
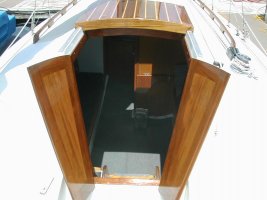
The following is a photo of my repaired c-way hatch and boards. Apparently they are the originals for my 1973 E27.
If that is the Uniden depth sounder in the photo of your E27, where did you place the transducer, and how did you seal it to the hull?
Also, those c-way doors are beautiful. Do you have any comments on them and more photos of them?
TIA
The following is a photo of my repaired c-way hatch and boards. Apparently they are the originals for my 1973 E27.
Attachments
-
 DSCF5974.jpg66.9 KB · Views: 194

Hi Chuck,
The depth sounder is a Norcross Hawk Eye http://www.westmarine.com/webapp/wc...eId=10001&Ntk=Primary+Search&ddkey=SiteSearch There was an Airmar P6 thru-hull already installed and the Norcross was the only unit I could find that was compatible that thru-hull.
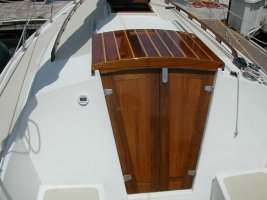
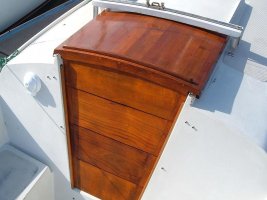
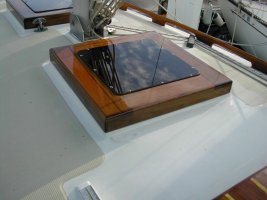
I made the doors to replace the drop boards. I like not having to remove the boards every time I go in and out of the boat. They are mounted with lift off hinges so when I'm sailing I can remove them. I made them out of 3/4" Teak.
The depth sounder is a Norcross Hawk Eye http://www.westmarine.com/webapp/wc...eId=10001&Ntk=Primary+Search&ddkey=SiteSearch There was an Airmar P6 thru-hull already installed and the Norcross was the only unit I could find that was compatible that thru-hull.
I made the doors to replace the drop boards. I like not having to remove the boards every time I go in and out of the boat. They are mounted with lift off hinges so when I'm sailing I can remove them. I made them out of 3/4" Teak.
Attachments
-
 companionway3.jpg60.8 KB · Views: 196
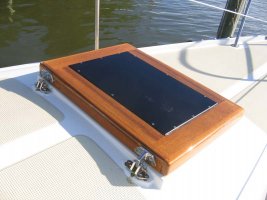
Hi John,
How did you mount the the lens to the frame on your salon hatches? Is the frame rabbited where the plastic rests? How are they holding up, can you stand on them? Do you have any inside photos?
I'm getting ready to rebuild mine (E27) and like how yours look.
Thanks, Mark
How did you mount the the lens to the frame on your salon hatches? Is the frame rabbited where the plastic rests? How are they holding up, can you stand on them? Do you have any inside photos?
I'm getting ready to rebuild mine (E27) and like how yours look.
Thanks, Mark
Attachments
-
 salon hatch.jpg95.4 KB · Views: 685
Hi Mark-
Hatches are holding up great! I can stand on them, jump on them - they are solid. I used the Bristol 2-part finish over the Epiphanes wood finish gloss (really like the darker tone that varnish offers). Anyway, the bristol really seems to protect the varnish - I varnished the hatchboards w/o using the Bristol a couple of years ago, and pretty much need to redo those again. The main companionway hatch is also holding up great.
There are a few design modifications I would make to these hatches if I were to rebuild them again:
1) The rabbet supporting the lens was not wide enough - I routed 3/8" width, and would widen that to 3/4" width next time. You can see in the photo how close the fasteners are to edge of the lens. I had use #6's and they are still a bit too close for comfort to the edge of the rabbet.
2) Add a lower frame (much like Martin King's design) to create a seamless profile when the hatch is closed. Mine don't sit completely flush against coachroof, and could foresee a wave breaking over the bow getting under the lip of the hatch and carrying it off (That said, I think mine are still more secure than the original hatches).
Otherwise, I think the joinery, materials, etc are right in line.
Look forward to seeing your project! Good luck.
")
Wow! That is some great work, Mark.
It looks like the four boards comprising the top extend to the edges, as opposed to mine which utilize a full height frame with the top inset to the frame. I think I like yours better. I also like your reverse hatch aft the mast.
Did you go with the woodfinish gloss and then Bristol?
Very impressed.
Lawdog
Member III
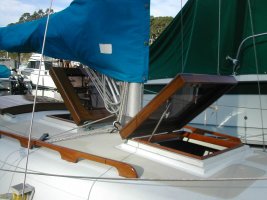
here's 2 more ways to build a hatch for a 29. Both were originally built like the aft hatch, but because the fore hatch was not throughbolted, and the hatch was partially open when I tacked on a windy day, my jib sheet took the fore hatch away. I used the second design just to see if I liked it better, but it actually holds more water, in spite of small drain holes in the corners.
Neal W
Enterprise
Portland, ME
Neal W
Enterprise
Portland, ME
Attachments
-
 DSCN0186.jpg110.1 KB · Views: 690
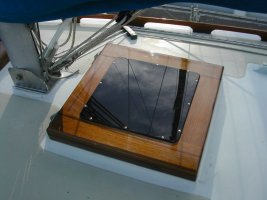
The top boards do run to the edges. You can see in this photo the end grain of the top pieces. I biscuited the frame sides to the top boards so it should be pretty stable. I liked how you kept the lens a bit proud of the frame to help with water run off. Works great.
I used one coat of thinned epoxy, a sealer (not sure why other than I had it) and 7 coats of Z-Spar Captains Varnish. Does the Bristol help with UV breakdown?
I had to switch the aft hatch so I could install the BoomKicker.
I used one coat of thinned epoxy, a sealer (not sure why other than I had it) and 7 coats of Z-Spar Captains Varnish. Does the Bristol help with UV breakdown?
I had to switch the aft hatch so I could install the BoomKicker.
Attachments
-
 hatch2.jpg61.8 KB · Views: 595
I opted for the bristol per Martin's recommendation in his thread 'Project 31C gets a new hatch'. See thread http://www.ericsonyachts.org/infoexchange/showthread.php?t=4452&referrerid=1235
Let me know what you think.
Let me know what you think.
Nothing yet Chuck. I have a shoulder routed into the inside of the frame so the hatch fits over the fiberglass curb on the cabin top. It's a pretty tight fit, maybe a 1/8" gap. I plan to add a strip of foam weatherstrip at the top of that shoulder. Does that make sense? I'll take a photo when I do it.
i'm fixing my old sliding hatch...
Hey there E27 owners.
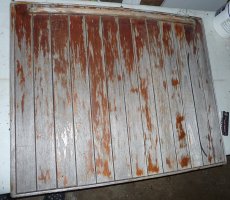
As my winter project I am fixing up my hatches. I took them all off my newly bought 1978 E27 split scoop boat and brought them home.
The sliding hatch looks neglected, but still structurally solid.
My question is what did"they" use in between the planks? Some kind of filler?
It was all cracked and came out of the seems very easily.
What would you recommend to fill the gaps???
What varnish works the best on our opinion?
What would you use to trip the old left over varnish?
Thanks,
Mac
Hey there E27 owners.
As my winter project I am fixing up my hatches. I took them all off my newly bought 1978 E27 split scoop boat and brought them home.
The sliding hatch looks neglected, but still structurally solid.
My question is what did"they" use in between the planks? Some kind of filler?
It was all cracked and came out of the seems very easily.
What would you recommend to fill the gaps???
What varnish works the best on our opinion?
What would you use to trip the old left over varnish?
Thanks,
Mac
Attachments
-
 old hatch1.jpg106.2 KB · Views: 608