• Untitled Document

    Join us on April 26th, 7pm EST

    for the CBEC Virtual Meeting

    All EYO members and followers are welcome to join the fun and get to know the guest speaker!

    See the link below for login credentials and join us!

    April Meeting Info

    (dismiss this notice by hitting 'X', upper right)

38-200 Keel Bolts

oceandreams89

Member II
Anyone have any idea what size socket is required for the primary keel bolts on the Ericson 38-200? Also, has anyone heard of a torque figure for these bolts?

Thanks,
Todd
 

Frank Langer

1984 Ericson 30+, Nanaimo, BC
I have heard of 250 ft/lbs. as the right torque, but as I'm going from memory, you may want to wait until someone else confirms/corrects this.
Frank.
 

oceandreams89

Member II
Thanks, but does anyone know the socket size that fits the bolt? It is larger than 1 1/4", but sockets of that size are pricy and I want to buy the correct one.
I'm assuming they are SAE bolts and not metric but I'm not positive.
 

NateHanson

Sustaining Member
Do you have a dial-caliper? These things are invaluable for any tool chest. You can get a durable plastic one (made by General) for $20. Great for woodworking and general maintenance work. (For the more demanding tolerances of machine-work you may want a metal caliper.

It'll take the guesswork out of which socket to buy.
 

Cory B

Sustaining Member
Keel Nuts

If you have a Harbor Freight or similar in your neck of the woods, you can get a reasonable facsimile of a dial caliper for about $2 which would be adequate for something like this.

On our boat, the nuts were 3 different sizes for the keel bolts. We couldn't get enough torque with a socket wrench to break the nuts, and bought a cheapo breaker bar (Harbor Freight, again) which did the trick along with a generous amount of PB Spray.

- Cory
 

oceandreams89

Member II
Well Chris........now I'm feeling like a bonehead! Sometimes the easiest solutions are the hardest to think up. (for me at least....I usually go to the hardest solution first)

Thanks for making it easy......
 
Last edited:

Chris Miller

Sustaining Member
no worries...
I always look for the easy way- no need to make all this stuff complicated.
plus, it helps that I have a set of these in a box in the basement:egrin:
Chris
 

ted_reshetiloff

Contributing Partner
I tried snugging up mine this spring when on the hard and while I dont recall the size I do recall there were 2 sizes. I think the one Chris has pictured were the larger ones and there are a few that are smaller. Maybe 1.25" but I dont recall for sure. I could not get to all with the socket because of location and a few I needed a deeper socket. In the end I guess I was happy because none moved even with a big breaker bar. I did have a crack at the joint which I reglassed with 24oz biaxial cloth and faired in. Just hauled last week and the joint is still solid. This is after kedging the boat over a 5' shoal with the anchor line run to primarys and 1 hour of grinding. (I draw 6.5')...
 

Roger Ware

Member III
kedging story

Ted, this sounds like a story worth telling. I did something similar to my 5'3" wing keel this fall by running aground on a flat rock shelf - started the engine, bumped across for about 100 ft, but when we hauled the boat there wasnt even a dent on the keel!
Roger, Kingston
 

oceandreams89

Member II
Ted,
Did you have a space in your keel joint? What exactly did you do to repair the joint? Any pictures?

I was thinking of sungging up the joint as good as I can, and then grinding down the joint, and fiberglassing the joint with thickened epoxy and cloth, fairing, barrier coating and painting. It might make it more difficult to ever drop the keel, but it should seal it good and tight.

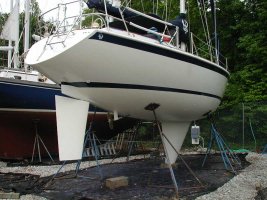
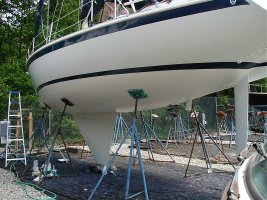
My joint is pretty tight except for the leading edge which I can get a putty knife blade into or a small screwdriver. I have filled and faired for 5 years now and am getting tired of the same old repair in the spring, which is why I was thinking of the glassing route.....

any opinions or suggestions concerning my plan, or any way to improve on my plan?

Todd
 

Chris Miller

Sustaining Member
I'm lurking curiously here-- we did a drop and rebed which I was happy with, but I'm curious to hear from our resident experts about glassing that joint.
Chris
 

Roger Ware

Member III
Curious too

I had my keel rebedded two summers ago (there are photos on this site), but no glassing in. My guess is that some of the professionals will say that if the keel wants to open up, it will, and make a mess of your glass repair, a bigger mess than if there wasn't one.

Just a fairly uninformed $.02 worth.

Roger, Kingston, ON
Ericson 38 200
 

treilley

Sustaining Partner
The keel joint on my '85 35-III was undetectable when I bought the boat in June. When I hauled last week I expected the keel "smile" to be visible but it still has no gap or even any stress cracking. Whoever faired the hull and keel did an awesome job and hope this will give me a nice edge next season when I start racing again.
 

ted_reshetiloff

Contributing Partner
That Joint

Dropping a rebedding is a big job that can be expensive. I would like to do it at some point but not today. The issue is that you can/will have crevice corrosion to the bolts which will deteriorate them over time. I had a crack from the fwd point of the joint back about 12" on either side. I could just barely slide in putty knife. I also had some cracking of the joint along the rear going 8-10" fwd. The OEM setup had a thin layer of glass covering the joint with fairing compound to fair the joint. Over the years that fairing cracked along with the thin layer of glass. Water got in and further deterioraed the fairing. I ground out the old fairng and glass to a point a few inches into the not cracked part. So about 18" back and 15" fwd. Once the joint was as dry as I could get it I stuffed some epoxy with colloidal sillica(sp?) filler into the small gap at the leading edge. Afterthat cured and was sanded flush I applied 24 oz biaxial cloth extending 6" above and below the joint. After that cured I sanded it a little to take out any big highs, then applied epoxy with microballoons to fair the whole seam.Afer that cured I took a piece of 1/4 plywood 2" wide by 2' long and applied sandpaper to it making it a long board with handles. I used this to sand the fairing until it was smooth and fair. I then used the longboard on the rest of the bottom. (What a PITA). After all this I applied 3 coats of Petit Vivid bottom paint. Pictures dont really show much I have attached a few. After a season of some pretty hard use, (groundings and a lot of heavy air upwind sailing including one race with 11 guys on the rail) the joint has remained crack free. I do not believe the keel is moving at all or it would re crack.
 

Attachments

  • 382330319303_0_ALB[1].jpg
    382330319303_0_ALB[1].jpg
    39.1 KB · Views: 55
  • 840630319303_0_ALB[1].jpg
    840630319303_0_ALB[1].jpg
    50.6 KB · Views: 63
  • 942630319303_0_ALB[1].jpg
    942630319303_0_ALB[1].jpg
    51 KB · Views: 64
  • ATT172792.jpg
    ATT172792.jpg
    199.4 KB · Views: 60
  • ATT173671.jpg
    ATT173671.jpg
    186.9 KB · Views: 55

ted_reshetiloff

Contributing Partner
Finished product, Beer and sunset made the work worthwhile, and 3 year old jumps up main halyard, no harket track there just a feisty kid...
 

Attachments

  • 2.jpg
    2.jpg
    64.8 KB · Views: 58
  • boat.jpg
    boat.jpg
    132.1 KB · Views: 57
  • 197817119303_0_ALB[1].jpg
    197817119303_0_ALB[1].jpg
    40.4 KB · Views: 69
  • 200157119303_0_ALB[1].jpg
    200157119303_0_ALB[1].jpg
    30.6 KB · Views: 66

oceandreams89

Member II
Bottom job came out great. That Vivid paint is pretty good. I used it on my rudder this year, and on a powerboat I have. It worked very well and looks great.

Every year I contemplate stripping, barrier coating, and repainting the bottom nice and fair like that, but I figure I'm not racing, and it wont make my beer any colder. Every year I get closer to pulling the trigger and just doing it. I would like to get the joint faired nice like that though.....I'll try your repair technique and see what happens. It will be interesting to see if I can get the keel bolts to even budge

I'm trying to not look too longingly at the picture of your hull....it might make me start scraping and sanding..........

looks great Ted, thanks for the advise
 

Chris Miller

Sustaining Member
our boat had 17 years of another coat of paint not making the beer colder- but it sure made the sanding harder!!:D
I would bet ours lost 50+ lbs in the sand job, which allows for more beer in the cooler. (plus it's fun to see the history of how many ugly colors your bottom has been:nerd: )
 

oceandreams89

Member II
Yea, I was thinking about how much a can of paint weighs full...and empty...multiply by 14 seasons of painting (out of the water for 3 years before I bought it) 4 of my seasons of which have been ablaitive paint and I figure about 2 gallons per coat. I think a conservative estimate considering some ablaitive washoff is around 10 coats on the hull (20 gallons X how many pounds per gallon...(15 conservative) thats about 300 pounds. not to mention the rough spots (read turbulance) from the hard paint under the ablaitive. Makes me want to get out my scraper. (then again...maybe not) I have waaaay too much time on my hands to think about this stuff. I hate winter..........
 
Top