• Untitled Document

    Join us on April 26th, 7pm EST

    for the CBEC Virtual Meeting

    All EYO members and followers are welcome to join the fun and get to know the guest speaker!

    See the link below for login credentials and join us!

    April Meeting Info

    (dismiss this notice by hitting 'X', upper right)

Relative pros/cons on plumbing options?

JPS27

Member III
As I work on my replacement to water and holding tanks and associated hoses, I had some questions I'm hoping folks could provide thoughts on.

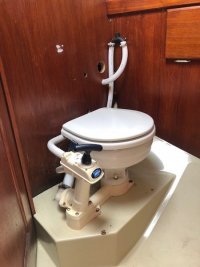
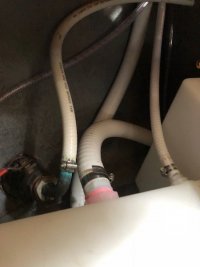
Quick back ground on original situation. My original set up had two vented loops, one in with the raw water, and one for waste come out of head. The waste hose went straight to the tank. Then from the tanks pump out fitting the hose when to a T, one side going to deck pump out and the other side going to hand pump and to through hull over board. Based on what I've been studying this is incorrect because a Y valve should be between head and inlet into holding tank allowing for pump out overboard or pumping to tank. And the deck pump hose should not have a T and be simply one hose.

What would be the best option? Or better stated, what are the pros and cons?

1. Direct to tank only. No Y valve. Close overboard waste through hull because I so far only sail coastal. It makes me nervous to have an unused t-h sitting there. But I had my boat hauled recently and don't plan to until next year at the earliest. I could then take out and glass over the t-h. But then what about resale value?

2. A Y valve before tank with no pump assist. this is Casey's example when the head is below waterline. I'm not absolutely sure but I think the head is close enough that it could be below waterline at a certain heel angle.

3. A Y valve after the tank splitting to deck and hand pump to overboard t-h. This was the way the set up was, but with a T fitting instead of a Y valve.

Thanks for any help. Ronco tanks will be here in two weeks. And the quoted prices were way cheaper than the list price on the web. I didn't ask why. Jay
 

markvone

Sustaining Member
Original Layout

Hi Jay,

Your original layout is functionally identical to mine except in place of the tee on your holding tank discharge I have two independent hoses going into the bottom of the tank, one to the deck pump out and one to the hand pump and OB discharge. I would leave this setup in place and just replace hoses and maybe cleanup the OB hand pump which has probably never been used if the boat lived in the Bay all it's life.

I would leave the OB thru hull for resale. I replaced my tank to hand pump OB hose and the (factory original) hand pump to OB thru hull hoses and they have never been used since. The always closed OB thru hull with the San hose attached does not bother me as a safety issue. I try to remember to cycle the thru hull valve every so often so it still works but if yours stuck closed I'd just leave it that way until you need it.

Your head to tank discharge hose DOES NOT need a vented loop in this configuration. The holding tank is vented and provides the syphon break.
Read Peggy Hall's Boat Odors book.
Use the best San hose you can afford - per Peggy.
Add the largest holding tank vent hose size you can fit - per Peggy. I added a 1.5 inch vent line. Use San hose for the vent line.

Cons - have to pump head to holding tank and then pump out holding tank. This is an inland waterways requirement for us anyway.

Option 2 - Lets you pump directly OB when offshore. Switch to holding tank for in port. Empty holding tank when offshore. When was the last time you were in a legal OB discharge zone? Planning to go soon? Works great for offshore boats.

Cons - Y valve adds possible failure (clog) point. Must have vented loop in head to OB discharge line if head below waterline.

Option 3 - The Y valve between the hoses on the discharge side allows control of discharge path. USCG regs and/or state laws require control of the discharge path in no discharge zones. You can lock the hull valve or the Y valve with a lock or non-releasable wire tie, remove the valve handle or lock the space with the head. I lock the access door to the small space where my closed OB thru hull valve lives.

Cons - Y valve adds possible failure (clog) point. You can control OB discharge without a Y valve.

An alternative Option 3 - Route single holding tank outlet direct to deck pump out. Leave the hand pump and OB thru hull/valve in place for resale. Remove old OB hose or replace with new.

Mark
 

JPS27

Member III
Thanks, Mark for the very helpful descriptions. So the T fitting rather than having a locking Y valve is not a "hack job". That's good to know. I'm down to considering two options. 1) having the T or Y valve after the holding tank. While the Y has the drawback of clogging, the reality is I dont really use the holding tank that much and I will pump out frequently if I do. But option 2) of simply having a deck pump out only is gaining in popularity among the voices in my head :egrin:. Leaving the OB option in place.

When you described that option you mentioned replacing the OB t-h hose. But since it wouldn't be connected, where do you envision that hose leading, to the pump and then no hose attached to the tank side of the pump, or am I just not following. And I'm assuming leaving the vented loop to tank in wouldn't hurt anything even if not needed? Seems like an easier bend in the tight space the way they did it.

Thanks again. Super helpful.

Jay
 
Last edited:

kiwisailor

Member III
Blogs Author
No Y Valve

I just went through this exercise over winter. Holding tank has two outlets one goes to deck pump out and the other to overboard pump out. The big change I made was to put an anti-siphon loop between the head pump and the bowl, this allows you safely to leave the head thru hull open without risk of siphoning into the bowl and then into the holding tank......I experienced that first hand :)

My write up is at this link. http://www.ericsonyachts.org/infoex...Tank-Manual-Pumpout-amp-Head-Anti-siphon-Loop

Also of help look at the systems diagram at the following link to see how it was originally factory plumped. http://www.ericsonyachts.org/infoexchange/vbdownloads.php?do=download&downloadid=75
 

JPS27

Member III
So perhaps I made a mistake in ordering a new tank configured like the old one. I have one inlet and one outlet. Two outlets allows for no T's or Y's. Downside is more clamps to fail?
 
Last edited:

kiwisailor

Member III
Blogs Author
So perhaps I made a mistake in ordering a new tank configured like the old one. I have one inlet and one outlet. Two outlets allows for not T's or Y's. Downside is more clamps to fail?

Maybe not. I have an E38 and yours is an E27? It works for my boat, but I also don't like the idea of two hoses coming from the bottom of the tank and it was a f%% nightmare to install as well
 

markvone

Sustaining Member
When you described that option you mentioned replacing the OB t-h hose. But since it wouldn't be connected, where do you envision that hose leading, to the pump and then no hose attached to the tank side of the pump, or am I just not following. And I'm assuming leaving the vented loop to tank in wouldn't hurt anything even if not needed? Seems like an easier bend in the tight space the way they did it.

Thanks again. Super helpful.

Jay

You wouldn't need to spend money on new San hose for the two OB pieces with only the single outlet port on the new holding tank if you went Option 3A. I had to do something with my second outlet (on the bottom of the tank), either plug it or just replace the old hose up to the OB hand pump and then plug it. My pump to thru hull hose (which runs under the floor to the opposite side of the boat where the TH is) was original hose so it had to go. Having the new, but unused OB hose keeps my OB pump out available, even though I never use it, and having the hose clamped on the always closed OB thru hull gives me a backup barrier against flooding. You could add a short piece of hose to your closed OB thru hull long enough to get above the waterline to do the same thing.

If in the future, OB discharge is needed, just add back the Tee (or Y valve) and the OB hose to the pump and TH.

Mark
 

JPS27

Member III
Thanks for the advice. Here are some pics, embarrassing as they may be. the first is the tangle of mildewed hose (see T splitting to deck pump out or to hand pump to OB thru hull). A pic of how the tanks were oriented before I threw them out. A pic of the empty space and then same space cleaned up. I epoxied the wooden platform as it was raw ply. And then the head (vented loops just out of sight in pic).

I think I'll find some brackets like Loren used in the link he shared. there were no side pieces, just a wooden L bracket on top of h2o tank and a piece forward at the foot of the holding tank. I'll post some pictures when finished and before my shoulder surgery which I'm calculating to maximize down time over the coldest months. Supposedly 5-6 months for a small labral tear. Starting to get old and the body doesn't bend, it breaks.

IMG_4783.jpgIMG_0314.jpgIMG_0250.jpgIMG_0322.jpgIMG_0323.jpg
 

markvone

Sustaining Member
Tip - Marking the waterline

Hi Jay,

One thing I did every time I had a hose off one of my thru hulls (I have 6 located in 4 different small bilge spaces) was to buy a 1 - 3 foot piece of cheap clear hose of the correct size and clamp it to the thru hull, then open the thru hull and see were the waterline was. I marked the waterline in each area on the inside. I now have the waterline marked in the engine compartment, under the galley sink and under the head sink. It's pretty easy to eyeball the waterline anywhere in the boat from one of these points or you can accurately transfer it to anywhere else in the boat with careful measuring. I know generally that the waterline is about 12 - 15 inches above the cabin sole and that my head bowl top is 4 inches above the waterline.

You can probably use the clear hose for another purpose when you are done. For example, you could leave this hose on your unused OB thru hull and clamp the end above the waterline (and/or plug it). Being clear, it also lets you check for TH valve leakage. I use the clear 3/4 inch hose for my engine intake to extend the hose to reach the antifreeze bottle to winterize the engine.

Mark
 

toddster

Curator of Broken Parts
Blogs Author
Excellent idea, Mark.

Just one more option: I added a lavatory sink and plumbed that to the through-hull as the default configuration. (Also carries brine reject stream from the water maker.) The Y-valve lets me select between the sink or the macerator output, to pump the holding tank contents overboard, where it's legal. There is no direct connection between the toilet and the through-hull. Nothing can go overboard without being macerated. If I sailed more beyond the three-mile limit, I might re-think that.
BTW: Since it so rarely gets used, I flush a little antifreeze mix through the macerator a couple of times a year, to keep it free and lubed. It was a nasty corroded mess when I took possession, but a rebuild kit and a Sunday afternoon brought it back to life. I'm not eager to do that again.
 

p.gazibara

Member III
A very important piece, that I did not do and wish I did is to order the tank with TWO vent fittings on either side of that tank or at least as either side as you can. that way you can get airflow through the tank which will keep the microbes aerobic and not anaerobic. the latter are what make everything smell really bad. There are aeration systems you can install in the tank as well, but the passive two vet method seems the simplest.

Cheers,
-P
 

Second Star

Member III
Plumbing options

My head hand pumps directly to the holding tank. A 3/4 vent goes from the top of the tank to a vent fitting just under the rub rail. To empty the tank, a deck fitting for pump out is used or a seperate hand bilge pump is used. The pump discharges overboard just at the waterline. In my configuration there are 2 discharge fittings on the tank, but a "t" with the hand pump line would do the same thing, keeping some slope on the line to the pump so excess "fluid" isn't trapped in the line. The boat interior "geography" is pretty important in that case. This allows either the hull valve or the hand pump to be locked if required to stop accidental discharge inshore. The only valve to service is the hull valve. The down side is that the hand pump needs to be serviced as required. Rather than glass over the thru hull opening you could fill the tube of the fitting with resin or body filler right out to the exterior opening and cap the interior end. The fitting would have to be renewed if needed again but it would be a pretty secure plug.
 

JPS27

Member III
Tanks going in--Question about running san hose

Back home for the day, so editing this post:

I would like to do what Mark mentioned above and not deal with overboard through hull for awhile and just keep it simple with holding tank only.

I have a question about how to run san hose from head to holding tank. The PO use of a vented loop between head and HT, which may have been done simply because the hose is difficult to bend as needed to get to tank. Given tight space the loop definitely makes it work.

But the more direct line to HT is an old hole right behind base of toilet. HOWEVER, the HT and bottom of toilet (about same level as joker valve position) would be at close to same level. Seems like that could encourage back flow. the attached pic shows the set up. The original hose from vented loop to tank is off. And I have a flashlight shining from the v berth where the other hole in bulkhead is.

is it standard practice to have a generally downward trip to the holding tank? Or does the joker valve keep backflow at bay when at the same level?

thanks. Jay
IMG_0392.jpg
 
Last edited:

markvone

Sustaining Member
Jay,

Your tank inlet is on the top of the tank right? So with the lower (direct) path you would pump up some length of hose and then into the tank? The length of the hose is the only volume of backflow? This is like my setup, except I pump up right from the head about 12 inches vertically and then drain slightly down to the inlet on the top of my tank. Total hose length about 30 inches. I haven't had any backflow issues but I try to pump all waste over the "hump" and into the tank so I don't have sewage sitting in the hose. The only downside to this is probably quicker filling of my 20 gal holding tank with the extra water over the minimum. However, getting all waste completely out of the head and into the tank has to help minimize clogs. I haven't had any problems since I redid my hoses a couple of years ago. I have the Annapolis City pumpout boat available for $5 every afternoon most of the year so the hassle factor is low for me to pumpout. I still only pumpout 4 times a year (not a lot of head use compared to others).

Mark
 

JPS27

Member III
Mark, I need a red face emoji. How embarrassing. You are right and I knew that. But I got myself all bungled up several times today with what I have self diagnosed as what must be late middle aged confusion syndrome. I got myself turned around multiple time with hose clamp positions, connections etc. I figured it out as I muddled thru. Took a break in the middle of the day and returned with a pal in the evening to wrestle with the sanitation hose at the pump out outlet and other issues. Tomorrow I’ll connect head to tank and decide then which route.

Thanks for all the advice and encouragement.

Jay
 

markvone

Sustaining Member
Jay,

I'd go the direct route with the shortest hose length. I don't like the whole concept of a vented loop in a sanitation line. I'll bet someone added the vented loop not fully understanding that pumping the head to a vented tank doesn't need one. You will also eliminate the extra San hose cluttering up your head. If you check your waterline vs head bowl height you may be able to eliminate the vented loop on the head intake as well. My head bowl lip is 4 inches above the waterline so I got rid of the intake vented loop also.

Mark
 

JPS27

Member III
I ran the sanitation hose directly to the holding tank and as you said it works great. And it looks better in the head. Less clutter. I believe I have my plumbing all straightened out. New hoses in head. New hoses to both sinks, and a hose from head sink to sump bilge. That sink used to drain to the bilge under the head and from there meandered down to the sump. I had no idea since i never used the head sink.
 

Attachments

  • IMG_0394.jpg
    IMG_0394.jpg
    42.8 KB · Views: 13
  • IMG_0403.jpg
    IMG_0403.jpg
    30.5 KB · Views: 13
Last edited:

JPS27

Member III
Two years ago forum members helped me think through my plumbing options. At that time, I opted to put a short piece of hose on the overboard TH and seal the hose with a plug and two clamps. The PO (as explained above) put a T after the holding tank and a non sanitation grade whale gusher pump that pulled from the holding tank overboard. I never used the overboard option. Glad I didn't knowing what I now know about the pump.

Last week I replaced the two head related THs (following "marinehowto")and added back the overboard option. However, I chose to have a Y valve before the holding tank to divert directly overboard (when legal) from the head pump. So, I put the vented loop for the waste hose back in. I also read that the authorities don't favor this set up because of ease of chosing over according to one explanation. To me the Y before or after the holding tank seems to be about the same challenge and is more about responsibility. Another issue was space and frustration with more hose bending with the Y or T after the HT. Is the Y before the tank going to great any problems I'm not foreseeing?

pics of new plates prior to seacock install, and a glimpse of new set up during hose wrestling, and what i replaced.

IMG_3792.jpegIMG_3803.jpegIMG_3508.jpegIMG_3511.jpeg


Incidentally, the discussion on paddlewheels on the other thread has caused me some pause because last week I also put in a new Signet paddle wheel knot log and depth sounder to replace the olds ones original to the boat, I suspect. I did this because I wanted to replace the four 45-year old plywood backing plates that I didn't trust, and I had mangle the instruments in the process. One the one hand, I questioned why bother with a new paddle wheel when I look at my phone for speed readings, But on the other hand I didn't want to undertake filling a TH hole, or forget about the dummy plug sitting there into the future. So I just replaced it. This Signet unit seems very beefy to me and unlikely to fail.

Incidentally, if anyone is looking for backing plates this guy makes great ones among other stuff if you don't want to take time to make them yourself. He drills and taps to fit groco flanged seacocks and with my signet pieces, he made them custom.

original signet paddle wheel. New backing plate and new paddle wheel thru hull

IMG_3699.jpegIMG_3796.jpeg
 
Top