Olson 34 Main Outhaul replacement

sjconnor

Simon Connor
The line connecting to my wire inside my boom for my main outhaul is very old and frayed and needs replacing.

Anyone done this before ? how to access the inside system ? I imagine the line would have been spliced to the wire and difficult to only replace the line.

Really looking for some tips on the process/method to replace please.

Many thanks,
Simon.
 

Loren Beach

O34 - Portland, OR
Senior Moderator
Blogs Author
The line connecting to my wire inside my boom for my main outhaul is very old and frayed and needs replacing.

Anyone done this before ? how to access the inside system ? I imagine the line would have been spliced to the wire and difficult to only replace the line.
Really looking for some tips on the process/method to replace please.
Many thanks,
Simon.

Hi Simon,
Not too long after we acquired our Olson, I had to take the boom off to repair (weld and reinforce) a broken vang attachment. Usual problems with the ss screws marrying into the aluminum castings on both ends; some swearing was involved. :mad:

IIRC there is a 4 to 1 tackle inside with the fixed end tied to a thru bolt up nearer the gooseneck. The wire is attached to the block set. It's been a long time and I'm not sure of the details anymore. Our "yacht braid" tail is still doing fine, if that's the line you are referring to. Once you get inside, you might want to replace the old tackle blocks with some small ball-bearing ones like the Harken designs.

There has been some good advice here over the years about what to soak the screws with to loosen them. Ericsons of the same era seem to have a more robust slider where the clew is shackled on, and ours came with a bronze slug. OTOH, ours might not be stock.

When you get further into it, please do post up some pix.
:nerd:

Regards,
Loren
 
Last edited:

Frank Langer

1984 Ericson 30+, Nanaimo, BC
Hi Simon,

I replaced this frayed wire on our E30+ last year, and Loren is right that it's not a tough job. As I recall, I removed the bolt that goes through the boom just aft of the mast/gooseneck. Inside the boom is a 4 - 1 tackle arrangement. I was able to pull it towards the stern end of the boom by pulling on the frayed wire until the blocks came into view. I cut off the frayed wire, measured the length and bought a replacement "high tech low stretch" line at the chandlery. The sheave at the aft end of the boom that held the wire was quite narrow, so if I recall correctly I bought 3/16" line which fit nicely and had lots of strength. I tied it to the block where the wire had been using a bowline (my favourite knot) and then repositioned the block and tackle arrangement and the bolt through the mast. The whole job took under an hour and it has worked fine since then with no sign of wear on the outhaul line, and best of all, no more frayed wire!

Frank
 

sjconnor

Simon Connor
Loren, Frank, Christian - many thanks for your replies. I shall take some photos of my setup. Probably won't be able to start the job for a month or so as there's way too much good sailing and racing to be had before the wind dies out :)

The wire appears to be fine, it's only the rope (yacht braid according to Loren). I wonder whether that would typically be spliced to the wire and therefore may have to replace the whole system. More will be revealed when I get a close-up of the system.

Best regards,
Simon.
 

Slick470

Member III
I re-worked the outhaul on my Olson 911 a couple years ago. A few of the lines within the boom had gotten twisted so I decided to open things up and see if I could re run them cleanly. I also needed to remove the vang attachment and get it re-welded as it had a crack.

I chose to take off the gooseneck end fitting. Once the end was off I was able to see how everything was run within the boom and sort it all out pretty easily.

I remember there being a need for a wire coat hanger, a electricians fish tape, and some futzing with things to get them lined up properly. It also helped to run messenger lines for the reefing lines and keep them as tight as possible so they didn't get in the way.

It was surprising how much gunk had collected in the boom, from just dirt to remnants of birds nests and mud dauber nests. It was a good opportunity to clean things out.
 

Rocinante33

Contributing Partner
My boom, like Loren's, had a 3, or maybe a 4 to one tackle. I have since added more purchase by changing the single block to a double and the double to a triple.

Anyway, here is how the original was set up;

Inside the boom about a foot and a half behind the gooseneck, there is an eye strap. I could barely get my hand in there but many guys probably cannot. The eye strap is pop riveted to the wall of the boom with the looped end of a short cable pennant under it.the pennant is maybe 1 1/2' long. The aft end of the pennant has another loop which was attached to a single block with a becket. The double braid line attaches to the becket then is led aft around another block (a double) back forward to the first block and around back to the double block. Finally around that, the tail leads back forward to the exit block which is only 1-2 feet behind the gooseneck. The "yacht braid" doesn't directly attach to the cables. Then another long cable attaches to the tail of the double block and goes aft and exits the aft end of the boom around the exit block there.

So the action of the two blocks, which are floating in the boom and only attached to lines & cables, pulls the cable which tensions the clew. Viola! Outhauls.

Clear as mud, right?:rolleyes:
 

sjconnor

Simon Connor
There's certainly some great information in the replies and the embedded threads, many thanks and I shall let you know how it goes.
 

sjconnor

Simon Connor
My boom is slightly different, looks like I don't have the screws that you guys have. It looks like I have 3 rivets holding the end piece on and possibly those other two rivets holding the system in place inside the boom. Only one way to find out I guess I'll drill out those 3 rivets nearest the mast first and have a look inside.

FullSizeRender (13).jpgFullSizeRender (14).jpgFullSizeRender (15).jpg
 

Loren Beach

O34 - Portland, OR
Senior Moderator
Blogs Author
My boom is slightly different, looks like I don't have the screws that you guys have. It looks like I have 3 rivets holding the end piece on and possibly those other two rivets holding the system in place inside the boom. Only one way to find out I guess I'll drill out those 3 rivets nearest the mast first and have a look inside.

View attachment 16236View attachment 16237View attachment 16238

Hi Simon,
Do you know if your boat was rigged out here or after delivery to your home region? I am wondering because I recall that the Seattle dealer bringing those lovely Choy Lee Ray Richards-designed Offshore 41 models in the late 70's was having the spars and rigging done locally.

Your spar section looks robust - more so than our Kenyon section, FWIW.

Loren
 

Christian Williams

E381 - Los Angeles
Senior Moderator
Blogs Author
Take the boom home, if possible. There will be drilling and banging and cleaning and maybe painting, and it's easier on a bench than in a cockpit.
 

sjconnor

Simon Connor
Hi Loren - the hull would have been shipped out to Singapore and commissioned here locally.

Hi Christian - thanks for the advice, homes here in Singapore are generally small apartments (like mine), however I'll take the boom ashore and do it at the yacht club. (www.csc.org.sg)
 

sjconnor

Simon Connor
Well thanks to the advice from this forum I had the confidence to tackle this job and managed to complete it surprisingly quickly.

I used a halyard on each end of the boom to lower it onto the pontoon after releasing everything and had some help carrying it up the ramp to the end of the jetty (in photo) where I worked on it for 3 hours.

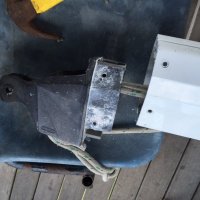
I used my cordless drill to drill off the heads of the 5 rivets keeping the end piece on and a hammer and alum key to knock through the rivets which proved stubborn.

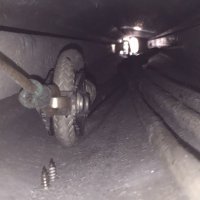
At the aft end of the boom, the outhaul was using wire and was connected round an eye-peice. This proved too large to fit through the gap in the block and so hammered it out of shape until it did. That also made the decision to replace it with rope much easier.

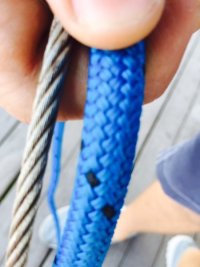
Tied some twine to the end of the wire and pulled out the block system and wire out of the bow end of the boom. Looked at the blocks, seemed alright, gave a squirt with drylube. Replaced the line that I needed to replace and replaced the wire with some spectra line I had lying around.

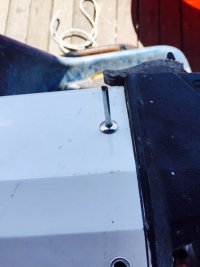
Carefully ensure lines weren't twisted, and pulled the system back in using the twine at the aft end of the boom. Then cleaned up the end piece with a bit of sandpaper, sprayed with dry lube and re-assembled, then riveted it back on.

Once done, lugged it all over the shoulder down the ramp and back onto the boat for re-assembly.

Job Done.

Attached pics, hope you like the one of the "temporary workshop" at the end of the jetty - nice and shaded with a good 10 Knot breeze.

Thanks everyone for the advice - it was very helpful.
 

Attachments

  • IMG_4026.jpg
    IMG_4026.jpg
    55 KB · Views: 64
  • IMG_4033.jpg
    IMG_4033.jpg
    37.8 KB · Views: 104
  • FullSizeRender (16).jpg
    FullSizeRender (16).jpg
    146.9 KB · Views: 47
  • FullSizeRender (17).jpg
    FullSizeRender (17).jpg
    38 KB · Views: 61
  • FullSizeRender (18).jpg
    FullSizeRender (18).jpg
    31.1 KB · Views: 61
Top