• Untitled Document

    Join us on April 26th, 7pm EST

    for the CBEC Virtual Meeting

    All EYO members and followers are welcome to join the fun and get to know the guest speaker!

    See the link below for login credentials and join us!

    April Meeting Info

    (dismiss this notice by hitting 'X', upper right)

Hull to deck joint leak ?

Sven

Seglare
[also posted to the sailnet Ericson list]

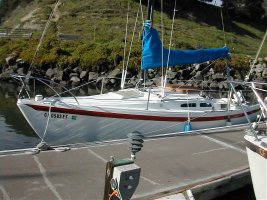
Another great weekend of sailing La Petite but also a recurring water mystery.

We sailed down to King Harbor from Marina Del Rey, and then back to MDR, making for a wonderful 5+/- hours of first peaceful, then rail-in-the-water sailing.

Once again, we ended up with water in the bilge and under the bunks ... not good. Last weekend we attacked the starboard stanchion bases and rebedded them but we had not yet gotten to the port ones. It is my hope that having just done the port one will take care of the problem, but what if it doesn't ?

How does one re-seal a hull to deck joint if that's where the water is coming in ? Are the E23 deck joints known to be solid or a problem ? Are they glassed on the inside or just bolted or ... ?

Any insights would be appreciated.

Thanks,


-Sven
 

u079721

Contributing Partner
I can't speak to the construction method on your boat. I know that with the E-38 the joint is glassed over, and it says in the manual that if you have a leak, it is extremely unlikely that it comes from the joint, so look elsewhere.

Seems like you need to do some major detective work first to find the source (unless you are in the mood to re-bed EVERYTHING).

Here is what sounds like a neat trick, though I have not tried it myself. It involves closing off every hole in the boat, by taping over lazerette hatches, dorades, engine vents, you name it. You then pressurize the boat cabin with the exhaust of a shop vac, which is the tricky part. It's tricky, because you will have to fabricate some type of temporary hatch board or entry point for the vac hose. Finally you soap down the entire deck and joint area, looking for any soapy bubbles that may be formed.

This certainly IS a lot of work, but is probably easier than having to re-bed every fitting on the boat.

Anyway, good luck!
 

Mark F

Contributing Partner
Blogs Author
Hi Sven,

My E23 Mk1 leaked like a sieve thought the bolts that hold the rub rail on the boat. There are lots of them. I tried sealing from inside with Boat Life and/or silicone but it didn't work. My solution was pretty drastic but it worked and made me happy. I removed the rub rail (get someone to help as you have to crawl back under the cockpit seats and with a bolt every 8" or so it takes a LONG time alone) of which the rubber was in bad shape and would have cost 100's of dollars to replace. Next I belt sanded the hull/deck joint so it looked even. Left is a gap running the full length of the boat with holes where the rub rail bolts were. I then filled the gap and holes with epoxy filler, making sure the filler oozed through the holes to the inside of the boat, sanded and painted. Of course my 1968 E23 is not pure any more but the thought of sealing all of those bolts, spending the money on the rub rail and then having the regular maintenance of rebedding those hard to get to bolts... My bilge is dusty now and the vee birth cushions are dry! Here's a photo.
 

Attachments

  • e23.jpg
    e23.jpg
    117.4 KB · Views: 1,036

Sven

Seglare
Hi Mark,

Originally posted by Mark F
Hi Sven,

...
holes where the rub rail bolts were. I then filled the gap and holes with epoxy filler, making sure the filler oozed through the holes to the inside of the boat, sanded and painted. Of course my 1968 E23 is not pure any more but the thought of sealing all of those bolts, spending the money on the rub rail and then having the regular maintenance of rebedding those hard to get to bolts... My bilge is dusty now and the vee birth cushions are dry! Here's a photo.

Nice looking E23 !

One question that comes to mind is if those bolts may be structural ? IOW, if you longer have the bolts, can you be sure the deck won't separate from the hull ?

Another question; how did you determine that it was the bolts that leaked ? Can you see the bolts on the MK-I without removing panels ?

I like u079721's suggestion about pressurizing the interior. On the 23 there isn't that much that needs to be sealed so it might be rather easy. The alternative would seem to be to find a way to winch the boat over onto a heel while holding it next to the dock with forward and aft lines. A shop vac would introduce a lot fewer logistics problems.


-Sven
 

Mark F

Contributing Partner
Blogs Author
Hey Sven,

The bolts are not structural, other than holding the rub rail on. They might even make the joint weaker. As I understand the deck to hull connection, both pieces were formed with an external flange. They bolted the two together on the outside of the boat, glassed the interior then cut off the external flanges bolts and all. The rough edges of the hull and deck flanges were then covered with the rub rail. If they did not install the rub rail there would not have been holes going through the glassed interior. Of course you wouldn't have a rub rail either. I did have to remove the panels on my boat to see the leaks. Mine would also leak when it rained. If you take the panels off you should be able to check for leaks at the joint with a hose. Sure was a good feeling fixing that leak as it was pretty bad.

Mark
 

Sailsteve

Member
Another source of water in bilge

You should also check out your bilge pump. If you have an electric pump as I do on my E-36, on starboard tack the pumpout hole is below the water line... a reverse siphon goes into effect and the bilge fills up with a great deal of water. I've installed a vented loop on my bilge pump out hose. It fixed it all. I still also have leaks along the rub rail, but the main source of water was the reverse siphon,
 

Commotion

Member II
Hull to Deck Joint E-35-2

i am re-working my rub rail and do not plan to use the bolts. I plained down the outside flange and will cap it with a 1.6" X 5/8" teak cap. No extrusion or vinyl insert. Any experience out there on this? I know I will have to keep the teak up, but, I think it will be beautiful! The vinyl seems to always oxidize and leave white streaks on a dark hull.
 

Sailsteve

Member
Please take pictures...

Hi, I would be interested to see what you are doing with your rub-rail replacement. Can you take photos and post them here? I need to do it myself. Do you think that grinding down the hull to deck joint lip will in some way weaken the boat?

Please keep me posted.

Thanks,

Steve
 

Loren Beach

O34 - Portland, OR
Senior Moderator
Blogs Author
Hi, I would be interested to see what you are doing with your rub-rail replacement. Can you take photos and post them here? I need to do it myself. Do you think that grinding down the hull to deck joint lip will in some way weaken the boat?

Nope. That point is heavily glassed over on the inside before the outside flanges were cut off and the trim strip went on over the edges remaining. The little remaining "lip" contributes no strength.

I have even seen one 80's E-34 with the whole "rub rail" eliminated and the outside area covered with cloth and faired in all the way around. Then they painted the hull with LPU (original off white shade).
I recall looking at that boat for several minutes, being sure from the general design and window placement that it had to be an Ericson while still not being 100% sure...
:cool:
The slick paint was flawless, and there was no way to tell that the original alum. rub rail had ever been there.


LB
 

Commotion

Member II
Deck Joint Photo of another Ericson (not mine) that was cut up

This is not my Ericson, but, I thought they would be a good example of a deck joint.
 

Attachments

  • IMG00180-20110208-0845.jpg
    IMG00180-20110208-0845.jpg
    103.9 KB · Views: 1,109

adam

Member III
I had a leak in my '73 Ericson 29 which caused my galley to be always damp. It took 6 months of pulling things out and resealing them, before I finally found the major culprit...

The hull deck joint.

I pulled off the rub rail, and filled in any gaps and screw holes the entire with 4200. That seemed to completely fix the problem.
 

Commotion

Member II
Attached is a photo of the teak rub (no rub please) rail.

AAATeak Rub Rail.jpg

This is before the final finish and before Teak Deck Systems caulk on the channel in the teak.
 

Loren Beach

O34 - Portland, OR
Senior Moderator
Blogs Author
Kudos!

Oh Wow! That's gorgeous.
That rudder looks like an upgrade, too.

If you have a good resolution copy, you might want to forward it to Sean to add to the splash page rotation for the site.
:egrin:

Matter of fact, I would like a large size one to add to the rotation on my own Mac.
(Jus' Love them shiny Ericsons on a 27" monitor!) :nerd:

Happy Holidays,
Loren
 

Commotion

Member II
Higher Res Photos (Med)

Thank you Loren,

I am pleased and at the same time, humbled that you noticed or would use a photo of mine on any splash screen. You are correct, this is a new Foss Rudder that is slightly modified, not in the shape, just the construction.

Attached are lightly compressed full size images. If you want the raw files, I think they are around 2 meg and would be happy to send them to anyone that wants them.

Also built a Vesconite bushing "system" for the rudder... nice and tight, yet, smooth. I have done a lot of little upgrades to her, with a lot left to go. Sometimes, I think I should change her name to Over-Keel. The mast is not on yet and I have a lot of hardware left to install, but, I am starting to see where she will sail again. I am absolutely CRAZY about Ericson's. I am still learning to live with this disease!

DSC04499 Med Res.jpg DSC04494 Med Res.jpg
 

Commotion

Member II
Higher Res Photos...

Loren,

I am not sure, but, I think the upload feature here restricts the resolution. If you give me an e-mail or please tell me where to send them, otherwise, I will look around here to see if there is another way. Rick
 

Loren Beach

O34 - Portland, OR
Senior Moderator
Blogs Author
Having Res-ervations about the Res-olution...

Loren,

I am not sure, but, I think the upload feature here restricts the resolution. If you give me an e-mail or please tell me where to send them, otherwise, I will look around here to see if there is another way. Rick

You are right about the U/L feature restricting the rez and the "size" of the pictures. The database would become too bulked up with zeros and ones otherwise!
Actually, I was just hinting for the higher resolution ones to be sent directly to Sean, and maybe even to me....
:rolleyes:

You can email me directly at sailaway10 (at) comcast (dot) net. If you wish to do that, I can pass any along higher resolution pics to Sean that you think might be good for the splash screen rotation.

Happy Holidays,
Loren
 
Last edited:

Sailsteve

Member
Inspring!

I'm inspired by two things here, first the beautiful work done on the red boat and second Loren's 27" monitor.

The big question facing me is that when I finally grind down my existing hull to deck flange and seal it up, what do I use to cover it? I would like the rub rail to be as flush to the hull as possible. Has anyone purchased an off the shelf low profile rubrail product that would cover the hull to deck joint width? If so I would appreciate any information about the product and the install process.

Thanks,

Steve

Ericson 36RH
Glory Days
 

davisr

Member III
Are rub rails really necessary?

Seeing Mark's pictures of his E23 has raised a question in my mind: are rub rails really that necessary, or do they serve more as pieces of trim, sort of like transitional pieces of trim work on the exterior of a house? I must admit that Commotion's teak rubrails are very attractive, but it seems that they are more decorative than functional. Instead of paying hundreds of dollars for new rubs rails, Mark simply eliminated them completely. It seems that this has served him well and has not resulted in damage to his hull. Fenders have done all the mean and dirty work.

I ask all this because I have put off the replacement of my rub rails as long as possible, just because I have more pressing projects that deserve the $300+ bucks that this project would require.

Thanks,
Roscoe

Here are some more relevant pictures:

http://www.ericsonyachts.org/infoexchange/showthread.php?9365-E25-rub-rail-and-hull-to-deck-joint
 

Commotion

Member II
Grinding on the deck to hull joint...

I think it is better to use a power plainer. I bought an inexpensive one at harbor freight. Hot glued tongue depressers a little wider than the joint to help control the depth and not destroy the hull. You get a even surface. I kept 1/8" height on the deck flandge and 1/8" step on the teak rail so I would have a nice caulk groove. There are many options on new rub rail. You can even plain the base extrusion (hull side) and put new vinyl insert in it. That was what I was planning on doing, before I decided to go with teak. I did not care for the oversized rub rail either. You can get rub rail easy enough at Taco or the OEM stuff at Waco (Sp? on both of those names. I also have my and base extrusions available for half of what new would cost, in Ventura, CA. I hope this helps. Let me know if you need any details. Good luck!
 
Top