• Untitled Document

    Join us on April 26th, 7pm EST

    for the CBEC Virtual Meeting

    All EYO members and followers are welcome to join the fun and get to know the guest speaker!

    See the link below for login credentials and join us!

    April Meeting Info

    (dismiss this notice by hitting 'X', upper right)

1970 E32 Annapolis MD area

RogerK

Junior Member
Can I make an appointment to see her?

If Vivant is still available I would like to come see her.

Last Sunday the stem fitting strap holding the furler to the deck on my 1971 Ericson 35 fractured causing the mast to come down with lots of damage to the chainplates and the mast.
Giving Vivant a good home might be a more practical option than trying to repair the many grievous wounds in my wonderful old boat.

Roger Kaufman
703-893-0840

1970 E32 hull number 165. Good running Atomic 4, many extras. Best offer. We have to give up the boat. Hate to see it go. Will donate it if no one wants it. Located on South River at a private dock in Riva, MD
Ray Stevens
Phone 301-513-7293 Link to Vivant web site :http://chimayohomeneedsnewowner.wor...-32-1970-hull-165-vivant-ready-for-new-owner/
 

Macgyro

Amazingly Still Afloat
Blogs Author
Vivant is sold

Sorry Roger,

I recently purchased Vivant from Ray and I'm scouring the internet looking for Ericson info. I'm sorry to hear about your 35, I hope it can be repaired.

I do have an Islander 26 for sale now. It has a 10' beam and would be cheaper than repairing the 35, but it's probably much shorter than you're looking for.

Best Wishes!
Dean
 

e32stx

Member II
sorry to hear you bought viv

That boat hasn't been out of the water for 20 years dude.:0
Rotted cockpit
Soft spots on deck
Rotted bulkheads
Rusted out engine beds
And that was just poking around for 10 min.
U have ur work cut out for u.
10k later and 2 or 3 years down the road she might be worth 8...
Fools Rush In
I can say that because im guilty of doing the same.
The one thing u have going for u is that at least everything is there.

Good luck
Ollie
 

e32stx

Member II
Macgyro
Please keep us updated as to ur progress.
Take lots of pics during haul out. I'm curious as to what condition her bottom is in.

Cheers
Ollie
 

tenders

Innocent Bystander
For what it's worth, I've replaced all of those things on my 69 E32 over the years and much more.

Point is, if the acquisition price is right, you're a little bit mechanically inclined (and I mean this: just a little bit), and you have the time or can find it over a few seasons, you can get that boat in shape for a few grand yourself and it will sail as well as it did the day it was made. If you don't have those things, that may not be the boat for you for the long run, but you'll find that out. Worst-case scenario: you've probably already made worse financial decisions, and plenty of people make even worse ones on $150K++ boats that they don't use and have to get rid of.

The cockpit deck core rot took about 25 hours of time and cost $700 including tools. First time on this kind of work.
The cockpit coaming board replacement (with Starboard) cost a little less and probably took less time.
I've replaced two soft deck spots, which took about the same amount of time and cost $300 (already had the tools from the cockpit job).
I've patched, not replaced, two bulkheads with G10, and had a pro do another with marine plywood - my jobs cost 10% of what the pro charged and look 60% as good (didn't install a top wood laminate yet, might never).
I had a pro replace my Atomic Four engine beds a long time ago as part of a rebuild. This isn't rocket science either, but I would recommend finding a pro, as it's quite difficult to redo if you make a mistake.

I also had a boat partner, who was an enormous help.
 

Macgyro

Amazingly Still Afloat
Blogs Author
Thanks for the advice

I was just getting ready to message you guys about my upcoming projects. Here's the list and the first update. Maybe I should start a new thread....

Replaced leaking fuel tank with a moeller plastic tank. As soon as I put gas in the original tank to run the engine off the installed tank, it started dripping from the bottom.:esad:

Resealed 1 window with Butyl tape after cleaning out the grey goop.

Hauled it and had a "post-purchase" survey done. Yeah, I know......

Put a coat of micron extra bottom paint on to get through the "rebuilding" phase.

I've repaired soft spots and rebedded deck hardware on a 23' before, but not looking forward to the scale on this one.

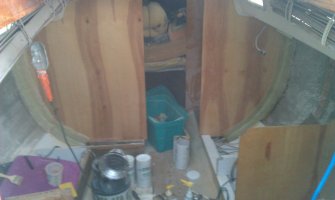
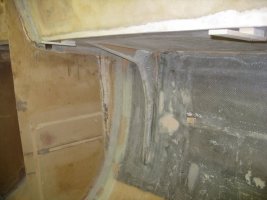
The surveyor pointed out that the bulkhead/chainplate repair wasn't done properly, so I'll be utilizing info from Tender's repair to replace at least half of the bulkhead. :esad: Given enough time, I'll be doing almost all of these projects myself.

I will ask lots of questions and seek advice from anyone willing to give it.

Here's my plan of action:
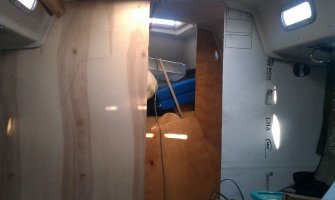
Winter: Seal windows and deck hardware, remove trim from around bulkhead, remove affected chainplates, cut away 1/2 of port bulkhead, fashion replacement half-bulkhead, also cut out small section of starboard bulkhead and repair.

Spring: Install replacement half-bulkhead with lots of fiberglass tabbing and securing it to existing bulkhead, replace chainplates.

Summer: sail with soft decks

Next year: replace coring material in soft spots on deck. look into engine mount problems.

Questions:
Tender, How is your "small" chainplate bulkhead repair holding up (where you replaced the rotted wood with the horizontal section (maybe 4"X12"))?
Also, how is the larger 1/2 bulkhead repair holding up?

Is there a way to drill holes in the interior headliner to allow the soft spots to breath? Maybe help keep the rot from spreading?

Thanks for the help! This is a bit larger of a project than I anticipated, and yes, I jumped in a little too aggressively, but how else would I ever learn how to replace a bulkhead, right?
 

Christian Williams

E381 - Los Angeles
Senior Moderator
Blogs Author
Maybe I should start a new thread....

Since you're rebuilding the boat, I suggest starting a blog. A blog puts your projects in one place. It also gives you room to discuss all aspects of the project without wandering off the narrow topic of a thread, is often a big help to the next guy setting out on a similar job, and produces a personal log, with pictures, that you wouldn't have otherwise.

Cheers,
Christian
 

tenders

Innocent Bystander
The blog (I think Christian means the blog feature on this site) is a good idea.

I think you're going to get through these repairs just fine. You sound like you have the right attitude and know more than enough to make it happen

To answer your question, I don't sail my boat particularly hard but I have had her heeled 40 degrees and all the bulkhead repairs look as good as they did the day they were done. The secret to my satisfaction on the repair is that I used a G10 "backing plate" on the bolts holding in the chainplate. The "backing plate" extends well below the original chainplates so that the chainplate is in effect bolted through the repaired area AND the original bulkhead below the repair, and is held in place by that slab of m&#*@! strong G10. For the repair to fail, the original bulkhead has to fail too, and I just don't think that's gonna happen.

To be clear, no parts of my repairs involved half a bulkhead.

In my opinion, attempting to drill holes to let wet core "breathe" is a noble but futile effort. It took many years for the moisture to wick its way into the balsa, and probably many more years for it to actually rot - no amount of breathing is going to get the water out of there. This type of construction was designed to fight capillary action on the way in and you'll have to fight it on the way out too: not gonna happen with a couple/dozen/hundred little holes. You'll see when you peel back the upper layer of fiberglass: a lot of that balsa will be surprisingly sound despite the sponginess of the deck and the wetness.

If you're in the greater NYC area you're welcome to have a look.
 
Last edited:

PDX

Member III
With Ericsons of that vintage, soft decks do not necessarily indicate moisture intrusion. The deck layup was light and the use of resin in the balsa was, well, parsimonious. A dry layup will also cause soft spots. So if moisture is all you're worried about, suggest going over the deck with a moisture meter.

Soft spots, whether wet or dry, will eventually lead to deterioration of the deck's top layer. If its primarily short run you're concerned with, a wet deck is a worse problem than a dry layup. And yes, agree with the previous post in that waiting for it to dry out would be a waste of time. And even if it does, the dried out balsa would be essentially mush and worthless as a sandwich layer.
 

Macgyro

Amazingly Still Afloat
Blogs Author
1970 Ericson repairs help

Thanks, lots of valuable information. The surveyor did use a moisture tester and found moisture in most of the soft spots on the deck. Luckily, none around the mast step. After measuring the bulkhead, .com pretty confident that that I can replace the entire bulkhead and still get it through the door. I think I will also add the extra brace for the mast while I'm at it. I'm pretty sure almost all of the windows leak, and it took me about an hour to remove and reseal my first test window.

Since this will be slightly different than previous posts, I will take lots of photos, and accept all the advice and criticism anyone has to offer.

Tender, I get up into the EWR JFK area regularly, so I may stop by sometime if it's convenient.

Relaunching Monday, not putting up the sails till she's fixed.
 

e32stx

Member II
Do Don't cut out that bulkhead!

U will NOT be able to install it in one piece w/o taking apart ur settees (yes port and stbd) and U'll have to pull the adjacent bulkhead to get it to clear.... ask me how I know. Oh yeah, removing the compression post with the stick up will not end well...
It's much easier and cheaper to simply cut out the bad and scarf in a new piece. The repair will be stronger than one piece of MP. Afterwards, paint it or layup a veneer.

1. Start by cutting out that bad repair done with woven roving.
When u have a new piece cut to fit with endgrain coated with neat epoxy (for waterproofing), fit it into place and screw it together from the salon side w/a scrap pice of ply. Then simply slap a 32 grit disk on the grinder and put a healthy bevel (from inside the head) across the joint sanding down about half the thickness of the ply at the joint and feathering it out 6" to 8" either side of the join.
Then coat the beveled area w/epoxy and begin laying up ur wetted out 1708 bi-axial glass (start w/largest piece 1st covering the entire bevel then work ur way down in 1" increments w/smaller pieces).
When u think u have enough layers of glass up to make the repair near flush (5to7layers) let it set up and trowl on some epoxy mixed w/fairing filler to smooth it out.
Let it cure, sand it all nice and flat.
Remove screws and ply from salon side and repeat on other side of bulk head.
This method is tried n true and the best part is u don't have to tear apart the boat to do it... only contain dust and epoxy :)

Cheers
Ollie
 

Attachments

  • IMAG0457.jpg
    IMAG0457.jpg
    48.4 KB · Views: 95
  • IMAG0416.jpg
    IMAG0416.jpg
    47.1 KB · Views: 87
Last edited:

e32stx

Member II
Oh yeah... and don't forget the other rotted bulkhead. May as well knock em all out at the same time.

How bad is the damage at the rudder post?
I nearly put my foot through the cockpit at the tiller handle head.
 

PDX

Member III
You can also do a half lap joint instead of a bevel. I'm not familiar with where your rotted part is, or how accessible it is, but if you can get a straight line cut on the existing bulkhead you can then use a small router to route a half lap about 1 1/2 to 2 inches and slightly more than half the plywood thickness. Then do the same on the replacement piece oversized by the lap. This is much easier to hold in place than a bevel--I didn't even need to use screws.


IMG_7631.jpg

Also, you don't need to use as many layers with 1708 as other types of cloth, but it soaks up a lot of epoxy and I have had it dry out before it cured. You can also use 10 oz cloth or 17/18 oz biax without mat. Whatever cloth you use, if you are using epoxy I would thicken it with cabosil.
 

Attachments

  • IMG_7630.jpg
    IMG_7630.jpg
    77.9 KB · Views: 365

e32stx

Member II
Imo the half lap should not be used to repair Any major load bearing structure like a bulk head (chain plate mounted at repair). Totally ill suited for the job. Now if u wanna make some doors n drawers... by all means, works great for that. Slapping a bunch of glass over a lap doesn't make for a flat hidden repair either. U would be better off using biscuit joints.
Not trying to bash here. Just giving u the facts.
You don't have to take my word for it. Do some research and then cross reference that. Like the new, good ol saying goes "Don't just believe anything you read on the intenet". Because some people will just post anything.

PDX
Your wetout kicked dry Because u were using cabosil (er too much anyway).

Ollie
 

PDX

Member III
You're entitled to your opinion and I don't want to get into a pissing match here, although you're making it difficult. I think a little tact might be in order on your part, both in your response to me and in your response to the original poster. We don't need this forum to turn into another Sailing Anarchy.
 

Christian Williams

E381 - Los Angeles
Senior Moderator
Blogs Author
Imo the half lap should not be used to repair Any major load bearing structure like a bulk head (chain plate mounted at repair). Totally ill suited for the job. Now if u wanna make some doors n drawers... by all means, works great for that. Slapping a bunch of glass over a lap doesn't make for a flat hidden repair either. U would be better off using biscuit joints.

Would you mind using all the letters in words? It takes a bit more time to type, but is a much appreciated courtesy on a technical and social forum like this one.

Cheers,
Christian
 

Loren Beach

O34 - Portland, OR
Senior Moderator
Blogs Author
Gettin' a wee bit off topic here

You're entitled to your opinion and I don't want to get into a pissing match here, although you're making it difficult. I think a little tact might be in order on your part, both in your response to me and in your response to the original poster. We don't need this forum to turn into another Sailing Anarchy.

Agree.
As for the underlying engineering assertions, suspect strongly that a number of different methods can succeed -- and that some are easier to carry out than others. If there were a sliding scale of strength with a butt joint on one end and a text book 12 to 1 scarf on the other, I suspect that the actual test-to-destruction strength would still be heavily-dependant on the application method used and the correct bonding agent.

And, for this thread diversion, please stop.
New thread is called for in a more appropriate forum.

That is all. Carry on.
Thank you.

Loren
 

e32stx

Member II
My bad :)
I was just trying to look out for the original poster's best interest n got a little carried away. I inspected the boat a while ago.

Ollie
 

Macgyro

Amazingly Still Afloat
Blogs Author
Haven't figured out the best method yet, but still lookng

Thanks for the replies and info. Since I'm unsure of the best method of joining the two pieces of bulkhead together, I enjoy a little debate as to the best method. I'm a little unsure of how the bevel method actually works, but I would imagine that the surface area of the fiberglass cloth makes up for the lack of surface contact between the two pieces of wood. If I'm thinking of this correctly, the bevel would reduce the 3/4" of contact in a butt joint to approx 1/2", and make up for the difference with three layers of cloth attached to 6"+ on either side of the joint.

A lap joint would reduce the thickness of each member being joined to 3/8", but result in more surface contact between the two layers of wood and a total thickness of 3/4". The fiberglass cloth would bump up with this method.

The method I was favoring was going to be a simple scarf joint with maybe 4" of overlap, the problem I have is I don't have the proper tools to make this joint properly. I have a table saw, but I wouldn't be able to get it onto the existing bulkhead, and a handheld circular saw would not stay true enough for a solid joint.

Overall, I think I'm favoring the bevel. I like fiberglass, and with enough coverage, I think I can make a strong joint that will resist both the twisting force on the hull as well as the pulling forces from the chainplate.

I've started a blog, but here are some photos from yesterday.
20131212_134632.jpg Here is the trim and accessories removed.
20131212_142957.jpgThis is the head area with the head and half wall removed. Boy there are a lot of wires going through that bulkhead. Some weren't even connected to anything. I probably should have labeled as many as I could before I snipped them off.
20131212_134642.jpgLuckily the damage is limited to within a foot or two of the hull. I'm still planning on replacing a good portion of the bulkhead though so the joint isn't under direct loading from the chainplate. Unfortunately, it also extends into the horizontal wood on the settee.
20131212_123330.jpgHere is the forward starboard bulkhead. The wood around the top two bolts fails the tap test and is delaminating. Hopefully this will be a much smaller repair.

Again, thanks for the help and comments about the various methods, I'll be picking up some West System Epoxy once it's on sale or I have a coupon. Unless there is a better, cheaper alternative.

Dean
 
Top