Jeff Asbury
Principal Partner
For the past seven weekends I have been working on removing the 38 year old galvanized steel sheet metal 15 gallon diesel fuel tank and replacing it with a new Moeller 12 gallon plastic tank. All I have left to do is install the fuel gauge, which will be nice because I never had one before.
The process was to first pump out the 11 gallons on old fuel in the tank. I used a Jabsco pump that attaches to a electric drill. The fuel came out fairly fast with this system.
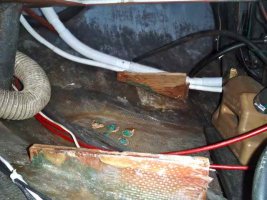
Then I had to use a "saws all" to cut the fiberglass that was securing the tank to the two glassed in plywood supports holding the tank in place.
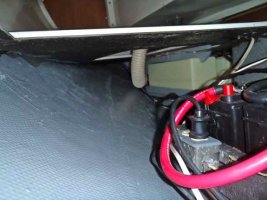
Yes, I was able to get the tank out through the Lazarette in one piece.
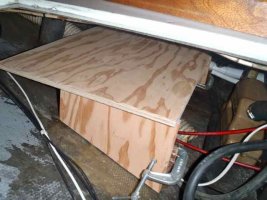
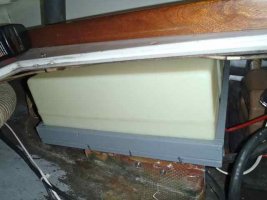
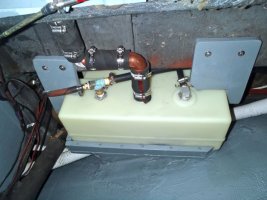
Now for the hard part. Fitting the new tank. I hired my friend and Diesel Mechanic from S&W Diesel to coach me through this process. First he had me build a plywood tray for the tank to sit on. All part's got two coats of West System Epoxy and two coat's of Interlux Bilge Coat. We then attached new 3/4" plywood wedges to the existing glassed in plywood wedge supports. We then had the challenge of supporting the tank from the top. We we're able to bolt plywood brackets to the sides of the inner deck on the port side. The starboard side proved to be a bit more challenging, because we had to attach a support from underneath the deck of the side of the quarter berth.
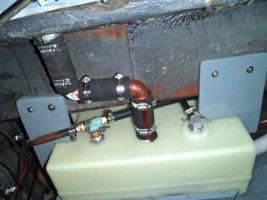
Now for the plumbing. Unfortunately the deck fill did on the new tank did not line up with the old deck fill. Both myself and my Mechanic friend, really did not want to cut another hole in the deck. So we used 1 1/4" copper elbows from the local hardware store and they fit the 1 1/2" marine fuel hose perfectly. I know this will be a slower pour to fill the tank, but the tank only holds 12 gallons, so I am not too worried about it. My little 8 hp Yanmar only guzzles about a quart and a half an hour anyway.
We also replaced pretty much all of the old plumbing. Deck fill, vent, fuel line, return line hoses. The cost of the tank from Worst Marine was $179. with tax. I have not totaled everything up yet, like the new deck fill, fuel gauge, wiring, epoxy, paint, brushes, thinner, copper elbows, nuts, bolts, washers and on and on. This was not at all a fun job, but I will now be able to cruise with some confidence that I will not have a tank that clogs at the pick up line for a while.
Some of you may remember this discussion under Mark A's posting " Fuel Polishing ASAP" earlier in the year, where I address the tank removal process: http://www.ericsonyachts.org/infoexchange/showthread.php?10330-Fuel-Polishing-ASAP/page6
Enough explanation. Check out the photos. I hope this may help anyone else with a E-27 in need of a permanent below deck tank replacement.
The process was to first pump out the 11 gallons on old fuel in the tank. I used a Jabsco pump that attaches to a electric drill. The fuel came out fairly fast with this system.
Then I had to use a "saws all" to cut the fiberglass that was securing the tank to the two glassed in plywood supports holding the tank in place.
Yes, I was able to get the tank out through the Lazarette in one piece.
Now for the hard part. Fitting the new tank. I hired my friend and Diesel Mechanic from S&W Diesel to coach me through this process. First he had me build a plywood tray for the tank to sit on. All part's got two coats of West System Epoxy and two coat's of Interlux Bilge Coat. We then attached new 3/4" plywood wedges to the existing glassed in plywood wedge supports. We then had the challenge of supporting the tank from the top. We we're able to bolt plywood brackets to the sides of the inner deck on the port side. The starboard side proved to be a bit more challenging, because we had to attach a support from underneath the deck of the side of the quarter berth.
Now for the plumbing. Unfortunately the deck fill did on the new tank did not line up with the old deck fill. Both myself and my Mechanic friend, really did not want to cut another hole in the deck. So we used 1 1/4" copper elbows from the local hardware store and they fit the 1 1/2" marine fuel hose perfectly. I know this will be a slower pour to fill the tank, but the tank only holds 12 gallons, so I am not too worried about it. My little 8 hp Yanmar only guzzles about a quart and a half an hour anyway.
We also replaced pretty much all of the old plumbing. Deck fill, vent, fuel line, return line hoses. The cost of the tank from Worst Marine was $179. with tax. I have not totaled everything up yet, like the new deck fill, fuel gauge, wiring, epoxy, paint, brushes, thinner, copper elbows, nuts, bolts, washers and on and on. This was not at all a fun job, but I will now be able to cruise with some confidence that I will not have a tank that clogs at the pick up line for a while.
Some of you may remember this discussion under Mark A's posting " Fuel Polishing ASAP" earlier in the year, where I address the tank removal process: http://www.ericsonyachts.org/infoexchange/showthread.php?10330-Fuel-Polishing-ASAP/page6
Enough explanation. Check out the photos. I hope this may help anyone else with a E-27 in need of a permanent below deck tank replacement.
Attachments
-
 PA200684.jpg29.1 KB · Views: 92
 -
 PA200689.jpg33 KB · Views: 101
 -
 PA300695.jpg23 KB · Views: 102
 -
 PB070712.jpg25.6 KB · Views: 94
 -
 PB070714.jpg25.6 KB · Views: 98

 on how it should be done until my mechanic told me there was going to be only one Foreman on this job. So I shut up, and stuck to following his lead. He has many years of experience, and he was able to see things that I would have never thought of. Nine years ago, he installed the head, holding tank, all plumbing for that as replaced all the thru hull fittings on my boat. Part of why it took so long was I had to work around his schedule. He works about 55 hrs a week for one of the best Diesel shops in the LA Harbor area. I would love to refer him, but I think he's done for a while.