mherrcat
Contributing Partner
I had read about these things a couple of years ago but finally had an opportunity to try them. I am working on refinishing the interior wood trim on my hatches and many of the screws were so corroded that the slots stripped off when I tried to unscrew them. I drilled off the heads but then a bunch of the shanks broke off when I tried to use a Vise-Grip to remove them.
Anyway, I bought these things and they worked pretty well. As the instructions say, you have to work the drill very slowly and use a lot of pressure to get the tool to expand over the screw. (They say a bit brace works better, but I didn't have one.) I still plan to drill out the holes, plug them and redrill, but these things helped get the embedded screws out.
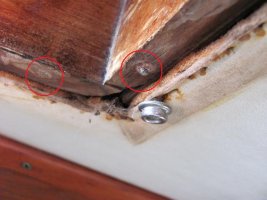
Picture 1: A couple of the broken screws; one with a little shank left and one flush with the wood surface.
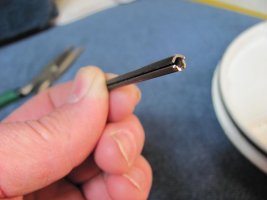
Picture 2: The Unscrew-ums tool. You can see the slot in the side that allows it to expand over the screw.
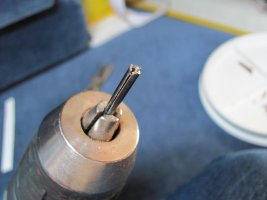
Picture 3: The Unscrew-ums tool in the drill chuck.
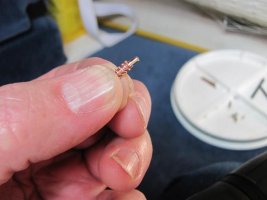
Picture 4: A removed screw showing where the tool cut down over the screw before it grabbed and backed it out.
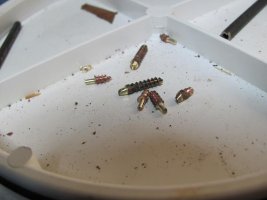
Picture 5: A bunch of removed screws. Some came out quickly and some the tool had to cut down further before they came out.
The only part that was kind of a hassle was when a screw just wouldn't come out and kept breaking off inside the tool. Then you have to insert something into the tool to push the piece out; but it's hard because the tool is really gripping the piece tightly. And since these screws were #6 size the inside diameter of the tool was only 1/16". I used a 1/16" drill bit and a hammer to knock the pieces out, but the bit was almost not long enough.
You can get these at Jamestown Distributors but I bought them directly from T&L Tools:
https://tltools.com/info.aspx
Anyway, I bought these things and they worked pretty well. As the instructions say, you have to work the drill very slowly and use a lot of pressure to get the tool to expand over the screw. (They say a bit brace works better, but I didn't have one.) I still plan to drill out the holes, plug them and redrill, but these things helped get the embedded screws out.
Picture 1: A couple of the broken screws; one with a little shank left and one flush with the wood surface.
Picture 2: The Unscrew-ums tool. You can see the slot in the side that allows it to expand over the screw.
Picture 3: The Unscrew-ums tool in the drill chuck.
Picture 4: A removed screw showing where the tool cut down over the screw before it grabbed and backed it out.
Picture 5: A bunch of removed screws. Some came out quickly and some the tool had to cut down further before they came out.
The only part that was kind of a hassle was when a screw just wouldn't come out and kept breaking off inside the tool. Then you have to insert something into the tool to push the piece out; but it's hard because the tool is really gripping the piece tightly. And since these screws were #6 size the inside diameter of the tool was only 1/16". I used a 1/16" drill bit and a hammer to knock the pieces out, but the bit was almost not long enough.
You can get these at Jamestown Distributors but I bought them directly from T&L Tools:
https://tltools.com/info.aspx
Attachments
-
 Unscrew_1.jpg54.2 KB · Views: 120
 -
 Unscrew_2.jpg34.8 KB · Views: 291
 -
 Unscrew_3.jpg37 KB · Views: 187
 -
 Unscrew_4.jpg40.1 KB · Views: 110
 -
 Unscrew_5.jpg38.6 KB · Views: 111