• Untitled Document

    Join us on April 26th, 7pm EST

    for the CBEC Virtual Meeting

    All EYO members and followers are welcome to join the fun and get to know the guest speaker!

    See the link below for login credentials and join us!

    April Meeting Info

    (dismiss this notice by hitting 'X', upper right)

Thru hulls and ball valves

Jarod

Member III
Hello Folks,

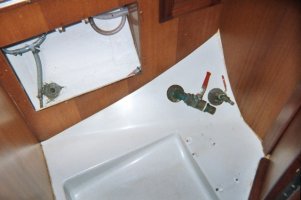
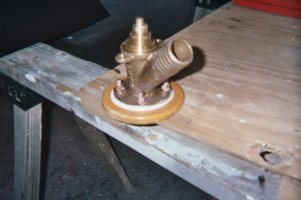
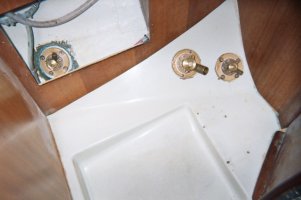
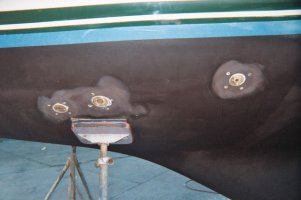
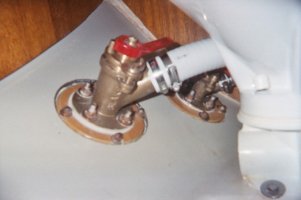
Jarod here, I will be replacing the thru hulls for the head this wkd along with the gate valve for the discharge and the seized ball valve for the inlet. I have the gate valve/thru hull seized on at the moment and i need to get a few things to get it off. While I am out getting tools I was wondering what type of thru hulls are on the boat assuming they are original .....by this I mean are they flush mount or the standard through hull with the slight bump? Also I was planning on using bronze ball valves as replacements is this ok...I wasnt going to spring for the seacocks just a standard ball valve as this is better than what was in there and i have seen many boats with them.

thanks :D
 

evm

Member II
I think I read from your post that you were not using any new gate valves. So I don't need to say "don't use gate valves".

I replaced the original gate valves on my Eriscon with bronze ball valves with stainless balls. I'm not sure that bronze/stainless balls matter too much. What can be a problem is to get brass gate valves rather than bronze.

At the time I was doing my replacement West Marine has a bunch of ball valves that were advertized as bronze but were actually brass. I "think" this was reported in PS.

I used bronze through hulls with the ball valved screwed into them. Here in Vancouver (WA) and in fresh water the demand is less than in hot salty water.

The replacements have been on the boat for 10 years now without failure or leaks or binding.

Not sure this answers your question....

--Ethan
 

NateHanson

Sustaining Member
If you want to know why you shouldn't be using ball valves (as opposed to sea-cocks) on your through hulls, go to www.zmiseminars.com and watch the lecture on through hulls.

Using ball valves is a poor substitute for through hulls. The tapered threads don't match the straight threads on the through hull, and so you get a poor fit, and a fairly precarious joint with only a couple threads engaged.

I'd spend the extra $30 on proper seacocks.
 

Emerald

Moderator
Jarod said:
Hello Folks,

[snip] I wasnt going to spring for the seacocks just a standard ball valve as this is better than what was in there and i have seen many boats with them.

thanks :D


Hi,


I've been watching this discussion silently. All I can say, is DO NOT USE BALL VALVES! I say this with the hands on experience of having the thru-hull break off below the brand new ball valve. Can you say sink your boat?


It is a total false economy to go through the effort to do this work and not use proper modern techniques. The old ball valve on a thru-hull is no longer acceptable in modern boat building. This is something done in the 60's and 70's, and this practice was stopped with good reason (besides leaving room for catastrophic failure, you've got thread issues as already mentioned).


You should be putting new bronze thru-hulls in, new epoxy coated backing pads made from marine grade ply or equivalent material, and proper flanged seacocks. If you have not already found them, check out www.hamiltonmarine.com and www.jamestowndistributors.com for all these parts. Seacocks and thru-hulls from either of these vendors is a fraction of what you will pay from Boat U.S. /West Marine type places. Roughly speaking, a 1 1/4 flanged seacock from them will be about $45-$50 instead of $75-$80. Yes, when you do it all, it adds up, but you will never have to worry when it gets rough, and you will not be beaten up on a sales survey when you decide to sell the boat. You will know that you did the job the right way. Also, you're going to do the same amount of work using the right parts or wrong parts. Might as well use the right parts.


Final thoughts are that you won't know what style thru-hull you need until out of the water. My former E-27 had flush mounted thru-hulls. I am helping a friend on his E-27 that has mushroom thru-hulls.


Also, the intake on the small thru-hulls (engine, head etc) was 1/2 inch originally. The smallest flange seacock you can get is 3/4". It is very simple to enlarge the hole and put the right thing in. I have special ordered flush mounted through hulls that fit the recess of the original 1/2 thru-hulls but have the 3/4" stem. If you need help locating this style, let me know.


On my website I have a write up about reparing a badly damaged seat on a thru-hull, but I also have some general information on the whole process. You might find this link helpful, especially regarding removal technique:


http://home.comcast.net/~ericson-yachts/thull/thull.html


Hope all this is off some help and your repair comes out well.


-David
Independence 31
Emerald
 

Loren Beach

O34 - Portland, OR
Senior Moderator
Blogs Author
Valve Talk...

Dave is right, i.e., use quality valves with a flange that fastens to a backing plate. As mentioned on this site elsewhere, they need to be able to pass a "kick test."
Now, notice the "Search" word above these messges? Click on it and type in "sea cock" or "thru hull" or "gate valve" (or something related) and hit the return key... and note that there is a LOT a good material on this site to read and d/l.
Here is a link to a prior related thread with a great "installed" picture:
http://www.ericsonyachts.org/infoexchange/showthread.php?t=1752&referrerid=28
And another thread with pics of both types of valve:
http://www.ericsonyachts.org/infoexchange/showthread.php?t=1973&referrerid=28

Our new Forespar sea cock valves are epoxied to the backing plates, and they would probably withstand a demented-sledgehammer test...

No solution is ever Perfect, but the stronger solution sure lets you sleep at night.
;)
[And then, a lot of us experienced sailing geezers tend to suddenly be "too busy to leave" when someone needs us for a delivery trip on a boat with gate valves.] :boohoo:

I apologise for being too opinionated, but keeping the water out is a priority.

Best,
Loren
O-34 #8
 
Last edited:

jmoses

Member III
Seacock install

I dug up some pics of the installation of the Blake seacocks in my boat's head area:

Picture #1 is before with ball valves --- they where beggining to leak!
Picture #2 is the discharge valve with an epoxied backing plat installed
Picture #3 is the head and sink valves installed
Picture #4 is the hulls exterior with flush thru-hulls installed
Picture #5 is the end result - nice clean install with the correct backingplates and a peace of mind!
 

Attachments

  • seacocks before.jpg
    seacocks before.jpg
    59.4 KB · Views: 573
  • backing plates.jpg
    backing plates.jpg
    64.1 KB · Views: 765
  • installed.jpg
    installed.jpg
    57.1 KB · Views: 550
  • hull.jpg
    hull.jpg
    62.7 KB · Views: 733
  • finished.jpg
    finished.jpg
    51.2 KB · Views: 920
Last edited:

evm

Member II
Perhaps we need a clarification of our terms....

To quote Don Casey from This Old Boat (p287) "The best seacocks by a wide margin are ball valves'.

He specifically is speaking of ball valves with flanges so that they may be through bolted to the hull for strength. He further cautions to keep the metals used the same in the throuugh hull and seacock.
 

NateHanson

Sustaining Member
I've wondered what people do with the holes in their seacock flanges. Do you really through bolt them into the hull? Seems like an awful lot of holes in the hull. How about lag-bolting them to the marine-plywood backer plate that's epoxied or even glassed into the inside of the hull. Seems to me (albeit an uneducated conclusion) that that might be a more sensible solution.
 

Glyn Judson

Moderator
Moderator
Nate, I too have thought the same thing. I'm not aware of any conventional through hulls getting loose, while only having a bronze nut and lots of bedding to hold them in place. Mind you, I have seen them get loose from untreated plywood pads rotting away but that's another story. Based on my former observation, I have installed several proper seacocks withought through-bolting them to the hull. I've used bronze lag screws (just like you mused) into West 105-coated plywood pads, while being sure to bed the lag screw threads also. Nothing seems to have moved over the intervening years and I plan to haul at the end of this month or February in order to, among other things, finally install seacocks in the rest of our E31 in the same manner. Glyn
 

Loren Beach

O34 - Portland, OR
Senior Moderator
Blogs Author
another picture link

http://www.jamestowndistributors.com/to;ID;,Marine.Plumbing,Seacocks

Here is a nice page with pictures of valves and sea cocks, from a reputable supplier.
As to whether to run the base bolts all the way through the hull... opinions vary... I prefer to run short screws only into a backing plate. Whether bronze or Marlon, the sea cock is "clamped" to the hull by the outside fitting flange when screwed into the base of the sea cock -- plus all that adhesive you mooshed in around it...
Moot point for our current setup -- Marlon sea cock epoxied to the backing plate.
It's a case of there being more than one "right" way to do the job.
:rolleyes:

And, a tip of the ol' Ericson helmet to John for the nice pictures.
:egrin:

Cheers,
Loren
 
Last edited:

Mike Thomas

Member II
Can't agree more with what everyone else is saying. Sea cocks is the only way to go. I did this job last winter and I'm glad I did it right. (Thanks Dave and everyone else)

More towards the actual application
My 76 E-29 has flush through hulls and I think that Jamestown also offers a "screened" through hull for your raw water intake. Take a good look at them. They were great to work with and I actually had to exchange some items. They are priced fairly and will special order what you don’t see on the web site.

Those Blake 45’s look cool. I’m jealous

Get marine rated fittings. Not all “bronze” is created equal. Shop around if dollars are the driving force here. There are some good deals on-line from reputable sources, “West Marine is for emergencies only”.

While you’re at it, get some wooden plugs and tie them to every valve when your done. Trust me you’ll wish you had one if you ever really need one!!

Always replace the through hulls along with the valves. A good valve is useless if the old through hull breaks off.

Getting the old through hulls out and new ones in may require a special tool. I found that a 12 inch section of gal pipe with a slot cut in the top to fit the tabs in the old through hull worked great. You can get a pipe wrench on it if you need to. Also "MILD heat" will help loosen the old caulking making it easier to remove the old ones.

Not all sealants are created equal. Be careful with the sealant that you choose. I used Polysulfide. It’s rated for underwater applications and best for bronze to fiberglass bonds. If you go with a plastic or composite through hull/fitting check with the manufacturer. Good Old Boat issue 39 has a GREAT article on sealants. Read it if you can.

As Loren said "Keeping the water out is priority" Marine rated bronze fittings and good sealants are cheaper than a new boat!!

Mike T
76 E-29
 

jmoses

Member III
To bolt or not to bolt?

Although the Blake sea cock install may look like a lot of bolts, there is actually 4 bolts per seacock that penetrate the hull. I bolted the sea cock to the backing plate, then bolted the who she-bang to the hull. It was a two step process due to the wider flange area of the recessed thru-hull fittings. Most seacock thru-bolt patterns will not fit on a recessed thru-hull fitting. A mushroom fitting is a different story.

Having seen seacocks spin around on a thru-hull fittings, plywood backing plates swell and toss out screws, self tappers that I could pull out with a finger and a host of other issues, I'd rather thru-bolt 'em. They ain't going anywhere now! In fact, my cockpit drain ball valves actually began to spin and pull the screws out.....Out they went for a pair of Groco's thru-bolted to the hull.

As for bolts through the hull, there are already plenty of them....strut bolts, chain plate bolts, keel bolts on some, grounding plates, etc. Properly recessed and bedded over with sealant is not a worry. In 4 years I have had no problems with the silicone bronze thru-bolts for the Blakes Seacocks.

My theory is do it right the first time or do it over again in a few years.....cursing all the way!

John M.
 

evm

Member II
In my mind if you do not through bolt it it is not a seacock. It is just another ball valve (or tapered plug valve) that is screwed into a through hull waiting for the through hull to valve connection to fail.

The through hull should not be part of the load bearing structure.
 

Randy Rutledge

Sustaining Member
JMoses or anyone

I would like clarification why the wood backing plate???? I guess this is to give a live connection that will have continuous pressure with expansion and contraction of dissimilar materials involved in the through hull, seacock and the hull. Or am I all wet?

In the picture it looks as though the seacock is bolted through the flush through hull flange and the wood backing plate is bolted through the hull. If the seacock is held in place by through bolts that pass through the flange of the through hull what do the bolts passing through the wood backing plate and hull add? I know they hold the wood to the hull but if the seacock bolts fail or loosen will the seacock flange not gap away from the wood backing plate and then I am all wet again????? If anyone has pictures of all components unassembled it would help or a diagram showing a cutaway of the seacock to hull connection.
 

Emerald

Moderator
Hi,

I think it's all about distributing the load over a greater surface area and reinforcing an area where you've got a big hole. It also keeps from having a hard metal edge against the fiberglass which over time will increase stress at the edges more so than with a nice round wood pad - not just a larger area, but it's not putting all the torque of operating the seacock right on that metal edge right against the hull where you could create a stress crack. If you have the opportunity, go operate a thru-hull on a smaller boat that's on the hard. On my old '66 Columbia 24, you could actually see the hull flex around the aft cockpit drain seacocks when you operated them - on this boat, like many I've seen, the layup in the rear quarter is much thinner than forward. For grins, and do be considerate of the other owners, check out your local yard and see if you can go make a walking tour where you gently push on the rear quarter of the under body. I bet you will be amazed at how many boats you can cause some hull deflection. I only meantion this because several years ago I got into a conversation about scantlings with the yard owner I haul, at and we took such a tour. Quite the eye opener on how many boats flex a fair amount in certain areas.


-David
Independence 31
Emerald
 

footrope

Contributing Partner
Blogs Author
Another thread that makes me cringe!

The only thing I would add to Dave's fine explanation is that a properly shaped and installed backing plate also provides a nice FLAT surface on the inside of the hull to fit the flange of the thru-hull against. There's probably a foolproof technique to get the shape and orientation perfect, but I haven't had the pleasure of discovering that yet. Good luck and have fun.
 

Loren Beach

O34 - Portland, OR
Senior Moderator
Blogs Author
Good clarification from Craig. I hadn't thought of it that way... When I moosh down (is that a verb?) the plywood backing plate against the curved hull in a bed of thickened epoxy, this creates a flat surface for the base of the seacock flange.
This is a great group to listen in on -- either I learn something new, or find out the correct motivation for what I was doing right without understanding why it was right!
:)

Cheers,
Loren
Olson 34
Portland, Oregon
 
Last edited:

evm

Member II
footrope said:
The only thing I would add to Dave's fine explanation is that a properly shaped and installed backing plate also provides a nice FLAT surface on the inside of the hull to fit the flange of the thru-hull against. There's probably a foolproof technique to get the shape and orientation perfect, but I haven't had the pleasure of discovering that yet. Good luck and have fun.

Here is the way that I get a conformal backing plate with a flat internal face.

Use a circle cutter to make a backing plate out of marine plywood. Then reset you circle cutter to cut the central hole. (Now you have a great doughnut.)

Coat the through hull with mold release and install the through-hull through the hull. Use your favorite epoxy mixture to wetout the hull and the backing plate where they meet. Place the backing plate over the through hull and tighten the nut to force the backing plate to bend to the hulls shape. Let the epoxy set.

Remove the nut and the through hull.

Use a block plane to shave a flat surface on the backing plate. Follow up with a sander to remove any boo-boos.
 
Top