You are using an out of date browser. It may not display this or other websites correctly.
You should upgrade or use an alternative browser.
You should upgrade or use an alternative browser.
E-35 II (& other E boats) Refridgeration
- Thread starter chrism
- Start date
gareth harris
Sustaining Member
I started the project earlier in the year (but thankfully did not install any expensive hardware before the hurricane), so I will just talk about the insulation:
The original box is very far from optimum. It is huge - far bigger than you would want to refridgerate, with totally inadequate insulation. When I ripped it out, there was just a couple of inches of spray in foam around it, and the drain hose just went down a couple of inches to let the ice water into the bilge.
The easiest, and cheapest, way to improve the insulation is to build up layers of the pink insulation available from Home Depot inside the original box, to a minimum of four inches, sealed together with epoxy. I have forgotten the name for the insulation, but it comes on bright pink 4'x8' sheets. The insulation must be resistant to water. This obviously decreases the size of the box, the alternative to which is ripping out the old one and building in a new one from scratch.
If you have a couple of thousand dollars, you can use stainless steel vacuum insulation, go to www.glacierbay.com for the top end.
Gareth
Freyja E35 1972
Mike.Gritten
Member III
We just installed a Nova Kool refrigerator system in our 35 MkII. We were most concerned about the insulation on the existing icebox and started with that. We were more than happy with the interior volume of the icebox but I have no idea what that volume would measure. We bought some styrofoam type insulation - blue, house-grade foam with a thickness of 1.5" and lined the inside of the box, taking care to overlap the butt joints and creating a small air pocket between the hull-side of the top half of the box and the insulated (?) hull interior. I later filled this cavity with low-expansion spray foam insulation. Our box had some spray foam insulation on the outside of the box, which we replaced where accessible (after scraping out as much of the old stuff as we could reach with minimal disassembly) with newly sprayed foam. There appeared to be many voids in the original application and I felt confident that we had done a much better job than the earlier attempt (factory?). There was a spot under the sink where we were able to use the blue foam onto the plywood exterior of the box. Underneath (by the drain) had been sprayed previously and appeared to be sound so we left that alone. We installed a simple rubber sink drain plug in the drain hole to prevent the cold air from simply falling into the bilge, but still allowing us to drain the box when defrosting the fridge later on, I used 3M above/below the waterline fairing compound on the interior of the box to smooth, seal and waterproof it. This was very difficult to sand and I would do it differently next time. Maybe automotive bondo followed by epoxy paint would work better and be easier to fair. After all this, actually installing the fridge was the easy part!
We cut a 2" hole for the refrigerant lines to pass through as high in the back of the icebox as possible and installed the evaporator to the "roof" of the box as far to the back as we could, allowing for bends in the copper lines. We later stuffed the 2" hole with fibreglass pink insulation. We installed the compressor unit on the shelf that sits behind the old electrical panel. It is accessed through the cockpit locker and is easy to get at for wiring/servicing/etc.. The unit comes complete with refrigerant in the lines and it is quite satisfying to join the lines up and hear the little "pfffft" noise and feel the copper lines get cold as you tighten the fittings up. I had a minor problem with power coming from an older pair of wires originally used to run the blower motor. These units have a low voltage safety system in them so they shut off if the voltage falls below a certain value (11.7 V) and the particular wires I had chosen had some issues (they have since been removed). The voltage was borderline when measured and the unit wouldn't operate. I ran new 14 gauge wiring and it worked like a champ. The moral here is "For new installations, don't trust any of the old original wires that were installed at the factory". Obvious if you think about it! Anyway, the system is in and running great. I can make the whole box a freezer if I wanted to, and we find that a setting around "2" or "2.5" on the scale of 0-7 is more than cold enough for our liking. I haven't done any official testing but it seems to cycle for about 3 or 4 minutes every 20 minutes or so during the day when we are in and out of it regularly, and less at night when it remains closed. We are very happy with it and would certainly recommed it to anyone interested in putting a fridge in their E35.
We cut a 2" hole for the refrigerant lines to pass through as high in the back of the icebox as possible and installed the evaporator to the "roof" of the box as far to the back as we could, allowing for bends in the copper lines. We later stuffed the 2" hole with fibreglass pink insulation. We installed the compressor unit on the shelf that sits behind the old electrical panel. It is accessed through the cockpit locker and is easy to get at for wiring/servicing/etc.. The unit comes complete with refrigerant in the lines and it is quite satisfying to join the lines up and hear the little "pfffft" noise and feel the copper lines get cold as you tighten the fittings up. I had a minor problem with power coming from an older pair of wires originally used to run the blower motor. These units have a low voltage safety system in them so they shut off if the voltage falls below a certain value (11.7 V) and the particular wires I had chosen had some issues (they have since been removed). The voltage was borderline when measured and the unit wouldn't operate. I ran new 14 gauge wiring and it worked like a champ. The moral here is "For new installations, don't trust any of the old original wires that were installed at the factory". Obvious if you think about it! Anyway, the system is in and running great. I can make the whole box a freezer if I wanted to, and we find that a setting around "2" or "2.5" on the scale of 0-7 is more than cold enough for our liking. I haven't done any official testing but it seems to cycle for about 3 or 4 minutes every 20 minutes or so during the day when we are in and out of it regularly, and less at night when it remains closed. We are very happy with it and would certainly recommed it to anyone interested in putting a fridge in their E35.
Thank you, both of you, for your responses.
I have a question regarding the Nova system... I just read your post and have yet to research the system, but I"m guessing it's DC. Do you leave a DC fridge unit on constantly when you are onboard cruising? (coastal cruising, week or two, tops) Or do you turn it on only with the engine on? I imagine the battery draw is quite high?
Also, with insulation and all, how much do you estimate it all cost you to do?
Thanks again,
Chris
Mike.Gritten
Member III
Yes, the Nova Kool is a 12V danfoss compressor and fan-cooled condensor with a choice of evaporators (ours is 12"x12"x6" high, and open at both ends, kind of like a tiny freezer in the old style fridges from the 1950's. The specs I have for the Nova Kool say that when operating, the unit will draw around 5 amps, which isn't too bad. But when you take into account the fact that the unit runs for only 20% of the time (in our installation), it is only using 24 amp hours per day. We will leave ours on all the time, the exception being if we are running short of amp hours in the house (battery) banks.
When you are talking about only running the fridge when motoring, you are probably thinking of an engine-driven compressor freezing a big holding plate. This kind of system freezes a liquid-filled plate to a temperature (0 to -10 degrees fahrenheit) well below the temperature of ice (~32 degrees fahrenheit). The plate warms up slowly, keeping your fridge cool long after the engine is shut off. For most of us, the holding plate systems are too expensive and finding the space on your engine to hang a belt driven compressor may be just impossible. So most cruising boats end up with some kind of 12V system. Mine is air cooled but water-cooling is very common in the warmer climes (the water your boat sits in is probably cooler than the air around the boat so this can be more efficient, but, requires additional holes or plumbing to supply the water to the condensor. Frig-o-Boat offers kind of a hybrid system using what they call a "keel cooler". They circulate refrigerant through very small heat exchangers which bolt through the hull of your boat. Seems like a nice system to me. I think Loren, here, has one or is installing one on his boat. He can probably offer up some info about it (he's good at that! wink, wink")
When you are talking about only running the fridge when motoring, you are probably thinking of an engine-driven compressor freezing a big holding plate. This kind of system freezes a liquid-filled plate to a temperature (0 to -10 degrees fahrenheit) well below the temperature of ice (~32 degrees fahrenheit). The plate warms up slowly, keeping your fridge cool long after the engine is shut off. For most of us, the holding plate systems are too expensive and finding the space on your engine to hang a belt driven compressor may be just impossible. So most cruising boats end up with some kind of 12V system. Mine is air cooled but water-cooling is very common in the warmer climes (the water your boat sits in is probably cooler than the air around the boat so this can be more efficient, but, requires additional holes or plumbing to supply the water to the condensor. Frig-o-Boat offers kind of a hybrid system using what they call a "keel cooler". They circulate refrigerant through very small heat exchangers which bolt through the hull of your boat. Seems like a nice system to me. I think Loren, here, has one or is installing one on his boat. He can probably offer up some info about it (he's good at that! wink, wink
Mike.Gritten
Member III
Oops! I missed the cost question....
Well the insulation, fairing compound, paint, wire, switch, screws, etc. cost me around $100 CDN. I bought the Nova Kool unit at Popeye's (local used boating equipment store) after a tip from a friend, for $48 CDN. So, that puts the total at $148 CDN (about $120 US).
Well the insulation, fairing compound, paint, wire, switch, screws, etc. cost me around $100 CDN. I bought the Nova Kool unit at Popeye's (local used boating equipment store) after a tip from a friend, for $48 CDN. So, that puts the total at $148 CDN (about $120 US).
WOW! What a deal. I wonder what I can get a new unit for...
I was talking about DC refrigeration when I was talking about the engine... I figured that people only had it on with the engine, but now that you've explained the plate system, I understand better. A friend with a 38' Ted Brewer Steel Cutter has an engine driven one, and it works great, but I think I may go with your exact setup! Do you have any model numbers for the fridge unit? I think I have found my new winter project... and if you have any pictures, I would be ecstatic.
Thanks, and everyone- excuse my spelling of refrigeration on the thread title...
Chris
Mike.Gritten
Member III
Chris,
the model I have is a NovaKool LT200 RT6. Here is a link to their website.
http://www.novakool.com/products/lt200.htm
I don't have any pics of our install, but, I will try and take some over the next weekend. Good Luck with your project. I have to say, it has been the most satisfying upgrade we have done to Papillon. Enjoy!
gareth harris
Sustaining Member
As I was writing my post yesterday, the library attendant started yelling at me quite loudly that my time was up, so here is some more:
Owens Corning is the name of the insulation I was talking about, buy the thickest size to laminate together. Note that my recommendation of at least 4", vs. Mike's of 1.5", is a reflection of my being in Pensacola (where 6" is really desirable) and his being in Vancouver.
An important element to think about is the electrical side, because in any warm climate the power requirements are huge compared to other boat loads. 24Ah/day sounds about right for Vancouver, in Pensacola even a well designed system can reach double that. So you will need to think about generating and storing that kind of power.
Most people use a large output alternator with a 3 phase regulator, and plan on running the engine up to an hour a day, although it is also possible with wind or water generators when conditions allow. It is not practical to mount enough solar cells on an E35 to power a fridge.
Storing the power - estimate all your electrical loads for a typical day under way, and make your battery capacity four times that, e.g. if your fridge, lights, autopilot, navigation system etc. use 40Ah/day, you need a 160Ah capacity. Lead acid batteries do not like to be drained deeply, and routinely going to less than 50% charge shortens their life. Also, the the rate of charging drops significantly as the batteries approach full charge, so it is not practical to give them a 100% charge every day. Having capacity four times anticipated use will allow the batteries to be run in the 50-80% charge range.
This obviously can drive up the cost of the system a lot. The alternative of the holding plate system, some of which can be run both electrically or off the engine, will run you close to $3000 for the unit, which is well beyond the budget of most who come to this website, but they look like very nice systems...
Gareth
Freyja E35 #241 1972
Thanks, I'll look forward to the pictures.
Being in New England, we do have very hot summers, but we also have the engine on for at least one hour per day during a cruise. Overnight, if the fridge was opened only a few times after dinner, would it be possible to shut it off over night, with the insulation holding the cold in? I imagine it would be, but does the unit stay cold when off, or does it warm up immediatley?
Chris
gareth harris
Sustaining Member
Hopefully there is someone who knows your climate who will chime in with experience, as how much the temperature will rise is a complex equation of outside temperature, inside temperature in the fridge when you shut it off, how much insulation you installed, and thermal mass of both the evaporator and everything else in the fridge.
A water cooled system I think would be very beneficial in your climate. In the Gulf of Mexico, the water temperature often compares closely to the air temperature, but since water has a much higher heat capacity than air, the water cooled compressors are still more efficient than air cooled. In New England, my understanding is that even when it is brutally hot, the water stays cool, so you would notice a huge difference.
Gareth
Mike.Gritten
Member III
Not really related, but, I received your E35 manual yesterday, Gareth!. It looks to be in very good condition, considering how old it is. I will have it scanned over the next couple of days and send it back to you (with a copy, of course, so you can hide the "original" away!). I should be able to send the PDF file to Sean shortly thereafter.
gareth harris
Sustaining Member
Great, and thanks for the copy. G
Refrigeration via Frigoboat
This is really a followup to an earlier thread on this site when I was just getting started on the idea of installing refrigeration on our boat. What works for others might be quite different. My installation could be an example to copy, or perhaps serve as a warning to others...
Not knowing the cubic footage of the box on the Mk 2- 35, I have no idea of the evaporator size you might want. Our ice box on the '88 Olson 34 was about 3 cu. feet. I got this by measuring the inside for gross dimensions, as though it were a retangular box. Then I measured the part that was not part of the real "box" that was in the missing section where it was stepped back from the curve of the hull, and subtracted from the first amount. Another way to have done it would have been to view it as a larger box shape sitting on a smaller (lower) box shape, and just add the two together.
Either way I got the cubic measurement in inches and converted to cubic feet.
I discussed my plans with the technician at Boat Electric in Seattle, since I was buying the parts from them. Our particular box has about 3 inches of rigid foam all around the sides and bottom, from the Ericson factory. The top is mostly lid, and was not insulated. I added an inch of closed cell foam rigid insulation with the aluminized surface (from the local building supply store) to the lid and the underside of the remaining top. It is held inplace with double-sided tape.
The hardest part of the job for a newbie like me was just "imageering" the crowded installation for the little compressor and routing the stiff copper lines.
I used the "keel cooler" from Frigoboat (http://www.frigoboat.com/home.html) to miximize efficiency and for lowest power usage. We installed the "keel cooler" (i.e. a flat plate of sintered bronze with a small coil of copper inside) during a haulout for a bottom job last March.
Here is a page with some photos of one being installed on a C&C, from Wally's awesome web site: http://www.wbryant.com/StellaBoat/hauls/0307/haul.htm. Scroll down quite a ways on the page to see the installation of the keel cooler.
I designed an aluminum bracket to support the compressor under the lower shelf under the galley sinks. Most of the pre-charged copper lines were coiled up in that area and secured with plastic ties when the job was done. Like another member of this list, I had to drill a two inch hole in the upper corner of the ice box and feed the copper lines through as the evaporator was eased into the box through the lid opening. I did not kink the lines, but worried about this a lot (Too much, actually....). I plugged that air leak around the tubing with foam bits and sealant, and put a piece of matching formica(r) on the inside to cover the hole and fit tight around the tubing.
Advice I got from the dealer was to go with the larger of the two possibilities of evaporator sizes that their chart reccommended -- larger is always better. The plate had to be bent 90 degrees, in a portion of it that is intended for bending without pinching the coolant channels. We built a bending jig on the lip of my work bench with the needed min. radius. I had a piece of 3.5 inch OD pipe handy to make the bending radius from. I also tried a sample bend on some old scrap copper tubing to be sure that both sides of the resulting right-angle bend would come out to the proper length.
FWIW, after about my third phone call to the shop (http://www.boatelectric.com/) in Seattle, the guy chuckled and told me that my only problem was that I think too much!
I bought the following parts:
Evaporator Plate 130F SM $136.
Compressor, Keel, K50 SSC 600.10
Keel Cooler w/zinc 374.
Thermostat (refrigeration) 28.90
___________________
Total was about $1139.
This was Feb. of 2004, and they gave me the winter boat show discount.
Obviously, it would be a little cheaper to go with the heat exchanger radiator and fan right on the compressor. I wanted the least amp usage, no heat generated inside the boat on a hot day, and least noise. [One more disclaimer: my solution is not the best or only answer, of course.]
As to amps, it proved to be quite thriftly during our two week vacation this summer. Our house bank (picture elsewhere on this site) is two Trojan T-145's, which is 235 amphours. We anchored out for two days and I checked the voltage with a digital meter -- I lost .2 of a volt per day from a fully-charged bank. What with having a spare starting battery, we figure that we could have gone about three days without running the engine. We have a stock 50 amp Motorola alternator on a Universal 23 hp diesel.
It was so quiet that you had to try to listen just to hear the faint purr of the compressor.
The Admiral is happy, and so, therefore, is the Captain. Not having to plan a vacation around the search for increasingly-rare block ice was just wonderful.

Lastly, we put a cork in the old drain outlet to keep valuable cold air from flowing down into the former drain hose.
If I have left out any steps, drop me an email.
Best,
Loren in PDX
Olson 34 #8
This is really a followup to an earlier thread on this site when I was just getting started on the idea of installing refrigeration on our boat. What works for others might be quite different. My installation could be an example to copy, or perhaps serve as a warning to others...
Not knowing the cubic footage of the box on the Mk 2- 35, I have no idea of the evaporator size you might want. Our ice box on the '88 Olson 34 was about 3 cu. feet. I got this by measuring the inside for gross dimensions, as though it were a retangular box. Then I measured the part that was not part of the real "box" that was in the missing section where it was stepped back from the curve of the hull, and subtracted from the first amount. Another way to have done it would have been to view it as a larger box shape sitting on a smaller (lower) box shape, and just add the two together.
Either way I got the cubic measurement in inches and converted to cubic feet.
I discussed my plans with the technician at Boat Electric in Seattle, since I was buying the parts from them. Our particular box has about 3 inches of rigid foam all around the sides and bottom, from the Ericson factory. The top is mostly lid, and was not insulated. I added an inch of closed cell foam rigid insulation with the aluminized surface (from the local building supply store) to the lid and the underside of the remaining top. It is held inplace with double-sided tape.
The hardest part of the job for a newbie like me was just "imageering" the crowded installation for the little compressor and routing the stiff copper lines.
I used the "keel cooler" from Frigoboat (http://www.frigoboat.com/home.html) to miximize efficiency and for lowest power usage. We installed the "keel cooler" (i.e. a flat plate of sintered bronze with a small coil of copper inside) during a haulout for a bottom job last March.
Here is a page with some photos of one being installed on a C&C, from Wally's awesome web site: http://www.wbryant.com/StellaBoat/hauls/0307/haul.htm. Scroll down quite a ways on the page to see the installation of the keel cooler.
I designed an aluminum bracket to support the compressor under the lower shelf under the galley sinks. Most of the pre-charged copper lines were coiled up in that area and secured with plastic ties when the job was done. Like another member of this list, I had to drill a two inch hole in the upper corner of the ice box and feed the copper lines through as the evaporator was eased into the box through the lid opening. I did not kink the lines, but worried about this a lot (Too much, actually....). I plugged that air leak around the tubing with foam bits and sealant, and put a piece of matching formica(r) on the inside to cover the hole and fit tight around the tubing.
Advice I got from the dealer was to go with the larger of the two possibilities of evaporator sizes that their chart reccommended -- larger is always better. The plate had to be bent 90 degrees, in a portion of it that is intended for bending without pinching the coolant channels. We built a bending jig on the lip of my work bench with the needed min. radius. I had a piece of 3.5 inch OD pipe handy to make the bending radius from. I also tried a sample bend on some old scrap copper tubing to be sure that both sides of the resulting right-angle bend would come out to the proper length.
FWIW, after about my third phone call to the shop (http://www.boatelectric.com/) in Seattle, the guy chuckled and told me that my only problem was that I think too much!
I bought the following parts:
Evaporator Plate 130F SM $136.
Compressor, Keel, K50 SSC 600.10
Keel Cooler w/zinc 374.
Thermostat (refrigeration) 28.90
___________________
Total was about $1139.
This was Feb. of 2004, and they gave me the winter boat show discount.
Obviously, it would be a little cheaper to go with the heat exchanger radiator and fan right on the compressor. I wanted the least amp usage, no heat generated inside the boat on a hot day, and least noise. [One more disclaimer: my solution is not the best or only answer, of course.]
As to amps, it proved to be quite thriftly during our two week vacation this summer. Our house bank (picture elsewhere on this site) is two Trojan T-145's, which is 235 amphours. We anchored out for two days and I checked the voltage with a digital meter -- I lost .2 of a volt per day from a fully-charged bank. What with having a spare starting battery, we figure that we could have gone about three days without running the engine. We have a stock 50 amp Motorola alternator on a Universal 23 hp diesel.
It was so quiet that you had to try to listen just to hear the faint purr of the compressor.
The Admiral is happy, and so, therefore, is the Captain. Not having to plan a vacation around the search for increasingly-rare block ice was just wonderful.
Lastly, we put a cork in the old drain outlet to keep valuable cold air from flowing down into the former drain hose.
If I have left out any steps, drop me an email.
Best,
Loren in PDX
Olson 34 #8
Last edited:
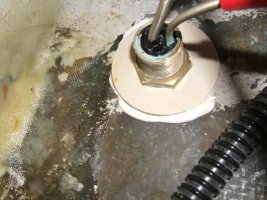
Photo of "keel cooler" installed
Here is a photo I took of the keel cooler (heat exchanger) from beside the refer unit, under the galley counter. Note that it is mounted like a bronze thruhull, on an FRP backing plate.
Loren
Olson 34 #8
Here is a photo I took of the keel cooler (heat exchanger) from beside the refer unit, under the galley counter. Note that it is mounted like a bronze thruhull, on an FRP backing plate.
Loren
Olson 34 #8
Attachments
-
 KeelCoolerInstalled.jpg74.5 KB · Views: 489
Last edited:
Chris Miller
Sustaining Member
NIce work, Loren!
I had one question (I'm really frustrated with our old adler barbour fridge) about the keel cooler. I'm contemplating going with frigoboat in the future. Does frigoboat say anything about where that keel cooler goes? could it go behind the keel to reduce the drag? I'm thinking if it went directly behind the keel, it would be in "dirty" water and wouldn't produce as much drag?
Nice work. As always, you guys with serious skills keep us all motivated!
Chris
Chris, I've still got the directions that came with the Frigo fridge I installed on my boat. I can look for you and see if there are any special guidelines. The bronze unit that sits outside the hull has tappered edges, so it's not that big a drag. Mine is under the galley sink (towards the back of the keel on the starboard side, behind the roundest part of the bilge. The compressor and the keel bulb need to be close together because the refrigerant is cycling between them in the fairly short lines that Frigo supplies. The lines between the compressor and the fridge are a little more forgiving but still, they won't get you from Tampa to Saint Louis. If you want to see the paper work for the Frigo, just let me know and I'll send you as a PDF.
ted_reshetiloff
Contributing Partner
Yeah Chris my understanding of the keel cooler is that it is like a thruough hull fitting and could be installed flush. The heat exchanger component does not extend beyond the hull surface. I am not 100 % on this but I dont believe it adds any drag...
Attachments
-
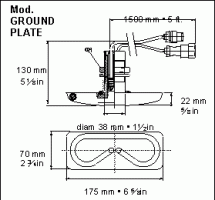 kcoolerdrawing.gif4 KB · Views: 574
Last edited: