E-38 Chainplate/Deck interface

footrope

Contributing Partner
Blogs Author
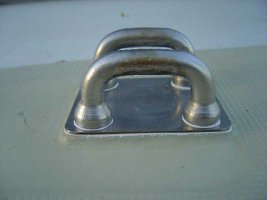
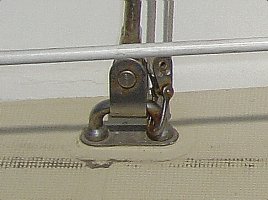
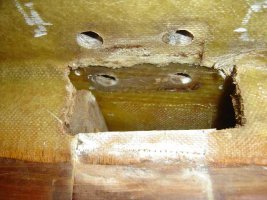
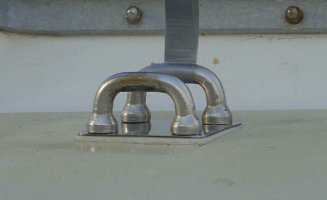
I have a 1980 E-38. This year the starboard middle chainplate started leaking. All the other five deck plates for the rig on my boat sit on a little built-up pad on the deck, but not the starboard middle one. Shouldn't there be a little pad for this one also?

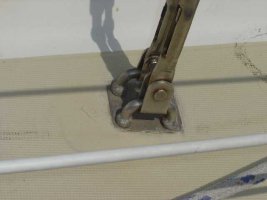
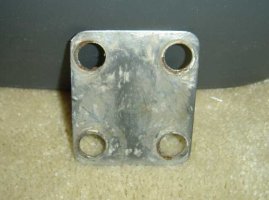
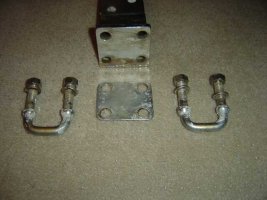
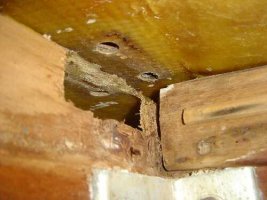
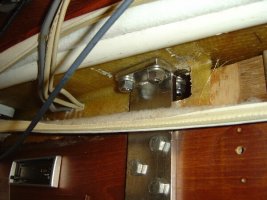
On the outside, it looks like it's been repaired before and there is some evidence of an old leak on the interior joinery. (***Edit: The second picture is what I found on the inside this year that made me suspicious.***) I'm getting ready to pull that chainplate apart and fix the deck. I'd like to restore that little pad, if it should be there. I'll probably have core damage and will have to re-build the deck so that the u-bolts will both be squared up again, so I might as well go all the way. Could someone confirm for me that there should be a pad? Thanks.

Oh, and any other advice, tricks of the trade, dire warnings - would be appreciated. I have help from an experienced woodwright and epoxy jockey, and a copy of Don Casey's hull and deck book.
 

Attachments

  • MiddleChainPlateStarboard-small.JPG
    MiddleChainPlateStarboard-small.JPG
    18.7 KB · Views: 568
  • StarboardChainplate03InboardJuly2004-reduced.JPG
    StarboardChainplate03InboardJuly2004-reduced.JPG
    37.4 KB · Views: 370
Last edited:

Geoff Johnson

Fellow Ericson Owner
Craig,

Have a look at my thread since you are about to embark on the the same journey I am on:

http://www.ericsonyachts.com/infoexchange/showthread.php?t=1501

To summarize, your major problem, I believe, will not be deck rot, but corrosion of the aluminum backing blocks and possible corrosion of the threaded rods in the aluminum mandrels embedded in the grid. You should pull all the chainplates apart.

BTW, I don't have "pads" as you can see from the attached photo. When I reinstall everyting in the spring when it is warmer, I intend to bevel the deck holes, put polysulfide on the underside of the plates, push them into place and then torque them down after the polysulfide has cured.
 

Attachments

  • Shroud02sm.jpg
    Shroud02sm.jpg
    167.3 KB · Views: 845
Last edited:

footrope

Contributing Partner
Blogs Author
A picture of another shroud connection

Geoff,

Thanks for the reply. I read your thread and I have seen some aluminum backing plate corrosion. I won't know how bad they are until I can completely take apart the below deck assembly. All but one (the one I'm going to fix) of my interior chainplate connections have stainless rods connected to thick flat steel plates that are bolted with stainless hardware to interior bulkheads. The bulkheads are glassed to the hull.

I attached another photo that I hope shows the pad under a deck plate. The pads are at the same level as the anti-skid grid - like there's a little 0.05" moat dug around the spot for the plate and holes. Your 32 doesn't seem to have the "moat." The anti-skid runs almost right to the plate.

My plan is to remove the u-bolts, make a pattern and/or a jig to use to drill new holes at the right spot and at a 90 deg. angle to the deck, then gouge out any nearby wood core so I can fill the space between the deck plys with epoxy filler. Then I'll drill again using the jig. I hope I don't have as much trouble removing the u-bolts as you did. These should be very short legged u's.

The inboard u-bolt is tilted slightly toward the house, which prevents it from mating to the plate - and that's where the leak is located. I will get to the rest of the chainplates over the next couple seasons, unless they start leaking beforehand. They all look great right now (uh-oh. I bet I jinxed myself :scared: ).
 

Attachments

  • Starboard aft chainplate - enhanced.jpg
    Starboard aft chainplate - enhanced.jpg
    189 KB · Views: 790

Geoff Johnson

Fellow Ericson Owner
Mine all looked great from the deck, but two were slowly disintegrating out of sight. Sounds like you may have a bent u-bolt. RigRite may have a replacement. Getting the bolts out was not particularly hard after I learned they cannot be hammered out from below since they are embedded in elastic sealant. Rather they have to be coaxed out from above using steady pressure with the crowbar method I described. Good luck.
 

footrope

Contributing Partner
Blogs Author
I hope the u-bolts aren't bent, of course. Thanks for the tip on pulling them out. The deck structural restoration should be straightforward, but the new holes have to align properly with a large flat steel fitting that is topped (welded) with a 4-hole backing plate. The stem of that "T" fitting is bolted about 8 times (nope, actually it's 14 half-inch bolts) to an interior bulkhead, starting about 4 inches below the deck and running straight down that bulkhead. Can't mess with that. Access to the outboard nuts under the deck is complicated by other interior structure.

If we feel nervous about drilling new holes in the deck, we may have the option of preserving the holes. Preventing future leaking problems depends on getting the upper deck surface right for the u-bolts and their plate.
 
Last edited:

Geoff Johnson

Fellow Ericson Owner
I posted photos of my chainplate assembly on the thread I started. I would interested to see a photo of yours, if you can manage it. On closer examination, I see that my u-bolts are actually set into slight depressions in the deck, which is not good design since they trap water.
 

footrope

Contributing Partner
Blogs Author
Disassembly and metal parts

I will post a few pictures of the parts, areas and conditions we found, in the next couple posts. Basically there wasn't much damage or rot, but the repair was very unsatisfactory for preventing leaks. I hope it was a bad repair, not an original design and installation. I guess I have some faith that Ericson would not have done it that way - all other original workmanship on the boat is first rate.

Geoff - My other shroud hardware above and under the deck is very similar to yours, but I don't "see" any problems with them yet. This stuff here is the oddball compared to the others, on the early E38s anyway.

We got the disassembly done this past weekend. Inside, the headliner had to come down to allow removal of two trim pieces that were in the way of the nuts and T-Plate. I'll post pictures of the interior later.

Next we loosened the main shroud and the 2nd spreader shroud (?) on both sides. I had the main halyard tied to the starboard rail. It took about 8 turns on the inboard right (2nd spreader) shroud to get it loose enough to remove. The main shroud only required 3 or 4 turns. We loosened the left side half that amount to minimize the out of column bend of the mast. We really didn't see that much bend, but what the heck. We got the nuts off the u-bolts and they came out of the deck with little resistance - and not much sealer. The deck plate came loose while we were coaxing the u-bolts out. Under the deck plate was - no gelcoat, no paint, just fiberglass layup and a little sealer. Pictures of that next week.

Below again, we removed the 14 nuts and bolts from the T-plate and it came off the bulkhead very nicely. We found aluminum inserts in the all the holes in the bulkhead (pictures later). The top two were corroded in place from water and the steel bolts. We assume they are used to prevent crushing the bulkhead. The 14 bolts were only tightened enough to squeeze the split lockwashers.

The pictures. The first is the deck plate. I don't know if it's original, but it is warped a little. Notice the marks from the u-bolt shoulders are way offset - providing almost zero sealing surface on one edge. Add some angle from the u-bolt and it takes frequent re-sealing to keep water out. I'm thinking about going one gauge thicker on the new plate, and tightening up the holes, which are 9/16". Too much slop for a 15/32" shank.

Next is a picture of the u-bolts, the deck plate, and the hefty T-plate from the interior bulkhead. The new deck plate will be patterned off the top of the T-plate. The old deck plate is not a good match. The u-bolts have a little corrosion under the flares where they contacted the deck plate. There's also a little rust on the underside of the U where the toggles were drawn up against them.

One U-bolt is twisted so that the two legs are offset a few degrees. Not sure whether to buy a new one or not. It could be persuaded back into alignment. I will clean them both and see what I can see with a magnifier. I'll check with Rigrite about replacements.
 

Attachments

  • StbdCenterChainplateDeckPlate02-smallreduced.JPG
    StbdCenterChainplateDeckPlate02-smallreduced.JPG
    22.5 KB · Views: 399
  • StbdCenterChainplateHardware01-smallreduced.jpg
    StbdCenterChainplateHardware01-smallreduced.jpg
    28 KB · Views: 420
Last edited:

Geoff Johnson

Fellow Ericson Owner
Craig, at least one of my u-bolts was skewed a couple of degrees in the way you describe, so I suspect that's the way they are made and there is no guarantee that a replacement would be any different. Also, when you reassemble everything, you should get a Loos Professional tension gauge to make sure the tension on all shrouds is correct. My mast is down. I am not sure I would be fooling with the shrouds if it were up.

Geoff
 

footrope

Contributing Partner
Blogs Author
I checked prices on the Loos gauges - I may try to borrow one, but I'm probably going to take the boat to a pro to loosen everything and do a complete check of the rig for me - dye, visual, mast, boom. The wires were new in 1998. I am thinking about taking a day off to go learn how to rig it when it goes back together for good, assuming they start at square one when the inspection is done and reset everything. Still checking in to that.

The mast might fall? The day after we took it apart we had a few hours of 15-30 knot winds in the central Sound. That evening I went to check on it. Tonight and Thursday we may get 30-40 knots while a little low rips through Vancouver Island to the north. I talked to a couple experienced do-it-yourselfers about what I was planning and didn't get any warnings about the mast falling. Logically, with a keel-stepped mast, the 4 intact lowers, fore and backstays, and a good, tight fit through the cabin top...? This board was noticeably silent about it, too, until you brought it up! So far, so good. I will go visit it to check my fine duct tape job Thursday after work. I hope my logic isn't faulty.
 

Geoff Johnson

Fellow Ericson Owner
I raised the subject out of ignorance. We can all learn from your experience. It's just that I had a vision of your removing all of the standing rigging.

As for the gauge ($75) I guess I like to buy tools (who doesn't) and do things for myself. Afterall, it will last you a lifetime. You can also get an excellent video on mast tuning from the Brion Toss web site.
 

footrope

Contributing Partner
Blogs Author
Geoff,

It's been proven time and again that it never hurts to mention your concerns. That's why resources like this website are so great. Someone in a group this active will usually ask a question where the other readers may have made assumptions. I appreciate that and didin't mean to be flip in my reply.

Thank you's to Sean and all the volunteers and members who have posted projects, manuals, questions, observations, experiences and opinions in any section of this website. :egrin: It's all great reading.

I need to take the interior pictures this afternoon so I can post them this weekend. The alternator (see my other thread) will be the only work I get done. I have to make a drawing of the new plate so I can take it to a shop for fabrication. I have a lead on a machine shop from a co-worker who used to be in that business. Does anyone in the Seattle area have a suggestion? I live in Federal Way and work in South Seattle.

As for tools... I admit to drooling over tools, hardware, sails, dinghies, and just about everything to do with vehicular travel (I am an inactive pilot and sorta wannabe airplane owner - and airplanes are possibly the only thing more expensive and maintenance intensive than a boat or RV). I'm trying to avoid buying stuff I'll seldom use. Maybe it's the "fear of having to buy two" because of different wire sizes? :p

I met Brion Toss this summer in Port Townsend. I may take the boat all the way to him for the rig inspection. He's given me an estimate. My wife and I like P.T. anyway. Thanks for the suggestion. I haven't really looked at his website, since I happened to stop in and actually got the fear of crevice corrosion from him in person.

I have read your cabin sole saga and I've really enjoyed it. Mine needs a varnish and dent repair and I may take it all up in the process. The PO replaced it himself in 94-95 and its quite good from the topside anyway, except for a few black spots around bungs. I am becoming convinced that square-drive bronze (no bungs) is the way to go when I get to that project.

Cheers, :cheers:
 

footrope

Contributing Partner
Blogs Author
Progress in the past two months...

The holidays are past and my wife and I had a very relaxing week between Christmas and New Years. Hope you all had a good time. I didn't work on the boat too steadily, but the parts I need are designed, purchased and fabricated now and we're ready to do final fit checks to verify the execution of our design. I also helped my friend with some brainstorming on his tiller autopilot installation (on a non-Ericson).

The new deck plate has been made - by a professional machine shop - for $95. It is 16 gauge instead of 18 as the old part was. It was laser cut, including the holes, on a numerically driven machine of some kind. The decision to go up a gauge was a good one. The holes barely clear the u-bolt threads and will allow good contact area with the shoulders.

When I fit the plate and u-bolts and underdeck hardware all together through the deck at the same time, it revealed a bad fit of the u-bolt shoulders against the new deck plate. They were tilted in relation to the plate. The u-bolts legs were not straightened yet and that didn't help. Fortunately, the underdeck T-fitting lined up beautifully with the deck holes and the new plate above deck, so I just had to deal with tilt angle problems. I carefully trimmed about 1/8" of material - gelcoat - around the old plate location while I was at it.

So, next we aligned the u-bolt legs using a bench vise and a steel pipe. We protected the threads with the nuts. Once the legs were lined up properly we then squeezed the legs towards each other very slightly. We are now able to put the u-bolt and plate assembly together with little trouble.

To measure the angle to correct the tilt of the plate I used a couple tongue depressors to prop up the outboard edge of the plate. When the nuts were tightened firmly I was able to determine that a wedge with a slope of 3/32" (two depressors thick) was necessary to make the shoulders fit flat to the plate. We decided to add 3/64" more (one depressor thickness) to provide a small pad on the deck for the plate to rest upon.

Making the wedge.
My friend built a small wooden mold, 1/8" larger than the plate perimeter. We leveled it (tilted it at a slope of 3/32" over the short dimension of the plate) and poured WEST system epoxy to a slightly greater depth than we marked on the mold. The epoxy leveled itself and cured for 48 hours. We used 1 oz. of epoxy and mixed in about 4 tablespoons of high density filler to increase strength against compression.

Tonight we finished it (pending fit checks and then paint). We took off the sides of the mold and chipped three edges of the wedge in the process. We left the bottom of the mold in place. The wax mold release didn't work for some reason. Then we taped the new plate to the wedge, in the center, and used a drill press to drill through the plate's holes to make the holes in the wedge. Then we sawed, chiseled, and sanded the bottom of the mold away. We then sanded the bottom and top of the wedge to get flatter surfaces. Then we sanded some of the 1/8" excess edge material and the chips are gone now. Pictures in my next post.

Next we'll mock everything together on the boat and see what other adjustments need to be made.
 
Last edited:

footrope

Contributing Partner
Blogs Author
Backing up a little bit

My last post skipped some of the findings from the deck and core, and some pictures from the interior and exterior.

(1) The starboard side of the cabin. The T-plate goes under the port above the settee.

(2) Underside of the deck. Note that a layer of mat ends between the two sets of holes.

(3) Here is the outboard side under the deck. The old damage wasn't getting worse and the rest is just surface discoloration, all above the headliner.

(4) Top of deck - before picture.

We found no softness in the wooden core of the deck, which is about a third of the total deck thickness there. There was no sealer at all below deck level and we believe that allowed water to drain through, down the u-bolt legs, and onto the t-plate and nuts. As a result of this observation, we will not go to the trouble to drill out, plug with epoxy, and redrill the deck holes, at this time.

All this is above the headliner, but there must have been sifficient air circulation so that the water could not stay around long enough to cause rot. What little dripped onto the interior plywood and veneer has caused some discoloration, but little deterioration. No delamination of the veneer was detected, either.

(5) Here is a closeup of the top holes in the bulkhead, where the T-plate bolts on. The top two had seen some water from the leak, and the aluminum collars were corroded from the water and dissimilar metal activity. I had to cut out the corroded collars. I carved a little damaged wood from the top hole. When I replaced the collar in that hole, I used a bit of tongue depressor as a replacement and it friction-fit just fine with no glue needed.

The aluminum collars were replaced with pieces cut from a standard 6061-T6 tube scrap I found at onlinemetals.com. They are located near the Ballard Bridge in Seattle. I drove up to their place on Ewing St. and the young lady who organized the alum. tubing scraps let me search for the right stuff. It took about 30 seconds to find an 8 inch length of the exact diameter I needed. Cost me $1. They are going to make their money selling large surplus amounts, and they have a good sized warehouse there. Check out the website.
 

Attachments

  • StbdInteriorGeneralShot-reduced.JPG
    StbdInteriorGeneralShot-reduced.JPG
    40.7 KB · Views: 301
  • StbdCenterChainplateUnderdeckInbd02-reduced.JPG
    StbdCenterChainplateUnderdeckInbd02-reduced.JPG
    37.8 KB · Views: 279
  • StbdCenterChainplateUnderdeckOutbd01-small-reduced.JPG
    StbdCenterChainplateUnderdeckOutbd01-small-reduced.JPG
    18.8 KB · Views: 284
  • StbdCenterChainplateDeck03-reduced.JPG
    StbdCenterChainplateDeck03-reduced.JPG
    22.6 KB · Views: 300
  • StbdCenterChainplateBulkheadDetail02-reduced.JPG
    StbdCenterChainplateBulkheadDetail02-reduced.JPG
    44.3 KB · Views: 298
Last edited:

footrope

Contributing Partner
Blogs Author
Fit checks

Thank you, Sean. I keep the boat at Harbor Island Marina in Seattle, slip B13. The marina is at the south end of Harbor Island, which is at the mouth of the Duwamish River. We enter the south end of Elliott Bay from the West Waterway of the main commercial Port.

I have tested the fit of the U-bolts, the molded epoxy wedge, and the new deck plate. It all looks good together - see the first picture. We've accomplished a good fit for the u-bolt shoulder against the deck plate with the wedge. There is enough length on the u-bolt to fully engage the nuts with the washers under them. I will sand one side of the wedge a few more passes to allow for the thickness of the epoxy we will use to permanently attach the wedge to the deck.

When I did the fit check I used all the hardware and that is how I discovered the need to shave a little more thickness off the wedge – see the second picture. Once I had it all tightened up and was satisfied with the alignment of everything, my wife and I put all 14 bolts, nuts and lockwashers into the T-plate to tie it to the bulkhead for good. The nuts were only torqued snugly enough to squeeze the lockwashers. Don't want to mar the veneer on the bulkhead.

The reason for shaving the wedge a bit more is that for the thickened epoxy to properly attach a fully cured wedge to the deck, we will have to ensure there's some thickness of glue remaining between the deck and wedge. There will also be some preparation and roughening of the deck surface to accept the epoxy. We are planning to shape the excess epoxy around the edges, to fair the wedge smoothly into the deck. I have some gelcoat that matches the deck in that area, but I understand epoxy isn't compatible with gelcoat. That means painting will be necessary.

Once the epoxy wedge is glued down and cured, we'll do the final fit in preparation for actually putting the chainplate back together. We may decide that the sharp corners of the wedge need to be shaved off – for looks if not for function. After that we'll paint the exposed wedge to protect against deterioration from UV. The last picture is the deck plate and the wedge.
 

Attachments

  • StbdMainU-bolts01TestFit2004-01-21-cut-reduced-small.JPG
    StbdMainU-bolts01TestFit2004-01-21-cut-reduced-small.JPG
    120.7 KB · Views: 228
  • StbdMainChainPlateInterior2004-01-21-small.JPG
    StbdMainChainPlateInterior2004-01-21-small.JPG
    234.7 KB · Views: 242
  • NewPlateAndEpoxyWedge03-small-reduced.JPG
    NewPlateAndEpoxyWedge03-small-reduced.JPG
    12.4 KB · Views: 222

footrope

Contributing Partner
Blogs Author
Final pics

Here are the last shots I have taken of the new deck plate, the installed epoxy wedge, and the u-bolts. The bedding compound is BoatLife Life Caulk, which is a polysulfide. [edit] I beveled the holes in the wedge before putting it all together, to help force some of the excess sealer to squeeze around the u-bolt shanks.

I wish I could say how well our planning for the matching of the colors turned out, but the cured epoxy with the high-density filler happens to match the gelcoat very closely. Instead of painting the exposed epoxy, I think I'll do a little research on the affects of UV on epoxy and see if there is a gelcoat-compatible clear coating I can apply. Anyone have any suggestions?

This weekend I'll attach and temporarily tension the shrouds. Next Wednesday Brion Toss is coming down to do a boat-show-special rig inspection :), and then a full-price rig tune :cool:.
 

Attachments

  • StbdMainU-bolts03installedFeb2005-reduced.JPG
    StbdMainU-bolts03installedFeb2005-reduced.JPG
    15.4 KB · Views: 101
  • StbdMainU-bolts01installedFeb2005-reduced.JPG
    StbdMainU-bolts01installedFeb2005-reduced.JPG
    13.4 KB · Views: 76
Last edited:
Top