• Untitled Document

    Join us on April 26th, 7pm EST

    for the CBEC Virtual Meeting

    All EYO members and followers are welcome to join the fun and get to know the guest speaker!

    See the link below for login credentials and join us!

    April Meeting Info

    (dismiss this notice by hitting 'X', upper right)

E27 Galley Countertop replacement

ignacio

Member III
Blogs Author
Looks like the galley countertop needs to be replaced. The PO let several years of water intrusion get in there and now it's seriously delaminated/rotting.

Aside from simply removing it so I can get the pattern for the replacement, anyone have any tips for how to go about this project? The leak is still there, and that's first on my list to resolve in the short term, with the galley countertop to be done in the spring when we'll hopefully have less rain.

Thanks in advance,

Ignacio
 

Loren Beach

O34 - Portland, OR
Senior Moderator
Blogs Author
Looks like the galley countertop needs to be replaced. The PO let several years of water intrusion get in there and now it's seriously delaminated/rotting.

Aside from simply removing it so I can get the pattern for the replacement, anyone have any tips for how to go about this project? The leak is still there, and that's first on my list to resolve in the short term, with the galley countertop to be done in the spring when we'll hopefully have less rain.

Ignacio

Be sure to find and cure that leak before you invest time and $$ in the rebuild. :rolleyes:

I did this project last year, pics on this site.
Once you remove the sink, faucet, and whatever else that was installed thru the surface.... use a heat gun to soften the adhesive. I ended up pushing every long piece of metal I could find slowly under the edge(s) where I started the heating. Spare hack saw blades were good, among other thin pieces pressed into temporary service. I also made some thin wood wedges -- pieces of shingles would work. It takes a lot of heat, but short of singing the material. Wear some light gloves at times.
Your surmise is correct that the old formica top makes a great pattern for the new one. Routing it out still requires clamped-on guides and a steady hand. I could have used contact cement for the new one, but went with the more forgiving West System epoxy instead.

We did not have to replace any of the unlaying plywood, but grinding/sanding out some rot should not be too tough...
after all the newly repaired surface only has to be fair. The new formica top will cover it.
My finished pics are in reply #20 in this recent thread:
http://www.ericsonyachts.org/infoexchange/showthread.php?t=6214&highlight=formica&page=2

You might consider posting up some pics as you go along. There are thousands of similar size Ericsons out there that would like the information.

Best,
Loren
 
Last edited:

Mark F

Contributing Partner
Blogs Author
Hi Ignacio,

It sounds like you may have an other than factory countertop. I'm pretty sure my galley counter is part of the fiberglass molded pan, no laminate or plywood.

Do you have any photos? Where does the water (leak) show up?
 

ignacio

Member III
Blogs Author
I'll go take pictures today. It actually does look factory installed. The formica top is different from the fiberglass/gelcoated mold that surrounds it.

The leak is coming in from the port side rear-most section of the galley. There's a little puddle that forms there when it rains, and the formica top is pretty saturated back there. Note quite sure yet where it's coming from, though I'm suspecting the portlights (water gets in between the outer and inner glass layers, leaks down, and then gets routed after via gravity to some exit point in the rear.

Hi Ignacio,

It sounds like you may have an other than factory countertop. I'm pretty sure my galley counter is part of the fiberglass molded pan, no laminate or plywood.

Do you have any photos? Where does the water (leak) show up?
 

ignacio

Member III
Blogs Author
Ok, you asked for it

Prepare yourself....this is ugly. Here's a bunch of pictures of the damage. With the pacific storms that just rolled in the last few days in the SF Bay Area, the formica is pretty much shot. I see now that the counter is just a glassed (gelcoated?) mold, into which the formica is inserted and presumably attached with some adhesive. I did notice (not shown) that some portions of the mess in there were stuck onto the gelcoat/glass, so that's probably the adhesive used. A heat gun will remove it without damaging the gelcoat/glass?

Fortunately, I determined that much of the deck hardware needs to be rebedded, so I'll be doing that quick once the weather gets better (unless someone can convince that it can be done when it's raining).

Another upside to this evening is that the PO ordered and received an Ericson logo for the mainsail and never ahered it to the main. Bright spot for an otherwise gloomy evening.
 

Attachments

  • IMG_2763.jpg
    IMG_2763.jpg
    48.7 KB · Views: 83
  • IMG_2764.jpg
    IMG_2764.jpg
    66.3 KB · Views: 96
  • IMG_2765.jpg
    IMG_2765.jpg
    33 KB · Views: 83
  • IMG_2766.jpg
    IMG_2766.jpg
    71.9 KB · Views: 85
  • IMG_2775.jpg
    IMG_2775.jpg
    93.5 KB · Views: 86

ignacio

Member III
Blogs Author
more pics

More pictures to scare you. I swear it....I'm going to make this awesome, and will post progress as I make my way through this. This is pretty grotesque to look at, but offers great motivation to fix it. The amazing part is that with a little care and maintenance, this could have been avoided by the PO.
 

Attachments

  • IMG_2777.jpg
    IMG_2777.jpg
    72.1 KB · Views: 78
  • IMG_2778.jpg
    IMG_2778.jpg
    78.4 KB · Views: 78
  • IMG_2779.jpg
    IMG_2779.jpg
    109.6 KB · Views: 92
  • IMG_2780.jpg
    IMG_2780.jpg
    94.4 KB · Views: 74
  • IMG_2790.jpg
    IMG_2790.jpg
    90.3 KB · Views: 85
Last edited:

Loren Beach

O34 - Portland, OR
Senior Moderator
Blogs Author
Concise & True

More pictures to scare you. I swear it....I'm going to make this awesome, and will post progress as I make my way through this. This is pretty grotesque to look at, but offers great motivation to fix it. The amazing part is that with a little care and maintenance, this could have been avoided by the PO.

The Real Truth! Same for our boat, and a zillion others....
:mad:
"The amazing part is that with a little care and maintenance, this could have been avoided by the PO."

(Listen for a collective sigh from owners of used boats all over the world.)

Loren
 
Last edited:

ignacio

Member III
Blogs Author
Latest progress

Progress has been slow with this weather. I travelled all week last week (and I'm told it was decent sailing weather too), and wouldn't you know it: the week that I'm back another front rolls through. This evening, managed to remove the formica and all the rotted wood. As you can see, I'm left with what looks like epoxy on gelcoat.

I would LOVE to remove this epoxy in preparation for laying down new plywood. From the reading I've been able to do, it sounds like lots of heat (and time and patience) is the only thing that's going to get the epoxy off. Is that a correct assumption (assuming also that this IS in fact expoxy that was holding the plywood)?
 

Attachments

  • IMG_0025.jpg
    IMG_0025.jpg
    95 KB · Views: 82
  • IMG_0030.jpg
    IMG_0030.jpg
    116.5 KB · Views: 86
  • IMG_0031.jpg
    IMG_0031.jpg
    80.9 KB · Views: 77
  • IMG_0032.jpg
    IMG_0032.jpg
    80.2 KB · Views: 75
  • IMG_0027.jpg
    IMG_0027.jpg
    96.9 KB · Views: 81

ignacio

Member III
Blogs Author
Next installment

Here's the next installation of "What did I get myself into?"

First, I sincerely hope this is helpful to someone down the road (besides me!).

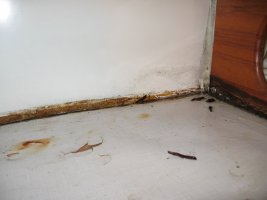
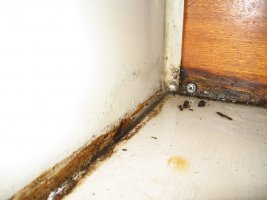
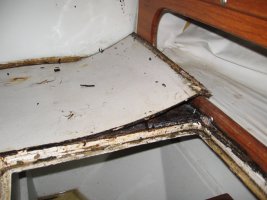
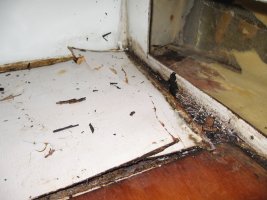
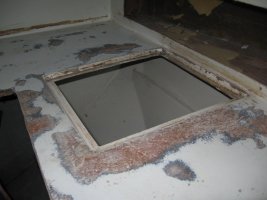
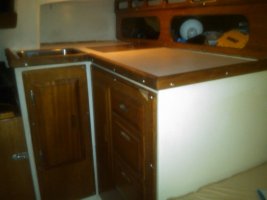
I spent a good long while removing the epoxy that previously held the plywood on which the formica was adhered to. It took ALOT of heat to get the epoxy to soften enough to be removable. Even so, I had to use a painter's tool/scraper to get underneath the epoxy and start removing big chunks off. Most of it required scraping bits off at a time. As I got to the back (where all the water and rot had been), I found the epoxy there was more rubbery, and whole big sections came off at a time but still needed much heat. So here are the layers of materials I've found (in this order):
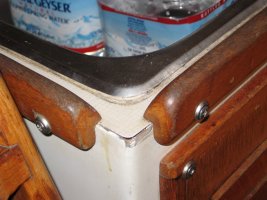
- Formica top
- Thin adhesive (apparently only in some areas)
- Thin plywood
- Epoxy (only in some areas...shown in prior post)
- Gelcoat
- Fiberglass (the mold for the whole galley)
- Thick plywood (mostly for the top surfaces)

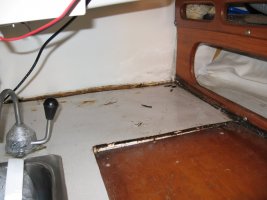
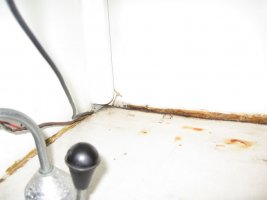
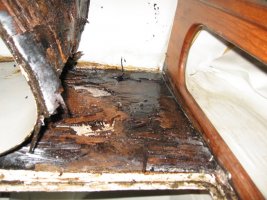
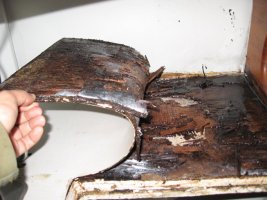
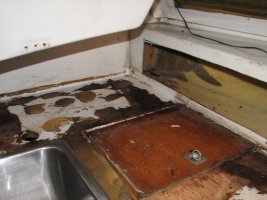
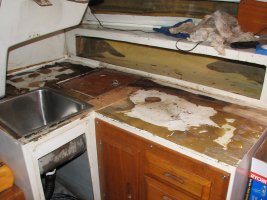
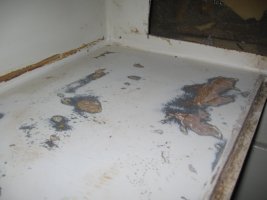
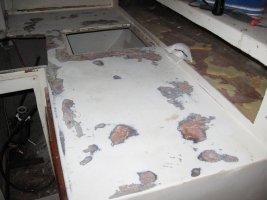
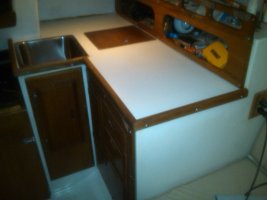
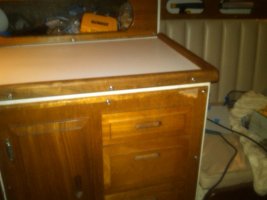
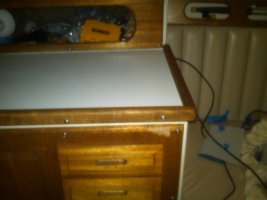
After removing as much epoxy as I could, I decided to sand the surface of the gelcoat/exposed glass and remove rough/jagged edges. You'll note that in some areas, the epoxy was pretty well adhered to the gelcoat, and so the gelcoat came off as well and exposed the underlying glass.

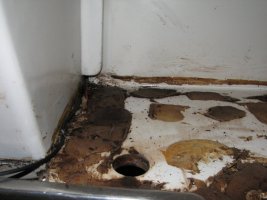
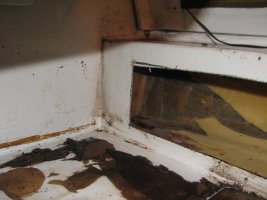
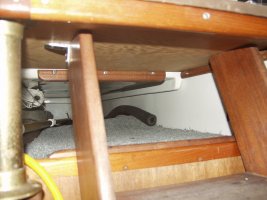
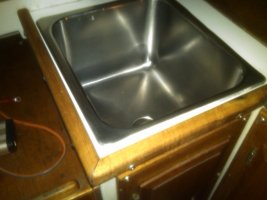
I also found that in the back where the water and rot had been, the fiberglass appears to have become delaminated from the thicker layer of plywood underneath it, resulting in a noticable lump. However, after I examined the plywood from underneath the sink area, I couldn't find evidence of rot. In addition, when I pressed down on the lump, it gives way as if there's a void beneath it. No squishing sounds or water squirting out anywhere. I think with the expansion and contraction of several years of water getting to the plywood directly underneath the formica (see first pics I posted in this thread) may have caused the lower sectionst to become delaminated as well.

This weekend, I'm going to drill a few holds and see what comes back on the drill bit. I'm expecting dry wood, but we'll see.
 

Attachments

  • IMG_2810.jpg
    IMG_2810.jpg
    55 KB · Views: 68
  • IMG_2812.jpg
    IMG_2812.jpg
    67.3 KB · Views: 75
  • IMG_2805.jpg
    IMG_2805.jpg
    80.3 KB · Views: 69

sailing42

Member II
Hi Ignacio
I also have an older 27 with the same situation and am also in the process of re-doing the countertop and ice -box. I had the same kind of leak which after a long process found its source to be the stanchion for the life-line. On my boat that stanchion is the one that is part of the gate for the life-line and when you unclip/clip the life line it caused that stanchion to flex at the base. I re-bedded that stanchion and added a angled brace to it to prevent the flexing and did the same on the starboard side.
Good luck with the repairs on the countertop, its a pretty tricky job.
John
 

bigd14

Contributing Partner
Blogs Author
I'm in the same boat:egrin:

The countertop was delaminating from the plywood beneath where the sink cutout is. I squirted a bunch of thickened epoxy under it and clamped it shut and its solid now. But the whole countertop is pretty gnarly. The gelcoat is stained and scratched. Not sure what to do about it, maybe I'll just sand it and paint it when I paint the deck.

I've also been thinking about cutting a drainage hole in the back corner where water collects. That way it should drain into the ice box and thence into the bilge, instead of accumulating there and eventually getting into the bulkhead on the cockpit side. Of course my plan is to have an absolutely dry boat, but if for some reason that doesn't work, this would help.

Good luck with the rebuilding of the countertop. Keep posting pics of your progress.

Doug
 
Last edited:

ignacio

Member III
Blogs Author
Hi John and Doug. Thanks for reading! Basically, no progress as of last post. It's been an unusually rainy season and each bit of free time I get, it ends up raining (or I go sailing :egrin:).

That said, I've discovered like you have that the port-side stanchion is one of the major sources of water intrusion (ditto for starboard side). There are other sources, but those are the big ones. Even more pressing is that there appears to be rot in that area of the deck (where the stanchions are bolted) as well, so I'm likely going to have to wait for a few weeks of dry weather before I can epoxy that area and seal it off. For me, getting that done (and resealing a bunch of other deck hardware) is pre-requisite to putting in new plywood and formica.

In addition, I'm in escrow on my first house, so not only have I been tied up in that, but I'd like to have that go through so I can get some real tools (like a table saw!!) in my new garage!

Will definitely post more pictures as I make progress.

IG
 

ignacio

Member III
Blogs Author
Looks great!

Hi Kevin,

That looks awesome! It's got me thinking about doing the same thing now. That looks like it's 3/4" thick at least. Is that plywood whose sides you covered with Corian? Those smooth rounded edges and the corner looks pretty cool.

Did you have any problems adhering the plywood onto the mold? I've notied that my counter is not flush and level...some parts are lumpier/lower/higher than others, so it's got me wondering what to do about it, and how to get the plywood adhered to it.

Here is a link to a previous thread I started a few years back.
My counter top project was one of the best improvements I made on my boat below deck.

http://www.ericsonyachts.org/infoexchange/showthread.php?t=5225
 

Kevin Johnston

Member III
Counter top

Thank you!

The corian type counter top is backed with 3/4 marine plywood only over the campionway. I used an adhesive to secure the counter top both to the plywood and to the fiberglass where the previous formica was. I didn't worry about the uneven fiberglass surface that I placed the corian on to.

I set a few screws into and through the counter top and the fiberglass than bolted them on the backside. I had to buy a complete square piece of corian. I cut it into an L shape and rounded the corners with a jig saw, file and sanded the corian material to my desired finish. I extended the counter top a few inches fore of the stove top (just enough room to rest a pint of beer on). With the remaining material, I made a top for the port side cabinet across from the bathroom, created a cover for the galley sink, and a counter top for the sink in the bathroom.

I have some more pictures of the underside support over the engine and some more detailed shots some where that I can post later in the week (if I can find the pics). Under the counter top the exposed plywood is trimmed with a teak interior trim I picked up at West Marine. I used the teak trim original to the counter area on each end of the corian.

The admiral and I couldn't be happier with this upgrade! Now if I could only get to the boat more frequently.
 
Last edited:

ignacio

Member III
Blogs Author
more picutres!

Hi Kevin,

I'd love to take a look at more pictures of your project as you progressed through it! Definitely looking for ideas on my next step, which I'm planning to take in the coming few weeks. Post a few here, or email me at: igonzale7@yahoo.com

Thanks!

Thank you!

The corian type counter top is backed with 3/4 marine plywood only over the campionway. I used an adhesive to secure the counter top both to the plywood and to the fiberglass where the previous formica was. I didn't worry about the uneven fiberglass surface that I placed the corian on to.

I set a few screws into and through the counter top and the fiberglass than bolted them on the backside. I had to buy a complete square piece of corian. I cut it into an L shape and rounded the corners with a jig saw, file and sanded the corian material to my desired finish. I extended the counter top a few inches fore of the stove top (just enough room to rest a pint of beer on). With the remaining material, I made a top for the port side cabinet across from the bathroom, created a cover for the galley sink, and a counter top for the sink in the bathroom.

I have some more pictures of the underside support over the engine and some more detailed shots some where that I can post later in the week (if I can find the pics). Under the counter top the exposed plywood is trimmed with a teak interior trim I picked up at West Marine. I used the teak trim original to the counter area on each end of the corian.

The admiral and I couldn't be happier with this upgrade! Now if I could only get to the boat more frequently.
 

Kevin Johnston

Member III
More pics

Here are a couple of more pics of my counter tops.
Enjoy and good luck
KJ
 

Attachments

  • P8100804.jpg
    P8100804.jpg
    72.7 KB · Views: 66
  • P8100807.jpg
    P8100807.jpg
    49.2 KB · Views: 71
  • P8190667.jpg
    P8190667.jpg
    50 KB · Views: 84
Last edited:

ignacio

Member III
Blogs Author
Galley countertop repair completed!!

All,

My galley countertop project has reached "substantial completion." I used 1/4" marine plywood with white formica. Used epoxy as the adhesive for both the plywood and the formica (contact cement wasn't forgiving enough). For the trim, I used some leftover teak from my handrail project, though they're a little thick at 1.25". I took a roundover bit to smooth them out, sanded, and applied teak oil. I decided to avoid the varnish on this.

I still have to put some trim in the back to hid the edges a little more, and have to make the icebox cover fit a little better, but this is far, far better than what was there before.

Sorry the pics are a little blurry, as I was taking them with my cell phone!

* Brought to you by "Ericson Cabinets 'R Us"
 

Attachments

  • IMG00191-20110411-2021.jpg
    IMG00191-20110411-2021.jpg
    48.9 KB · Views: 64
  • IMG00194-20110411-2021.jpg
    IMG00194-20110411-2021.jpg
    46.8 KB · Views: 66
  • IMG00196-20110411-2022.jpg
    IMG00196-20110411-2022.jpg
    52.7 KB · Views: 70
  • IMG00205-20110411-2024.jpg
    IMG00205-20110411-2024.jpg
    56.7 KB · Views: 68
  • IMG00203-20110411-2023.jpg
    IMG00203-20110411-2023.jpg
    47.1 KB · Views: 65
Last edited:
Top