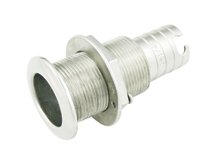
Yesterday I removed all the above-water factory thru hulls on our transom. It's been over 20 years and from the outside I had observed for some time that the exterior part of each was getting attacked by UV.
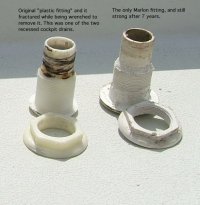
One of the 1 1/2" ones had been replaced a few years ago by the yard when a workman broke it off on the inside while freeing up the rudder post to drop the rudder. That one was replaced with Marlon and is still "bullet proof". It was the most difficult to remove and is quite reusable.
The others seem like nylon or some other plastic. Several cracked when I turned them from the inside to break the seal. One broke off completely.
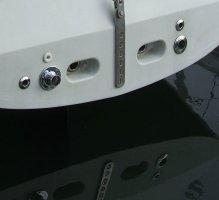
Whereas the 80's Ericsons have their stern thru hull exits for bilge pumps and cockpit drains under the turn of the hull aft, ours are on the flat surface of the transom, low down. Lots of UV exposure, which damages many plastics, given enough time.

Replacements are going back in this week, all SS. Bronze is certainly just as good, but I just like the shiny look of the SS that I have seen on other boats. Purely Subjective sort of thing.")
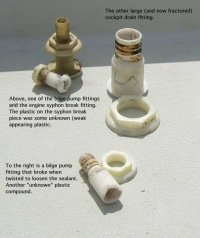
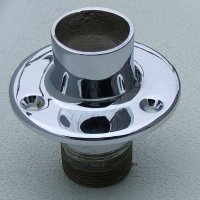
BTW, the small thru hull that, on our model, carries the warm water out of the syphon break for the Universal diesel engine cooling, is one of the more-afflicted ones, condition-wise. UV plus warm water really degrades the plastic, evidently.
As you all can imagine, it's a bear working back inside the stern. I'm just happy not to be paying yard labor rates this time around. It takes a while to worm my way back there, after pushing all the tools and trouble-light ahead of me... and more time to reverse out.
The hoses look to be OK (no cracks when I give 'em a pull and a twist), but I shall start replacing them soon. Two decades is a long time for vinyl.
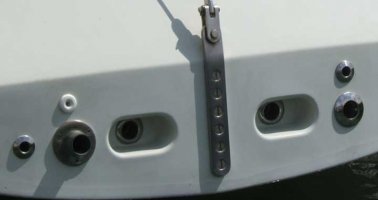
Lotsa "holes" in the hull there: one 1 1/2" for the manual bilge pump. Two 1 1/2" for cockpit drains. Two 3/4" for the two electrical bilge pumps. And, one for the 1/4" siphon-break hose exit.
**It would be nice, someday, to restore the shine on the exhaust thru hull.... anyone here ever have one of those re-chromed? If so, what did it cost?
Photos will be added as they occur.
Best,
Loren
One of the 1 1/2" ones had been replaced a few years ago by the yard when a workman broke it off on the inside while freeing up the rudder post to drop the rudder. That one was replaced with Marlon and is still "bullet proof". It was the most difficult to remove and is quite reusable.
The others seem like nylon or some other plastic. Several cracked when I turned them from the inside to break the seal. One broke off completely.
Whereas the 80's Ericsons have their stern thru hull exits for bilge pumps and cockpit drains under the turn of the hull aft, ours are on the flat surface of the transom, low down. Lots of UV exposure, which damages many plastics, given enough time.
Replacements are going back in this week, all SS. Bronze is certainly just as good, but I just like the shiny look of the SS that I have seen on other boats. Purely Subjective sort of thing.
BTW, the small thru hull that, on our model, carries the warm water out of the syphon break for the Universal diesel engine cooling, is one of the more-afflicted ones, condition-wise. UV plus warm water really degrades the plastic, evidently.
As you all can imagine, it's a bear working back inside the stern. I'm just happy not to be paying yard labor rates this time around. It takes a while to worm my way back there, after pushing all the tools and trouble-light ahead of me... and more time to reverse out.
The hoses look to be OK (no cracks when I give 'em a pull and a twist), but I shall start replacing them soon. Two decades is a long time for vinyl.
Lotsa "holes" in the hull there: one 1 1/2" for the manual bilge pump. Two 1 1/2" for cockpit drains. Two 3/4" for the two electrical bilge pumps. And, one for the 1/4" siphon-break hose exit.
**It would be nice, someday, to restore the shine on the exhaust thru hull.... anyone here ever have one of those re-chromed? If so, what did it cost?
Photos will be added as they occur.
Best,
Loren
Last edited: