• Untitled Document

    Join us on April 26th, 7pm EST

    for the CBEC Virtual Meeting

    All EYO members and followers are welcome to join the fun and get to know the guest speaker!

    See the link below for login credentials and join us!

    April Meeting Info

    (dismiss this notice by hitting 'X', upper right)

M25 alternator mount cracks gear case cover

Geoff Johnson

Fellow Ericson Owner
I am in the process of installing a Balmar alternator on my 1985 Universal M25 engine. In the course of researching the mounting (on the Catalina site) I came across dire warnings about how the pre-1988 method of mounting to the bracket, which is attached to the aluminum gear case, will eventually crack the case causing oil to spill into the bilge. I also came across Westerbeke's 1991 Service Bulletin #193 issuing the same warning. The recommendation is to switch to the alternate mount which is bolted to the manifold studs. I have ordered the kit from Torresen (part #256891 - $98), but am wondering if anyone else has made this modification and has any pointers.


http://www3.telus.net/Atomic_4_Eng_Service/Universal_Service_Bulletin_193.htm
http://www.c34.org/projects/projects-alt-bracket.html
 
Last edited:

Geoff Johnson

Fellow Ericson Owner
To answer my own post, I installed the new alternator mount over the weekend. Removing the studs through the exhaust manifold (the new mount requires longer ones supplied with the kit) turned out to be easy; the studs unscrewed from the engine block before the nuts (10 mm) attached to the ends of the studs came off. I had fears of the nuts coming off, not being able to get the studs out and having to take the engine apart. Not only is the new mount (picture attached) much stronger than the original, but it allows mounting of the slightly larger Balmar closer to the engine so that the engine cover will now fit. The only problem is that the tensioning bracket does not work with the larger Balmar (912) case so I had to invent another method using a rigging turnbuckle attached to plates fastened to the engine mount (which seems to be aluminum and I did not want to weaken it by drilling holes.)
 

Attachments

  • balmar0002.jpg
    balmar0002.jpg
    302.7 KB · Views: 2,538
Last edited:

Sean Engle

Your Friendly Administrator
Administrator
Founder
Hummm?

Why do you always manage to post things that scare the hell out of me? :)

//sse
 

Loren Beach

O34 - Portland, OR
Senior Moderator
Blogs Author
I see that you have changed the hose run that used to have the copper 90 deg. piece tight-fit between the stock alternator and the engine...
Love your tensioner!
Was the orig. 50 (55?) amp alternator too small for your battery bank? Or were you wanting to go with external regulation anyway??

Loren
1988 M25XP, Olson 34
 

Geoff Johnson

Fellow Ericson Owner
Actually, I didn't change the hose run; that's the way it was when I got the boat. However, the new alternator mount kit comes with a nice short hose with a built in bend that would do away with the piping. But, it also comes with the same pipe to turn the corner under the alternator. Next time I have nothing better to do that to drain the coolant from the engine, I'll make the switch. I went the high output alternator/external regulator route because after installing a battery monitor a couple of years ago, I realized how persistently undercharged my batteries are; my boat's on a mooring so sun and engine power are all I have. I am replacing the two Group 24 lead acids with Group 24 AGM's because they can take better advantage of the high amperage output and don't self discharge much and I am adding a third (starting) battery on the shelf in the starboard cockpit locker, with a manual switch.

One more tip for anyone of thinking of making the conversion. When you pull the studs out of the exhaust manifold, coolant will shoot out of the hole, so be quick with the replacement stud. Beats me why coolant doesn't leak around the stud when in place with no gasket or sealant, but it doesn't.
 
Last edited:

cruis-n

Member II
Thanks, mine is done now.

I had seen the thread on the Catalina list as well. With your prodding, I ordered the upgrade kit as well. Installed it in about an hour and 1/2. The bolt through the aluminum housing had seized and twisted off. Had to cut the aluminum alternator bracket in two with a hack saw to get it off. Finessed out the studs and only two leaked antifreeze. Thanks for warning about the antifreeze, it was not so much of a surprise as it would have been otherwise. Now to finish off upgrading the wiring harness plug to terminal strip upgrade recommended by Universal. Ahhhh, the life of a boat owner <grin>.
 
Last edited:

Geoff Johnson

Fellow Ericson Owner
What's the terminal strip upgrade? Did you have to shim your new bracket to align the pulleys? I had to.
 
Last edited:

cruis-n

Member II
shim???

I hate to say this but I was a bit rushed for time so I did not check the alignment. Didn't start the engine so will check it this weekend. Where did you have to shim it? What material did youy use? Was it obvious that it was out of alignment? How were you able to tell?

The terminal strip upgrade is to get rid of the two sets of 8 position plugs in the wiring harness. They are prone to corrosion and given time will cause starting problems and in one case that I saw, melt/char the connectors. The recommendation is to replace the two sets of plugs with terminal strips and properly crimped lugs on each wire.

Most folks don't know that the plugs are there because they are wrapped in black electrical tape.
 

Geoff Johnson

Fellow Ericson Owner
To test alignment, place a straight edge on the flange of the alternator pulley and check to see that it is parallel to the belt. My alternator pulley was "toed in" a few degrees, so I canted the bracket out by placing washers between the bracket and the engine at the front and between the bracket and engine for the first two of the four studs on the side. Like you, I was very pleased with my self on getting the bracket installed, but then had to take everything apart to get it aligned.

So where do you fasten the terminal strip? I am modifying the wiring on an ad hoc basis. For example the alternator output now runs directly to the solenoid via a 4 gauge cable. (This is supposed to be fused so I'm thinking about how to do that). I plan to bring all switched circuits (alternator field, fuel gauge sender, Tiny Tack tachomter, fuel pump) down to a dedicated terminal strip from the ignition switch. So that really leaves only the power to the panel and the temp and oil gauges, that still run through the harness.
 

Mindscape

Member III
Tach with a Balmar

Geoff - I know this is an old post but I'm looking at going to a third battery and adding a Balmar alternator, so I found this thread while searching. Once you replaced the alternator were you able to keep the original tach working?
 

Geoff Johnson

Fellow Ericson Owner
I found that the tach continues to work, but the reading is off, e.g. 3000 rpm now reads 2350 (I used a handheld tach and a TinyTach to check this). However, the discrepancy is linear across the full range. I suppose you could adjust the tach, but I haven't bothered as I set engine speed according to how much vibration is being produced by the engine.
 

Rocinante33

Contributing Partner
Alternator upgrade

Frank,
Based on Geoff's fine posts and others here and info gleaned from the internet & Catalina website, I recently upgraded my alternator. I was able to add a 90 amp marine alt for much less than the cost of a Balmar, though. Less hassle, too. I used a Leece-Neville (Prestolite). This alt fits without modification to the mounting bracket. It works identically with the tach, though I had some problems that were apparently bad wiring connections at the panel and/or wiring harness. My problems were somewhat intermittent (the tach initially worked, then stopped), so I am keeping my fingers crossed that they are truely fixed.

This alt cost $169 instead of $460 to $600 (depending on the model) for a Balmar. I did the alt mount upgrade & changed all my hoses at the same time.:egrin:
 
Last edited:

Geoff Johnson

Fellow Ericson Owner
You do pay a premium for Balmar, but I wanted to match it with their fancy external regulator with presets for AGM batteries and battery temperature sensing. So far it has worked as advertised.
 

Mindscape

Member III
Alternator

Keith - although I'd love to do the upgrade Geoff spoke of I'm attracted to the costs you described! Where did you get the alternator from? I'd may do that along with the bracket upgrade and see how it goes.
 

Rocinante33

Contributing Partner
Alternator

Frank,
Here is a dealer locator site;
http://www.prestolite.com/pgs_buy/d...e_code=WI&list=submit&province_name=WISCONSIN
Here is the spec sheet;
http://www.prestolite.com/pgs_produ..._id=896&item_series_id=105&refresh=1185927037
Application sheet;
http://www.prestolite.com/literature/alts/PP1128_marine.pdf
Product performance sheet;
http://www.prestolite.com/literature/alts/PP1113_AG_Const.pdf

By the way, there is apparently an option for this alternator that can be added to bypass the internal regulator, if you want the external version, as Geoff did. I did not opt for the external regulator. It would again be more $$.

Another BTW, the bracket upgrade now costs $145, not $98 like it did when Geoff did it!

I really should write all this up as either a separate thread or an owner's project.:rolleyes:
 
Last edited:

eherlihy

Junior Member
Caution - mounting bolts

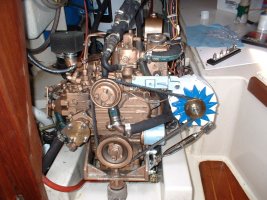
Last year I installed the upgraded Alternator mounting bracket, and a new Leece-Nevile / Prestolite 90 amp alternator on my Universal M25. If you are reading this far, you probably know that the new alternator uses EXACTLY the same housing as the old 55 amp Motorola. BTW the kit is now ~$180.00

When I opened the box, I was happy to see that it included all the parts, including the Alternator mounting bolts.

I did the installation using the new bolts, but noticed that they did not seem to fit perfectly. The SAE Grade 5 pivot bolt allowed "a little" play of the alternator, and the tension bolt never seemed to fit "right." At the time I assumed that the alternator was machined so that the bolt would jam, thus preventing the bolt from loosening. The real reason is embarrassing....

I thought it strange that both of these bolts, and the nut were SAE.
031555 - 5/16NC x 1
031615 - 3/8NC x 3-1/2
031762 - Nut 3/8-16 Hex Steel Zinc

However, EVERY other fastener is Metric. I thought that Torrensen would know and include the correct bolts, however the extra play was because the bolts did not fit.:rolleyes:

The Pivot bolt SHOULD BE a Metric M10 fastener. The tension bolt (connects the tension arm and the alternator) SHOULD BE a Metric M8 coarse thread.

I realized this because I was getting a little belt dust on the engine. After only 50 hours this summer, I thought that was unusual, or I would need to buy a lot of belts. I checked the alternator tension, and the "little" play seemed a "little" worse than it should have...

Because by now I had stripped some of the threads with the bolt that was included with the kit, I purchased a slightly longer bolt, a nut, and lock washer to use as a tension bolt. I also replaced the pivot bolt with a slightly longer M10 Fine thread bolt. It fit perfectly (no play at all). I used 2 nuts and a spring washer to jam the pivot bolt, so that it will not vibrate loose.

Lesson 1: If the components in the "kit" don't seem right to you, they are not.
Lesson 2: DO NOT USE THE ALTERNATOR MOUNTING BOLTS INCLUDED IN THE TORRENSEN KIT if they are SAE, and you have a Leece-Neville or Motorolla Alternator.
 
Last edited:

Stu Jackson

C34IA Secretary
Thanks again for that post, which also appeared on co.com. I have updated the C34 tech wiki with it (http://www.c34.org/wiki/index.php?title=M-25_Alternator_Mount_Conversion_Kit_"B/M_256891")

For those who have no idea about this, or the engine wiring harness issues, please read our C34 Critical Upgrades page, which includes lots of M25 engine issues: http://c34.org/bbs/index.php/topic,5078.0.html

You shouldn't wait to upgrade the alternator bracket until you upgrade the alternator!!! It broke on my OEM Motorola alternator.
 
Last edited:

bknight365

Member I
Thanks for the heads up on the M10 pivot bolt - my Torrenson kit did not include a pivot bolt, and the previous pivot bolt had a lot of play in the bracket. The M10 bolt fit the new alternator bracket, but would not pass the stock alternator hole. I was forced to drill out the alternator (rather than shim the bracket).

I have the alternator adjustment all the way out, and the belt is still not tensioned properly. Has anyone else experienced this? So far, I am not too impressed with this kit.
 

eherlihy

Junior Member
Here is a pic of my engine with the new bracket, and the upgraded alternator (not on an Ericson BTW);

East Providence-20120506-00108.jpg

(I'm not too impressed with this kit either).
 

bknight365

Member I
thanks for the picture. Its just like mine, but with a different alternator. It looks like you're nearly out of tension adjustment also.
 
Top