• Untitled Document

    Join us on April 26th, 7pm EST

    for the CBEC Virtual Meeting

    All EYO members and followers are welcome to join the fun and get to know the guest speaker!

    See the link below for login credentials and join us!

    April Meeting Info

    (dismiss this notice by hitting 'X', upper right)

Installing a MaxProp, a DIY job ?

Sven

Seglare
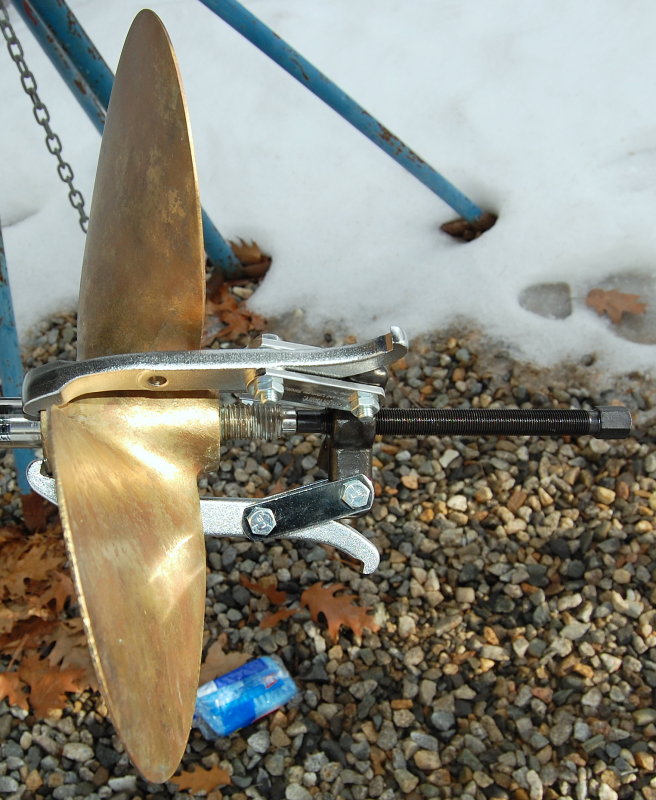
Is there anything about a MaxProp which would prevent a DIY installation ? Am I likely to need any special "propeller-puller" tools to remove the old fixed one ?

I can't imagine that there is any rocket science involved but I'd rather ask than learn by repeating others' mistakes :)


-Sven
 

Guy Stevens

Moderator
Moderator
Just make sure the tapers match

And that you apply a liberal amount of tef gel between the prop and the shaft... That way it may come off when you want it to later!

I assume that you know that the shaft almost always has to be modified for the max prop to fix right? The maxprop nut is special and has to have a hole drilled through the shaft for the roll pin that secures it. (If you are installing the classic model) * If you are not installing the classic model then you may ignore this section.


Guy
:)
 

Sven

Seglare
Hi Guy,

And that you apply a liberal amount of tef gel between the prop and the shaft... That way it may come off when you want it to later!

I assume that you know that the shaft almost always has to be modified for the max prop to fix right? The maxprop nut is special and has to have a hole drilled through the shaft for the roll pin that secures it. (If you are installing the classic model) * If you are not installing the classic model then you may ignore this section.


Guy
:)

The classic model apparently comes with a drill or no-drill nut, customer's choice. I'm not sure why one would want a nut that needs the shaft drilled but assume that was just the earlier model.

In what way does the shaft have to be modified ? The instructions at the Max-Prop site didn't mention any modification other than the drilling (if you chose that model nut). It does mention that the key may need to be filed down, but nothing about the shaft itself.

Thanks,


-Sven
 

Guy Stevens

Moderator
Moderator
Just the drilling!

The original in the way that it goes together is secured from turning by the roll pin in through the shaft.
If you get the no drill nut, then you should be able to put them together without a problem on the hard. Make sure that you know how to read the chart for the pitch adjustment.
Also make sure that your shaft taper is correct for the maxprop.

Guy
:)
 

Cory B

Sustaining Member
Sven -
For the "Classic" at least, a third hand for setting the pitch would probably be helpful. Theres too many bits that have to be held "just so" for us ordinary people to hold on to (but I'm sure Guy can do it with one hand tied behind his back :) ) - and to top it off its all covered in grease.
 
Last edited:

Tom Metzger

Sustaining Partner
There is a good chance that you will have to circumcise - :oops: Oops - shorten the shaft for the nut to seat. Just a little time with a good hacksaw blade.
 

Maine Sail

Member III
A large

A large three jaw puller from an auto parts store will work fine for removal.

This photo is how NOT to pull the prop.

Always back the nut off about 1/8 -1/4 of an inch off the prop face and leave it there. Then use the gear puller to "pop" the prop. When I say "pop" I mean they really pop off. If a nut is not there you could seriously hurt your self and get hit with the prop. Always leave one nut on but loose when pulling a prop..
107634139.jpg
 

Sven

Seglare
Also make sure that your shaft taper is correct for the maxprop.

I asked my PYI contact (who has been very helpful) and he told me that the Ericson line was built with standard SAE taper. I'll assume he is right unless you think there might be exceptions ?

Sven -
For the "Classic" at least, a third hand for setting the pitch would probably be helpful. Theres too many bits that have to be held "just so" for us ordinary people to hold on to (but I'm sure Guy can do it with one hand tied behind his back :) ) - and to top it off its all covered in grease.

Unless I can convince Nancy to provide the third hand I'll just have to pretend it is a dingy sheet and use my teeth :)

There is a good chance that you will have to circumcise - :oops: Oops - shorten the shaft for the nut to seat. Just a little time with a good hacksaw blade.

Thanks for the heads up. It would be a pain to be on the hard and have the old prop off only to have to run off and get a fresh set of hacksaw blades.

A large three jaw puller from an auto parts store will work fine for removal.

Another excellent suggestion.

With all these hints I'm sure we'll do as well as we could even hope to.

Thanks !


-Sven
 

Sven

Seglare
Placed the order

Last weekend, after 6 glorious hours actually sailing, I decided to try to back down to our side-tie, despite the lady's demonstrated free spirit.

Over half an hour later, and many laughs ashore and aboard the spectator fleet, I gave up.

I'm sure glad Nancy doesn't get embarrassed as easily as I do when I act incompetent, she didn't even go hide down below. I was sorely tempted to go hide myself.

So we just committed three BOAT$ and placed the order with Fred at PYI.

In a week and a half I'll install it and cross my fingers :)


-Sven
 

Greg Ross

Not the newest member
The Auto Parts Store Puller

Sven,
Unless you feel some specific desire to own the Puller tool!
Many Auto Parts Stores offer "Loaner Tools" such as "Puller Kits" for the DIY Set. Only qualifier if you opt to borrow, check thru the kit to make certain there are enough of the bits and pieces to assemble the length of puller assembly you require for this application.
Also check threads, these are a tool type that are definitely abused!
 

Sven

Seglare
Hi Greg,

Sven,
Unless you feel some specific desire to own the Puller tool!

I think I will buy a cheap one since we'll be keeping the old prop as a spare and might need it at some point when it would be most inconvenient. I just have to figure out where to mount the spare on board ... I'm sure it will look quite large and bulky down below but fortunately the E-39B has a reasonable amount of storage (for two).

The loaner tool suggestion is very good and I'll keep that in mind for other jobs.

Thanks,


-Sven
 

Loren Beach

O34 - Portland, OR
Senior Moderator
Blogs Author
Sven,
If the Lone Ranger had worked in a boatyard, and had to install a MaxProp classic, he would have really needed Tonto!
I have watched this procedure, and it looked like four-handed-dentistry, with greasy hands!

So.... "Be prepared."

:)

LB
 

ted_reshetiloff

Contributing Partner
Mine went on single handed. I did have to cut off the end of shaft. Hardest part IIRC was dealing with the tiny cotter pins on all of those screws.
 

Tom Metzger

Sustaining Partner
Send Tonto for beer...

Ditto Ted. I put mine on alone originally, and the next spring adjusted the settings alone. As I remember changing the settings was more challenging as everything was covered with grease.

I didn't have a problem with the cotter pins.
 

Sven

Seglare
Got the prop and the puller

The puller was a grand total of $9 and looks quite adequate for the job:


<table style="width:auto;"><tr><td><a href="http://picasaweb.google.com/sven.grenander/MoreSentaWork?feat=embedwebsite#5311374302814746834"><img src="http://lh4.ggpht.com/_5euMixf8XfI/SbXKyZxpONI/AAAAAAAAAhk/ODJnjaK4smM/s144/DSC_9110.JPG" /></a></td></tr><tr><td style="font-family:arial,sans-serif; font-size:11px; text-align:right">From <a href="http://picasaweb.google.com/sven.grenander/MoreSentaWork?feat=embedwebsite">More Senta work</a></td></tr></table>

The prop weighs 17 lbs and looks beautiful. I'm glad we'll have 4 hands to assemble it as putting it together on the workbench by myself was a real challenge even without trying to align the correct angles.


<table style="width:auto;"><tr><td><a href="http://picasaweb.google.com/sven.grenander/MoreSentaWork?feat=embedwebsite#5311374365576017938"><img src="http://lh4.ggpht.com/_5euMixf8XfI/SbXK2DlGOBI/AAAAAAAAAho/kCHBfawaSgI/s144/DSC_9111.JPG" /></a></td></tr><tr><td style="font-family:arial,sans-serif; font-size:11px; text-align:right">From <a href="http://picasaweb.google.com/sven.grenander/MoreSentaWork?feat=embedwebsite">More Senta work</a></td></tr></table>

It will be a busy weekend :)


-Sven
 

footrope

Contributing Partner
Blogs Author
A beaut!

Nice looking prop, Sven. Good choice, I think.

I often lost the zinc on mine between changes because the zinc wall around the outside of the screws was so thin. I was advised to paint that area of the edge and since then I haven't lost one. I've used acrylic spray paint and refrigerator enamel touch-up paint, both work about the same.

Best --
 

Sven

Seglare
Nice looking prop, Sven. Good choice, I think.

I often lost the zinc on mine between changes because the zinc wall around the outside of the screws was so thin. I was advised to paint that area of the edge and since then I haven't lost one. I've used acrylic spray paint and refrigerator enamel touch-up paint, both work about the same.

Best --

I took another look at the zincs after you posted that suggestion. You certainly have a point !!

The zinc around the screws is really thin compared to the rest of it. I'll definitely follow your advice and pre-paint the areas around the screws. Thanks for the heads up.


-Sven
 

Leon Sheean

Member II
Max Prop Retaining Nut

My two blade did not have a cotter pin to hold it in place (a 1990 version), so I checked it annually over 12 good years. But I must have had a "senior" moment a couple years back, and of course it was gone before I knew it! Keep it snug with regular checks...
 

Sven

Seglare
It was nerve wracking but it is done

The gear/prop puller almost turned the weekend into a failure, but thanks to great help the job still got done !

<table style="width:auto;"><tr><td><a href="http://picasaweb.google.com/lh/photo/XfFIGYeW0M62NHRJjK8nOA?feat=embedwebsite"><img src="http://lh4.ggpht.com/_5euMixf8XfI/Sb2p5uDM5NI/AAAAAAAAAjA/E3tAQZeowwo/s144/IMG_4446.JPG" /></a></td></tr><tr><td style="font-family:arial,sans-serif; font-size:11px; text-align:right">From <a href="http://picasaweb.google.com/sven.grenander/Maxprop?feat=embedwebsite">Maxprop !</a></td></tr></table>

It was wonderful to back out of the hoist slip and turn while backing !!

-Sven
 
Top