• Untitled Document

    Join us on March 29rd, 7pm EST

    for the CBEC Virtual Meeting

    All EYO members and followers are welcome to join the fun and get to know the guest speaker!

    See the link below for login credentials and join us!

    March Meeting Info

    (dismiss this notice by hitting 'X', upper right)

Exhaust elbow riser fitting problem

Bolo

Contributing Partner
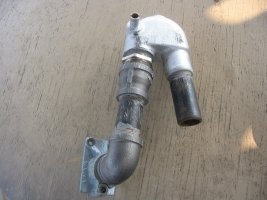
I have an E-32 III with a Universal M-25XP engine. The original exhaust elbow riser started showing rust spots on either side of the elbow indicating that it was failing. The metal was rusting out at both spots so I figured it was time to replace the unit. I contacted Torrensen Marine, via email, sending them the details on the engine and even a digital photo of the failing elbow.

They recommended and sent me a replacement elbow (with a Westerbeke name on it) flange (to connect it to the exhaust port on the engine) and other parts to make it all work. It went on the engine without a hitch. A perfect fit up until I got to connecting it to the muffler. It seems that the "old" Universal elbow had a 1 5/8" fitting but the new Westerbeke replacement has a 2" fitting. So I couldn't connect it to the muffler which has a 1 5/8" fitting. I tried to find an adapter, 2" to 1 5/8", so I could make the connection, but no one in the Annapolis, Md area had one which surprised me.

I tired a couple of variations of brass fittings to go from 2" to 1 5/8" but adding all those reducers and fittings just made the whole set up a nightmare and it just wouldn't fit. So then I called Torrensen Marine and told them about my problem. They suggested that I purchase a 2" to 1 5/8" reducer coupling (by Centek) which they told me was made from fiberglass and would be OK to use on the "wet" side of the exhaust system. The guys at "West Marine" also told me that a fitting made from fiberglass was OK to use. But still there is the problem of a tight fit which was a challenge with the original 1 5/8" hose but will be more so with the reducer and a 2" hose. So I was thinking of getting a length of Vetus 2" corrugated hose which is suppose to be "extremely" flexible and approved for exhaust use.

So, what I'd like to hear is if anyone else has replaced the old exhaust elbow and, if you had similar fitting problems, what did you do? Thanks in advance to you all!
 

jgarmin098

Member II
I did that replacement about 8 years ago. Same boat, same engine. I don't recall having a fit problem with the exhaust hose. It's possible that there are two versions of the elbow, one with 2 inch and one with 1 5/8 inch fittings. It might be worth a call the Westerbeke for a confirmation before you force fit something that is less than optimal.
 

Bolo

Contributing Partner
Only 2" available, I'm told

I was told by the rep at Torrensen Marine that the only elbow now available is one with a 2" hose port. I do have an email into tech support at Westerbeke asking if there is one available with a 1.62" port but they've not gotten back to me yet. As of right now I have a reducer and Vetus (very flexible) exhaust hose on order. Only solution I know of right now. :esad:
 

Bolo

Contributing Partner
Final answers

I went to the source and emailed Westerbeke with my question and got a quick answer too. All exhaust systems are now 2" and the only option is for me to use and adapter (which I'm going to do) or replace the rest of the 1.62" hose exhaust from the elbow out to the exhaust port in the hull. That's something I'm not prepared or willing to do right now because the system is in good working order. But when the time comes to replace the exhaust hose from the muffler and/or the muffler, I'll then replace it all with 2" hose.

Thanks for all your suggestions.
 

gfilipi

Member I
Mixer Replacement

I have the same boat, one year older. I just replaced my Mixer/elbow with part number #200266. I redid my exhuast a year ago and should have replaced it then. Since the exhaust hose from the muffler was new and 1 5/8 I decided to go with the Vernalift muffler part #1500077. It is 2 inch side in and 1 5/8 top out. It works very well and made the project very easy. Feel free to email me with any questions.
 

Rocinante33

Contributing Partner
Sorry that I am late to reply on this, but maybe still in time to help out. My M-25 has the 2 inch exhaust elbow with a Vernalift 1 5/8" muffler. The simple solution (apparently by some P/O) was to cut a piece of 1 5/8" hose only as long as the hose barb (I'm guessing 2-3") on the muffler. Slide the small hose piece over the muffler hose barb & then slide the large, 2" hose from the exhaust elbow over the outside of small hose & double clamp it all down. The small hose is the correct diameter to fit within the large hose. I suppose it restricts the exhaust flow a bit where it enters the muffler, but this is no 21 HP hotrod!:egrin: It is very simple, though not elegant.
 

Ray Rhode

Member III
Bob,

Sorry about the timing. I was talking to a friend with a Catalina 27 and mentioned your problem. He had just gone through the same repair and had posted his solution in Mainsheet. His engine is a M-18 but we did some measurements on my M-25 and I believe the exhaust is pretty much the same. Here is the article and some pictures.

"After 21 years of faithful service, the mixing elbow on my Universal M-18 engine began leaking above the water nipple. The original setup was a flange on the aft end of the exhaust manifold. A steel exhaust pipe screws into the flange. The pipe does a 90 degree upward turn, then a 180 degree loop heading down. Toward the end, a stainless section with the water injection fitting is welded to the pipe. Mine broke at the weld. The pipe has a layer of hardware cloth (wire) covered with fiberglass fibers and covered with 2 inch fiberglass tape. Not really a great setup because so much heat is given off over a long run. Mine was 50% clogged with carbon at the top bend. There was no way to know that or clean it.
Many people have made a system using black iron pipe with a “T” fitting at the end for the water injection and I am sure this works fine, but still ends up with a lot of hot pipe before the water is injected.
I used black iron pipe and a Yanmar exhaust riser. This set up seems to be the same as what Ericson used on their boats back when they were in production. There are several benefits to this system. The water is injected much closer to the engine to keep the heat down in the engine bay. Repairs can be made in the future with off the shelf parts. Best of all, the system could be disassembled for cleaning.
The how to: Remove the water injection and wet exhaust hoses. Drain the coolant from the manifold. Remove the 3 nuts on the exhaust flange. Be very careful with the nuts. If they don’t come fairly easy, soak with penetration fluid. Don’t use an open ended wrench. If you round off a nut, you will have much bigger problems. If the flange will not come off, use a razor blade to trim some of the gasket material along the top and side until you can lightly tap in a chisel. Try not to damage the surface on the manifold. Remove the flange and be ready to catch some coolant that will come out the bottom. Remove the old pipe from the flange. My flange was so far gone, I could not save it. You might be lucky.
Now for parts, starting at the engine and working aft.
Flange Gasket You could make one, but due to the high temp, I bought one to be sure. Universal p/n 298600 $2.80
Flange If you are lucky you can use the old one. If not, you can buy one from any Universal dealer or online for $73.70 p/n 298599
Nipple Black iron 1-1/4” nipple, 2-1/2” in length (don’t use a close nipple, the bottom flange nut will not go on). $1.78
Elbow Black iron 1-1/4” 90 degree $3.12
Nipple Black iron 1-1/4” 4” long $3.00
Reducer Black iron 1-1/2” to 1-1/4” $4.32
Adaptor & Riser The exhaust riser is a very common part used on many Yanmar engines up to 30 hp. Yanmar p/n 104214-13521 ($99.91). The inlet is left hand threads, so you will need an adaptor, Yanmar p/n 104214-13580 ($27.10). The riser may look strange because the water injection nipple is on the engine side. This is because there is a passage inside that dumps water out of the outlet side. This is a big advantage because the water cools the entire riser.
Pipe 1-1/4”, 5” long (I got a 6” nipple and hacksawed the threads off one end) $3.25
My local Lowe’s had some black iron pipe, but a limited amount. I have been told not to use galvanized pipe because the coating gives off a poison gas. Black iron is used for natural gas, high pressure air and petroleum products. Any plumbing supply store should have all the black iron pieces you need. You will need one 1-1/2” to 1-1/4” reducer for the riser adaptor. Everything else is 1-1/4”.
With everything hand tight, put it all on the engine a see how the hoses line up. Also see if you have clearance above the heat exchanger. When you get it how you like it, take it off the engine and tighten it. This is IMPORTANT. Use a high temp pipe dope or muffler sealer on the threads and get it very tight. Use 2 big pipe wrenches. Check each fitting and make sure that over half the threads go into the next joint. Get it tight as you can, then get it tighter. I had to take mine off and get it tighter. It is big stuff and I doubt a mere mortal could get it too tight.
You will also need a piece of fiberglass heat wrap to cover the pipe from the flange to the riser. Many marine supply stores carry it, but if not you can find it at performance auto shops, but you might have to buy a role. Hot rodders use it to wrap exhaust headers. It takes about 26 inches of wrap. I used stainless steel wire to hold the wrap in place. You could use hose clamps.
Installation is using Lanacote on the flange gasket and anti-size compound on the stud threads. Put the assembly on the manifold and tighten all three nuts a little at a time. Buy new nuts, Ace Hardware has them. Hook up hoses and refill manifold with coolant. After the engine has been run and cooled back down, re-torque the mount nuts.
Photos show the new exhaust system and installed system.
My new elbow is about 2 inches closer to the top of the engine compartment, but that is alright since the top is water cooled and being closer to the top should not hurt anything. It will make it even harder to ever get a following sea to flood the engine.
The fiberglass wrap will smell bad for the first few hours of operation."

Ray Rhode
S/V Journey
E-35III, #189
 

Attachments

  • Copy of Exhaust Assembly.JPG
    Copy of Exhaust Assembly.JPG
    107.7 KB · Views: 1,645
  • Copy of Exhaust Installation.jpg
    Copy of Exhaust Installation.jpg
    88.6 KB · Views: 2,939
Top