You are using an out of date browser. It may not display this or other websites correctly.
You should upgrade or use an alternative browser.
You should upgrade or use an alternative browser.
This is especially effective when using a polysulfide type e.g. 3M101 and you have dissimilar materials moving in relation to each other through flex etc. It results in a custom gasket with some meat to it. Note that the full cure time on some of these sealants is several weeks.
In my "ignorance is bliss" days I rebedded my lifeline stations and numerous blocks using the "final" tightening method(as a topside fastener holder can be hard to find). I've experienced NO leaks since '88 and here's my $.02.
Unless you prep the holes w/ epoxy before mounting your running the risk of disturbing the seal on the bolts when doing the final tightening(absolutely NO movement) and allowing moisture into the deck core, if not the interior.
By final tightening the bolts the sealant is forced into the screw threads and as I remember it even "oozed" out around the heads. Why would you want to disturb that kind of seal?
My other thought is I want NO movement in any deck mounted hardware I have. I guess it all depends on the application.
Maine Sail
Member III
I don't know the ..
I don't know the origins of this practice but it has sure given boat yards a ton of deck core repair jobs!
The best method for bedding hard ware is to countersink each hole slightly on the deck side. Then apply your bedding compound/sealant and then tighten it all the way down! Reaming & potting the holes with epoxy takes it to the next level beyond this and insures no deck core damage..
By doing this you've created an o-ring or gasket completely surrounding the shaft of the bolt and the countersinking ensures the sealant does not squeeze out and actually forces more into the countersunk area the more you tighten. By waiting for it to cure then tightening you run a huge risk of twisting the bolt and BREAKING the seal!
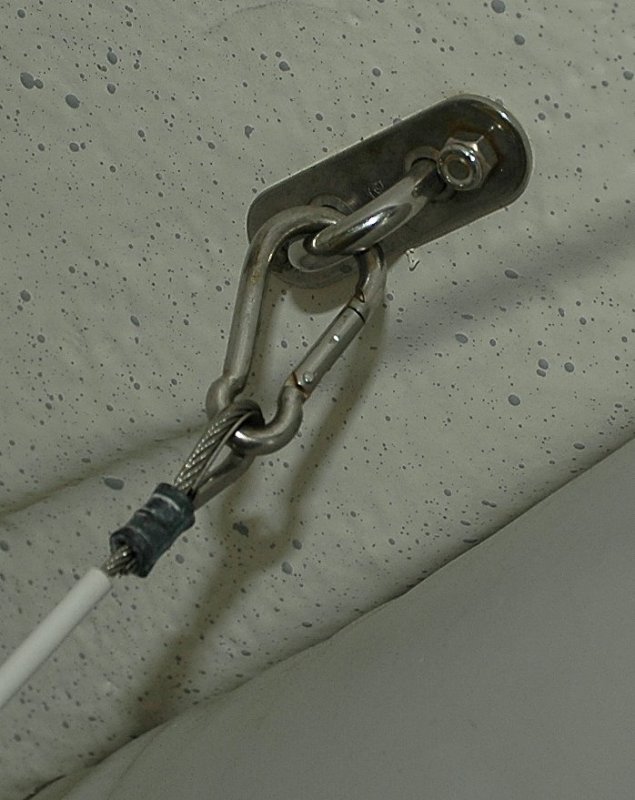
The picture bellow shows a set of lifting pad eyes I installed on my RIB using the countersink method and 3M 101. These pad eyes are BELLOW the waterline and are used to lift the dinghy into the davits. They have been bone dry and never once leaked a drop of water in the five years since I installed them this method works bellow the waterline and on deck too...
DO NOT wait to tighten! I'm convinced this method was created by boatyards to ensure future business...
Outside the hull backing plate:
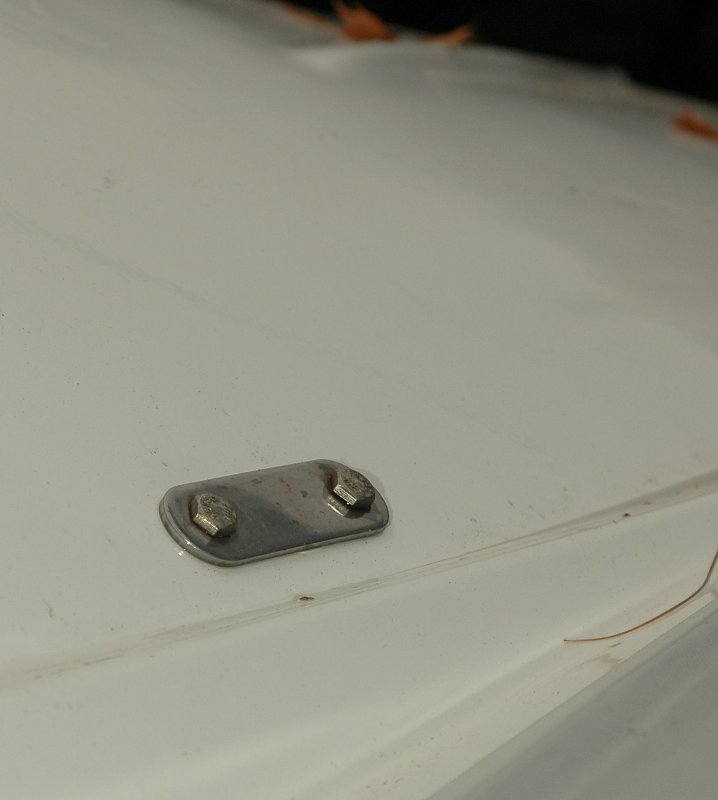
Inside the hull lifting eye. Five years and not so much as a rust stain! There is NO leaking:
I don't know the origins of this practice but it has sure given boat yards a ton of deck core repair jobs!
The best method for bedding hard ware is to countersink each hole slightly on the deck side. Then apply your bedding compound/sealant and then tighten it all the way down! Reaming & potting the holes with epoxy takes it to the next level beyond this and insures no deck core damage..
By doing this you've created an o-ring or gasket completely surrounding the shaft of the bolt and the countersinking ensures the sealant does not squeeze out and actually forces more into the countersunk area the more you tighten. By waiting for it to cure then tightening you run a huge risk of twisting the bolt and BREAKING the seal!
The picture bellow shows a set of lifting pad eyes I installed on my RIB using the countersink method and 3M 101. These pad eyes are BELLOW the waterline and are used to lift the dinghy into the davits. They have been bone dry and never once leaked a drop of water in the five years since I installed them this method works bellow the waterline and on deck too...
DO NOT wait to tighten! I'm convinced this method was created by boatyards to ensure future business...
Outside the hull backing plate:
Inside the hull lifting eye. Five years and not so much as a rust stain! There is NO leaking:
Last edited:
M S
I forgot to mention the countersinking thing..........blissfully ignorant?....... maybe not.")
The best method for bedding hard ware is to countersink each hole slightly on the deck side. Then apply your bedding compound/sealant and then tighten it all the way down! Reaming & potting the holes with epoxy takes it to the next level beyond this and insures no deck core damage..
By doing this you've created an o-ring or gasket completely surrounding the shaft of the bolt and the countersinking ensures the sealant does not squeeze out and actually forces more into the countersunk area the more you tighten. By waiting for it to cure then tightening you run a huge risk of twisting the bolt and BREAKING the seal!
I forgot to mention the countersinking thing..........blissfully ignorant?....... maybe not.
Thanks for the infomation. As far as enlarging hole and filing with epoxy which is a better method
Drill bigger diameter hole and fill or
Dig out core with allen wrench attached to drill then fill
w/epoxy
The dig-out would be "better" although much more difficult. The sleeve from a larger hole "may" collapse a bit when tightened, but hopefully the core will be saturated before the epoxy cures .
Duct tape usually works pretty good to plug the hole on the inside and surround the topside hole w/ blue painters tape. Cut the hole w/ an X-acto knife.
Thanks for the infomation. As far as enlarging hole and filing with epoxy which is a better method
Drill bigger diameter hole and fill or
Dig out core with allen wrench attached to drill then fill
w/epoxy
Drilling a bigger hole removes all the strength the skin on each side has to offer. If going the epoxy route the best way is to dig out the core with Allen or bent nail. Note, I only do this when the core is compromised. If the core is solid then the bedding/sealant did its job so I just rebed and move on. As long as the bedding/sealant is working why worry unless you LIKE working with epoxy and filler....
RT
Maine Sail
Member III
To dig..
To dig out the core I use my Dremel with a small rotary wrasp.. Digging out the core is the preferred method as you keep the top and bottom skins intact. Using a bent nail or allen wrench can get messy and really mess up the surface hole if your not careful...
To dig out the core I use my Dremel with a small rotary wrasp.. Digging out the core is the preferred method as you keep the top and bottom skins intact. Using a bent nail or allen wrench can get messy and really mess up the surface hole if your not careful...
I think there should be some clarification of applications and suitability of approach. Let's say I was running halyards aft and was attaching a cheek block to the cabin top. I would view this as an application for an adhesive sealant such as 3M 4200 or 4000. In this application, fully tightening up front is the approach I would take. There are several reasons. I am tightening it enough complete with a backing plate on the interior side that I never expect or want it to move. The 4200 or 4000 are also considered adhesives as well as sealers. Since they have a glue property, I don't ask them to flex a whole lot, granted they can withstand some flex. So, this is scenario that I would bolt it tight right up front. Same with stanchions and other related deck hardware.
Now, the second scenario would be something like the chainplates on Emerald. On my particular boat, and it varied in the production of the Independence 31, I have aluminum chain plates fiberglassed into the hull. They pass through cut outs in the deck. Around the chain plates is a flat stainless plate that screws into the deck with basically a stainless sheet metal screw. Can you see the leak scenario here?! You have aluminum chainplates that will flex. They are passing through a deck structure that is going to move independent of the chain plates. Attached to this deck is the stainless plate that is supposed to help seal, and it has it's own issues being secured into the glass with sheet metal type screws. Attempts to seal this with the bolt it tight method using an adhesive sealant such as 4200 or 4000 did not work. To my rescue was the past experiences of another Independence 31 owner. Solution. Use 3M 101 - a polysulfide that from my understanding, turns into basically rubber when cured. It is a sealant more than an adhesive, even though it has very good ability to adhere to surfaces - it is important to distinguish a glue property versus an adhering property for sealing - the 101 is a different creature from the 4200/4000. So, in the Independence 31 scenario, where it needs all the help it can get, we cut a shallow groove around the chain plate in the deck to add an "o-ring" to the final shape, apply a nice layer of 101, press the stainless plate down on it firmly, but not enough to squish it all out, let it sit a day, and then snug up the screws. I think it's also important to note that on the 101, full cure time is 2-3 weeks, so if you have some movement 16-20 hours into it, I don't think it has the same impact as using 4200 fast cure. This approach seems to handle all the movement that occurs as these dissimilar materials of aluminum chainplate, glass deck, and stainless plate are coming together. Also note that the stainless plates that are screwed to the deck are never stepped on, touched, grabbed etc., so they aren't like a stanchion that you want/need bolted hard down.
So, to get back to the original question, there is a valid approach for the right application to do the final tightening after some time period has passed if you are using certain sealants, but like all things, there isn't a single right answer that covers all applications. If there were, this wouldn't be nearly half the fun it is
Maine Sail
Member III
David
David,
My guess is that you did more to help your situation by creating a bevel around the chain plate than by using 3M 101.
Now don't get me wrong I love 3M 101 because it's easy to remove in the future and it does not have the DEATH grip of 5200 that is not needed in a mechanical connection. It is not however more flexible at break than any other 3M sealant other than 3M silicone. In my experience however the polyurethane sealants continue to harden until they become almost brittle and polysulfides stay rubbery for the duration depending on UV exposure..
Elongation at break and tensile/grip strength:
3M 5200 = 1350% Tensile Strength = 700psi
3M 4200 = 900% Tensile Strength = 300psi
3M UV400 = 800% Tensile Strength = 300psi
3M Silicone = 350% Tensile Strength = 220psi
3M 101 = 416% Tensile Strength = 139psi
Don't turn the bolt
I would add, to all the great advice above, that if you do tighten later you should move only the nut. Try not to turn the screw or bolt. May not always be possible - if the hole is threaded or if you don't have help.
In cool weather polysulfide can take forever to cure and even waiting a few days probably isn't too long to come back and tighten. I love the stuff and use it when I have mechanical fasteners for security and will have to take it apart again. Polysulfide is incompatible with most plastics, which makes it a no-no for glazing hatches or ports, unless you're using glass (mineral glass). Obviously it works fine on fiberglass and gelcoat.
I put all my pulpits and stanchion bases down with "LifeSeal" and never had a leak. Tightened 'em up good at installation and never looked back...
Agree about not letting the bolt turn; tighten up with the nut only and let the sealant force its way around every thread.
Loren
Agree about not letting the bolt turn; tighten up with the nut only and let the sealant force its way around every thread.
Loren
polyurethane sealants continue to harden until they become almost brittle and polysulfides stay rubbery for the duration depending on UV exposure..
For the scenario I am describing, it's the stay rubbery quality that I attribute to the success, and why the 101 works better than other sealants with the high flex in the chainplate scenario I describe. It's that quality to be rubber and have a seal due to mechanical compression as much as adhesion - just like most gaskets in an engine which don't have any compound on them. This secondary tightening technique is taking advantage of this stuff acting like a rubber gasket. It is using a mechanical compressive force to seal the rubber against the screw, not relying on an initial gluing of the sealant or ultimate tensile strength, but that the thing gets enough form to it before final snugging that it becomes squished mechanically tight against all surfaces, and can withstand everything moving around it because it is a rubber gasket under pressure in effect.
OK, horse is now lying dead in road with many bruises.
I've got a situation that maybe you sealant experts might be able
to help with. My traveler track sits in a molded fiberglass recess
in the cockpit. The original version was through bolted using
flat head machine scews into tapped holes in the glass and
into backing plates with nuts. It was replaced with high profile
Harken track-the kind that holds captive hex head screws in
a slot. This high profile track was chosen to raise the car enough
to clear the deck without resorting to spacers. So far so good?
Because there is no access to the bolt heads, they need to
drop into oversize holes when installing the track and there lies
the problem. Even with a countersunk bevel around the hole and
copious amounts of caulking, I've been unable to stop the leaks.
2 attempts at it and no joy, only leaks. Water likes to pool
between the track and the recess and exacerbates the problem.
I'm open to any suggestions y'all might have.
Martin
Rob Hessenius
Inactive Member
Martin K
Martin~
Just a week or so ago on another site we were discussing the product called Captain Tolley's. I have used it and have had great results. I would give this a try for your problem. It just might be the answer, if not, back to the drawing board.
Martin~
Just a week or so ago on another site we were discussing the product called Captain Tolley's. I have used it and have had great results. I would give this a try for your problem. It just might be the answer, if not, back to the drawing board.
Hi Martin, On our boat it is really difficult to get at most of the nuts under the bridgedeck traveler due to interior liner material... but I had to get at several on one end to get the (Harken) traveler car off and service/inspect the bearings.
I also had to use a lot of sealant when putting those big ol' flathead screws back into place. It worked and is water proof, but somewhat due to luck.
I wonder if you can access all of the area under that deck to get at the nuts?
Plan B might be to over-bore the holes and put nuts and washers under the reinforcing plate. If the the holes in the top surface are too enlarged, perhaps a 1/8" plate of G10 could go under the base of the traveler to provide a tighter fit for the screw and sealant to bed against?
OK, I probably have no idea what I am talking about, having only visits aboard a couple of E-31's at a rendezvous...
Got any pics to post?
Best,
Loren
Last edited:
Hi Martin,
I have the same traveler and the same problem. I'm going to try to put a very thin bead of 101 on the bottom of the metal edge of the traveler as well as the bolt holes. Hoping if I can seal it on the edges, the water will never get under it to get to the bolt holes. We'll see if it works.
I have the same traveler and the same problem. I'm going to try to put a very thin bead of 101 on the bottom of the metal edge of the traveler as well as the bolt holes. Hoping if I can seal it on the edges, the water will never get under it to get to the bolt holes. We'll see if it works.