• Untitled Document

    Join us on April 26th, 7pm EST

    for the CBEC Virtual Meeting

    All EYO members and followers are welcome to join the fun and get to know the guest speaker!

    See the link below for login credentials and join us!

    April Meeting Info

    (dismiss this notice by hitting 'X', upper right)

1986 E-32 Lewmar Hatch Replacement

gfilipi

Member I
Hi All,

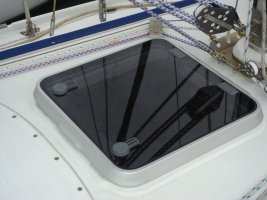
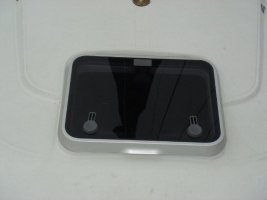
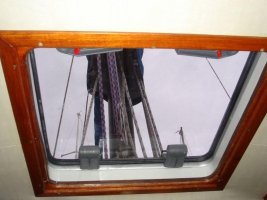
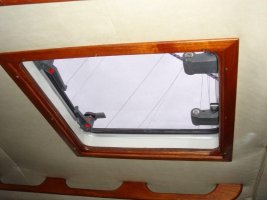
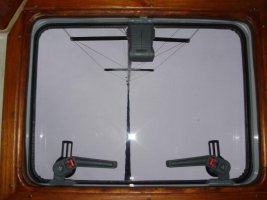
I'm going to replace my top-side hatches this winter. From reading through other posts, I believe my main cabin old Lewmar Super Hatch is the new Lewmar Ocean 60 Flat. I couldn't find any posts about the smaller forward hatch in the V-berth. I think it is the Lewmar Ocean 20 flat. Can anyone help with specific's that has replaced on around the same vintage (late 80's) E-32?

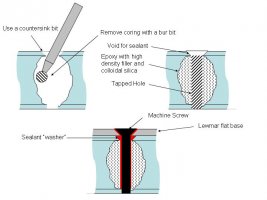
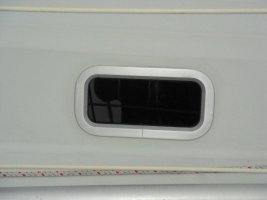
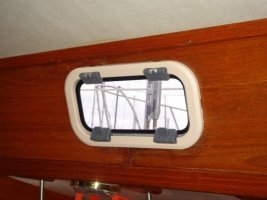
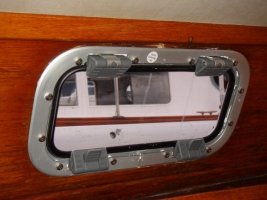
I'm also going to replace the old bomar portlights with the Lewmar size 1 Hatches. From what I read, a little needs to be cut out to make the new Lemar's fit.

Any advice on either subject would be appreciated.

Gene
 
Last edited:

treilley

Sustaining Partner
Gene, measure your hatches and note if they are mounted with a flat base frame or an L flange that fits down inside the opening. Call Lewmar and they can tell you what you have and what will replace it. If you have the flat base than the only choice you have for new is to use the Ocean Hatch. The others are not offered with the flat base.

As far as the portlights, I installed replacement Bomars and had many leaks that Bomar determined was from a manufacturing fault. They sent me replacements but I am not sure I will use them. I bought one of the New Found Metals 512ss portlights to see how they will fit. They are heavy bulletproof portlights at a reasonable cost. I considered what you are doing with using the Lewmars but I did not like the cheap look of the inside of the Lewmars.
 

WBurgner

Member III
New Found Metals Ports

Tim,
I am interested in the same project you are getting started on. Photos and comments as you would go would be a great help to others following along behind you. Good luck!
 

Al Emondi

Member II
Replaced both hatches on 32-3 - looks great

Gene,

I did complete the hatch replacement on my 32’ and it went fine and they look great. Unfortunately, I am overseas at the moment, and I don’t have access to the exact lewmar sizes I used or any pictures to post. But as others have confirmed on the site the Lewmar Ocean series flat base fit just fine however the screw holes do not match up. Maybe I can get my girlfried to post some pics if she goes to the boat this weekend.
In the mean time.. if you are getting into this project I highly recommend that you re-bed the holes in the deck when you remove the hatch. I like using West Epoxy system to plug everything up, then I redrill the new holes, tap them, and use 4200 to make the final seal in the base and threads. Here is how I would go about it.
1) Remove the old screws and remove the hatch
2) Remove any old sealant that was used
3) Using a countersinking bit, put a bevel in the gelcoat so the epoxy has a place to stick.
4) Place the new hatch on the opening (with the hinge facing forward so the hatches opens to the rear) – this avoids the chance of the boom vang interfering with an opened hatch.
5) Do your best to center the hatch on the opening and use a pencil to mark the new hole locations and I used a center punch to get an exact mark for the center for my drill (this was critical for me since I was retapping the holes –they need to line up exactly.)
6) Here is where techniques will vary – you can either just drill pilot holes in the deck for the new screw locations and just goop everything up real well with sealant, or you can drill larger holes and bed the hole with epoxy and let it kick, then redrill with a smaller bit and tap it. I prefer the later since sealants give way over time and there is nothing then stopping water from getting into the wood core of the deck (bad news!). If you use Epoxy, you will need to mix in some stiffener, I use a high density filler mixed with some colloidal silica
7) Once the new holes are bedded and tapped, fasten the new hatch with just a few screws and use painters protective tape to tape all around the outside of the flat base to make cleaning up the caulk easer.
8) Remove the hatch leaving the tape in place.
9) Apply sealant
10) Position hatch over holes and mount

I attached a picture below to help describe all this a bit better.
 

Attachments

  • Rebed Diagram.jpg
    Rebed Diagram.jpg
    38.4 KB · Views: 1,133

gfilipi

Member I
Hatch and Portlight Project Complete - 1986 E32

I completed the Hatch and Portlight Project. The correct size for the main hatch is a Lewmar Ocean Flat Series 60 and the V-berth hatch is Lewmar Ocean Flat Series 50. I had a contractor do most of the work for me. It took him 4 hours to do both hatches and an hour a piece for the portlights. I flipped the main hatch around 180 degrees so it doesn't open against the vang. The new hatches fit in perfectly. No glass was moved. The old inside decorative frames worked as well. The old holes where filled and new holes redrilled and anchored. I think the project went well. It sure is nice to be able to see out of the Hatches again. I'm going to get some canvas for them to protect them from the sun.

I used Lewmar standard size 1 for the portlights. The opening had to be widened a little bit but it was very easy to do. I have some cleaning up to do around the portlights. I'm deciding whether I want the put the trim kit on them or not. I'm trying to standardize old equipment so I can easily get parts. Next I'm going to rebed all deck hardware and replace deckfills.

I've attached a few pictures of the project.
 

Attachments

  • main hatch outside.jpg
    main hatch outside.jpg
    60.1 KB · Views: 489
  • berth hatch outside.jpg
    berth hatch outside.jpg
    23.4 KB · Views: 209
  • main hatch inside.jpg
    main hatch inside.jpg
    53.3 KB · Views: 243
  • main hatch inside 2.jpg
    main hatch inside 2.jpg
    45.8 KB · Views: 282
  • berth hatch inside.jpg
    berth hatch inside.jpg
    43.1 KB · Views: 156

gfilipi

Member I
Portlight pictures - 1986 E32

I decided to go with the Standard Lewmar size 1 portlight primarily because of cost and part availability. The price was $149 each on Defender. There was nothing wrong with the old Bomars that were in there exept they needed to be rebedded. From reading other old posts about Bomar not supporting parts for them anymore, I figured I might as well replace them since I'm pulling them out so I can find parts for them in the future ie gaskets, etc. I'm going to pull the one out of the quarter-berth later after it stops raining. The cut out needed to be widened a bit, bit but I think everything looks fine and most importantly the water stays out. I need to clean them up a bit and I'm still deciding on whether to use the trim kit. I've attached some photos of the project.
 

Attachments

  • portlight outside.jpg
    portlight outside.jpg
    27.5 KB · Views: 194
  • portlight trim.jpg
    portlight trim.jpg
    46.9 KB · Views: 227
  • portlight no trim.jpg
    portlight no trim.jpg
    54.9 KB · Views: 251

Glyn Judson

Moderator
Moderator
Saving your hatches from checking by the sun.

Gene, Lovely job, you should be proud. When having the canvas hatches made, consider asking to have 1/4" closed cell foam included in the construction. You could have it made such that the foam would slip into a pillow case affair made entirely of the canvas. You see it's the heat of the sun that checks Lexan and Plexiglas, not UV as much as you might think. I installed two identical hatches in two Ericsons in the forward slope of the cabin and covered mine with the above canvas/foam combination and my friend simply chose to use canvas alone. That was 14 years or more ago and the one I installed in our E25+ is still as clear as the day I put it in. ON the other hand, my buddies is all checked and got that way within 5-7 years after the installation, maybe less time, can't really remember. Note the old plastic and see that the areas it was protected from the sun are clear while the rest of it probably went bad. This trick was told to me by the local plastics house that cut the Lexan for my larger main hatch that is also protected with foam in the canvas. Good luck, Glyn Judson, E31 hull #55, Marina del Rey, CA
 

gfilipi

Member I
RE: Saving your hatches from checking by the sun

Hi Glyn,

I'm slowly getting the boat to where I want it. I have a couple of more big time consuming jobs to go.

I just spoke with my Canvas person and she said to ask you if you used Sunbrella Material. She said the Sunbrella is breathable and it lets the heat out. She said she'll build whatever I request, but she hasn't heard of putting the 1/4" closed cell foam in for the Sunbrella hatch covers yet.

Gene
 

Glyn Judson

Moderator
Moderator
Brand of hatch canvas.

Gene, Sorry not to have included that detail. Yes, in both cases it was and is Sunbrella. Mine was their color called Toast and my friend Lloyd's is generic sailboat blue. The fact that your canvas maker may not have heard of the practice (I hadn't either before being told by the guy at Hastings Plastics here in Santa Monica, the guy who cut the lens) shouldn't take away from the effectiveness of the result. I literally had a comparative test bed of two Ericsons with identical hatches installed, one with the foam and one without and the results have long been in, the foam wins. As a matter of fact, I even left out a detail I thought not relevant. I installed my 10" opening hatch maybe somewhere six months to a year before installing Lloyd's. Trust me on this one and go with the foam, you really won't be sorry and will have a clear hatch for as long as you own the boat. Anyway, breathability ain't at the heart of the problem, it's the heat generated by the sun beating down on it that causes the crazing. A simple 1/4" of foam is all it takes, amazingly simple. Regards, Glyn Judson, E31 hull #55, Marina del Rey, CA
 

gfilipi

Member I
Re: Brand of hatch canvas

Hi Glyn,

Thanks for your advice. Those hatches are pricey and anything I can do to extend their useful life I will do. I will definitely do the closed cell foam. A couple of questions on the foam.

1) Is the foam just on the top square portions or along the sides as well?

2) Is the foam sewed in or can you remove it?

3) Did you have your canvas person get the foam or did you get it yourself?

Gene
 
Top