• Untitled Document

    Join us on April 26th, 7pm EST

    for the CBEC Virtual Meeting

    All EYO members and followers are welcome to join the fun and get to know the guest speaker!

    See the link below for login credentials and join us!

    April Meeting Info

    (dismiss this notice by hitting 'X', upper right)

Buying (maybe) an E32-2 with a wobbly rudder

skipper007

Member II
Did we cheat?

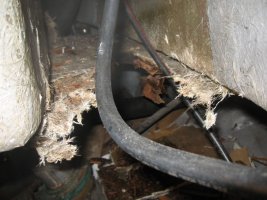
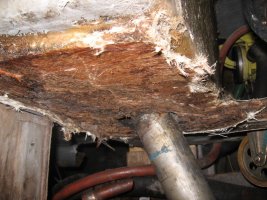
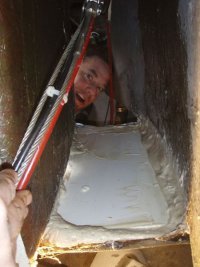
So MacGyver and I gave up on trying to get all of the rotten wood out. It actually appears as though there are two layers of glass holding 2 layers of wood spanning the distance between the forward and aft cockpit bathtubs (~20x24"). The boat yard said we'd pay more to have them replace the wood than we paid for the boat. The manager also said the strength was in the fiberglass not the wood - don't worry about leaving the rotten wood. We followed their suggestion.

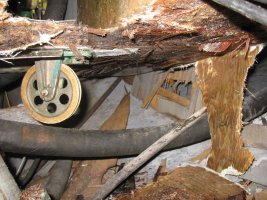
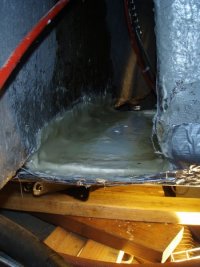
What we did is remove all of the rotten wood we could get to. We were left with a very nice fiberglass surface. First we used epoxy to penetrate as deep as possible into the remaining rotten wood. Then we pieced in a 1/2" piece of starboard (~8"x18") and epoxy filled with peanut butter strengthened epoxy. After the starboard was solid we then glassed in the corners. We intend to put one more piece of glass across the top to seal everything nicely, although we expect no issues with water penetration at this point.

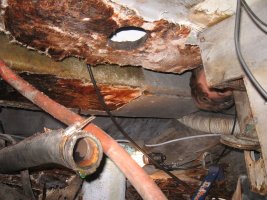
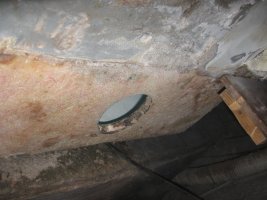
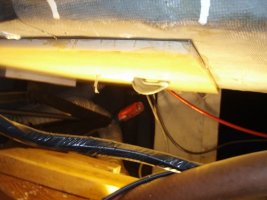
Last we added a 3/8" 20x24" piece of G10/FR4 to the bottom to serve as a backing plate for all 3 areas of steering hardware. We pre-cut a hole for the rudder shaft and then pilot hole drilled one front and back anchor point. Then we dropped the G10, spread mayonaise strengthened epoxy and clamped it up to dry. The G10 is nicely bonded to the bottom of the fiberglass (left encasing the rotten plywood).

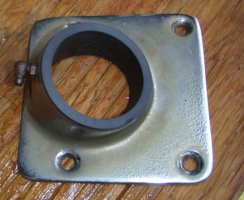
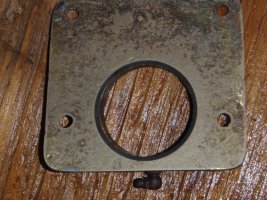
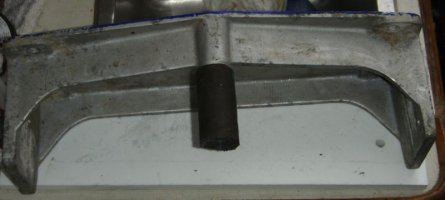
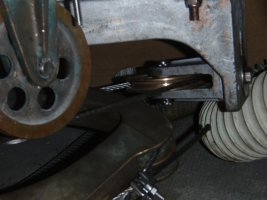
The local machine shop is drilling a larger hole in the deck plate/tiller attachment assembly into which we'll insert new delron bushings. They are also rebushing all 4 sheaves - the 4" bronze idlers and the new edson 3" bronze sheaves. Next weekend we'll do the re-installation of the sheave box, stuffing/bearing, quadrant, idlers, and deck plate. And the rebuild will be complete.......I hope?

3 Photos below: 1: the strengthened epoxied starboard (with bilge breathing MacGyver). 2: add fiberglass mat. 3: G10 while the epoxy kicks

How's it going in Canada?
 

Attachments

  • Starboard inplace.jpg
    Starboard inplace.jpg
    42 KB · Views: 68
  • glassed up starboard.jpg
    glassed up starboard.jpg
    46.3 KB · Views: 65
  • g10 kicking off.jpg
    g10 kicking off.jpg
    54 KB · Views: 62

skipper007

Member II
Wobbly Rudder - NO MORE!

Finished the installation on Sunday! Can't wait to get her under sail next weekend. Hope the weather in SFBay is good.

The yard wrapped the bottom rudder shaft area with "Delrin Tape". Yard Manager said they buy it at McMasterCarr. I didnt' find it, and forgot to measure to find what I needed. I suspect 5 mil would have been about right for the lower bearing. Put the rudder in through the new Edson packing gland (middle bearing) and new 3" exhaust hose, 4 hose clamps. Added the top deck plate with new Delrin bearing machined in. Then we added the quadrant, sheave box with newly exteneded Rudder stop, and then finally the idelers. New cables, 2 hours of alignment and everything is so very tight.

I've got a million photos - if anyone has questions let me know. But for now I'll post the following:
1. Deck plate top with Delrin bearing and lip; Installation tolerance required removing the top lip pictured; future servicability is possible
2. Deck plate bottom; machine shop drilled out a little bronze to leave a large enough Delrin wall thickness
3. Yacht Specialties Sheave box with rudder stop extended about 1". Machine shop drilled and tapped and inserted all thread to attach additional stop length. Exhaust hose as a cover. New Edson 3" sheaves to go in after hanging
4. Completed shaft zoom
5. Completed box zoom

After hours with this design and studying the YS manual I find that this isn't a recommended installation. The tolerances are very very tight and the fact that the idlers and the quadrant are on the same side of the sheave box makes alignment extremely difficult. Especially in the tight quarters.

To minimize the amount of wear on the horizontal sheaves and the quadrant, I had to set the sheave height as low as possible, limited by the cable going over the top of the quadrant. I realize now the right method would be to replace the idlers, currently 4" with 3" idlers to give me some more working room. Didn't happen this time.

Most importantly is the repair is complete. There is NO play at all in the rudder and the whole system is tight. Actually even too tight, but as the yard manager said - tight is fine - if you can move it, it is ok. It will loosen up. Total parts cost ~$1400. Total time 2 guys * 3 weekends = 12 man days, although we found our 3rd elbow hurting too much on Sundays to get to 100% efficiency. In short, we used all the best materials we could get to save labor time.

Peace to all in the new year.
Skip
 

Attachments

  • Deck Plate Small.JPG
    Deck Plate Small.JPG
    148.9 KB · Views: 56
  • Deck Plate Back small.JPG
    Deck Plate Back small.JPG
    247.7 KB · Views: 69
  • Sheave Box YS411.jpg
    Sheave Box YS411.jpg
    32.6 KB · Views: 55
Last edited:

skipper007

Member II
More photos

I could post many many more..........
Thanks again to all for hearing me out, past posts, and current suggestions.
Skip
 

Attachments

  • Rudder Shaft small.jpg
    Rudder Shaft small.jpg
    38.2 KB · Views: 64
  • Cable Run small.JPG
    Cable Run small.JPG
    186.8 KB · Views: 63

footrope

Contributing Partner
Blogs Author
Skip,

Great job on the repair and the blow-by-blow description. I appreciate the pictures, especially. One of your last photos is the Sheave Box. I have a similar box in my 38 and I have discovered that the quadrant stop is a little loose, and has dropped about an eighth inch. It brushes a spoke on the quadrant. How is the stop (aluminum tube?) installed in the hole in the Sheave Box? Is it inserted from the top or does it install from below?

Thanks,
 
Last edited:

skipper007

Member II
Craig (or Ellen?)
In the YS manual I found the 411 box listed as part of a set, including the original 3.5" sheaves that we tossed due to breakage and wearage. The quadrant stop of ours is actually molded to the box, I believe. The entire assembly appears to be molded aluminum. If yours is loose, and the same as mine, I guess it has broken free. I assume it isn't the hose padding only? My Machinist friend drilled and tapped the aluminum - so you might try that? The stop appears to be solid aluminum. I've got one more photo at home I can post tonight, with better detail of the molded stop.
Skip
 
Last edited:

footrope

Contributing Partner
Blogs Author
Hi Skip,

That was fast. This is Craig - Ellen is "MsFootrope."

My stop is an aluminum tube stuck into the hole, which is in the same place in the box as your cast or molded stop. It has a bit of hose forced onto it for padding. Don't know which is the newer design. The aluminum tube is somehow held in the sheave box, and I've not been able to figure out how, or why it has come loose. It's a minor interference issue as long as it stays where it is and I will probably let it go until it is time to do some other work below there. I have thought about forcing a bit of plastic sheet around it to make it stay up, but access is very tight, as you know.

Thanks for the quick reply - best of luck on the test sail and happy new year!
 

jthistle

Member II
Congrats and Update from Canada

Hi Skip...and the rest of you.

Congrats on the fix. Looks like a nice job - neat and tidy. We're still making messes up here in the north and working in colder temps about -10c most of the time I guess that close to 0-f. Anyway - grinding, sanding and swearing warm us up.

Thanks for the pics. I've saved them in my "sailboat rehab" folder and use them for inspiration. Our job is getting a bit bigger and of course we have to wait for warmer temps to start with the epoxy or get some heaters in there for a time. It seems the cockpit floor needs to be recored so We're going to cut the entire floor out from the top and re-core and re-glass as part of this proceedure.

We were up on Dec 31 and removed the fuel tank and all the scupper hoses, exhaust system and ball valves. Then took out the rudder and all the sheaves. I'll have a look at them, clean them up and see if they need bushings - etc. We;re going with a full replacement of the floor so the plate for idler sheaves will be replaced at the same time. Likely with glassed over plywood - G10 seems to be difficult to get. Life is also a little easier with the wall out that separates the quarterberth from the cockpit bilge. Quite a bit easier to work now.

Here are some snaps of the destruction and the rot.

Hope you all had a good new year. Stay tuned for more updates.

Jason (and Ches)
72- E35-2
 

Attachments

  • IMG_2478.jpg
    IMG_2478.jpg
    83.2 KB · Views: 64
  • IMG_2496.jpg
    IMG_2496.jpg
    126.5 KB · Views: 64
  • IMG_2497.jpg
    IMG_2497.jpg
    117.6 KB · Views: 63

Loren Beach

O34 - Portland, OR
Senior Moderator
Blogs Author
Last edited:

skipper007

Member II
Wow Wally really went after it. Probably a good thing I didn't see those pages before starting on our cockpit - it could have turned into a huge project....I don't think we are so bad off - but ignorance is bliss. I need to borrow a moisture meter at some point and re-evaluate.

But given what KKMI said - the strength is in the fiberglass - how bad is it to have hollowness or wetness between two strong fiberglass layups?

Craig - attached is a zoom of my extended rudder stop - Does it seem molded to you? Didn't take a picture of the top plate - but it was flat with no signs of welding or screwing.

Jason - You are into it now! Looks so deep. You are definitely not cheating, but your labor time will be huge. Good luck and keep those respirators & goggles on you and your bilge breather..... and BTW - saw your traveler picture - looks like a good idea - your kids are adorable too - about 2, 4, 6? My three girls are 2,4,7. You've had your boat since last summer? Sandles on deck in Canada......Good luck

Skip
 

Attachments

  • rudder stop extension small.jpg
    rudder stop extension small.jpg
    41.8 KB · Views: 88
Last edited:

jthistle

Member II
Update from the North

Whew...You folks are the best support group a crew can have. No one else can share the pain...and when you describe "grinding in the bilge" to the non-initiated I don;t think they can appreciate it.

In deep here in Newfoundland. Finished griding out the plate that holds the idlers and have made a replacement about 24" by 28" to fit back in. No the tough part is lining up the idlers with the chain and cable coming out of the pedestal.

Can anyone get me the measurements of the distance between the Idler sheave holes on a 35-2? I'm guessing with a bit of trial and error built in.

here are the before and after's of the cleanup. Soon time for reconstruction.

Thanks for the encouragement and interest...more later!

Skip....the kids love it - hope your do too! Makes all the dust and noise worth it!

Jason
'72 E35-2
 

Attachments

  • IMG_2494.jpg
    IMG_2494.jpg
    110 KB · Views: 57
  • IMG_2510.jpg
    IMG_2510.jpg
    73.4 KB · Views: 58

footrope

Contributing Partner
Blogs Author
That one is definitely molded as part of the assembly. Quite different from mine. I was just looking for the pictures I thought I took, but can't find them. Thanks for the shot, Skip.
 

skipper007

Member II
It sails (and steers well)

Boat yard dropped her in the water - and the manager calls me up - do you want the good news or bad news? Good news it floats and isn't taking on water - bad news is the steering is backwards!!! Very funny. If you turn the wheel starboard, the boat goes to port. I look back at every photo and don't see the cable crossing above the cabin sole plate at all - but with the quadrant behind the shaft it does make sense. So.....

1.5 hours to disconnect the chain from the cable and cross and re tighten and it works great. All in all the project is complete. I'm not sure my cable runs are the greatest. I don't have enough room and my cable rubs on the edge of the sheaves, on the top of the quadrant and against each other where the cross was added below the steering. But all play is gone and it is tight........It may last 3 months or 3 years or 30 years - we'll be watching it closely.

Sailed her in 12-15 knots of wind from Richmond to Alameda and it was GREAT!!! Clicked off 6.8 knots. I can't wait for the next outting......
Skip
 

jthistle

Member II
Project Completed

Hey Skip, Count yourself lucky. I believe that every project has a gremilin/oversight or problem. I always wait for that "one" thing that just ain't right and the project is not over until you find it. I always count myself lucky when that oversight is easily fixable. Good job.Cheersjason</p>
 
Top