• Untitled Document

    Join us on April 26th, 7pm EST

    for the CBEC Virtual Meeting

    All EYO members and followers are welcome to join the fun and get to know the guest speaker!

    See the link below for login credentials and join us!

    April Meeting Info

    (dismiss this notice by hitting 'X', upper right)

Project 31C gets a new hatch

Martin King

Sustaining Member
Blogs Author
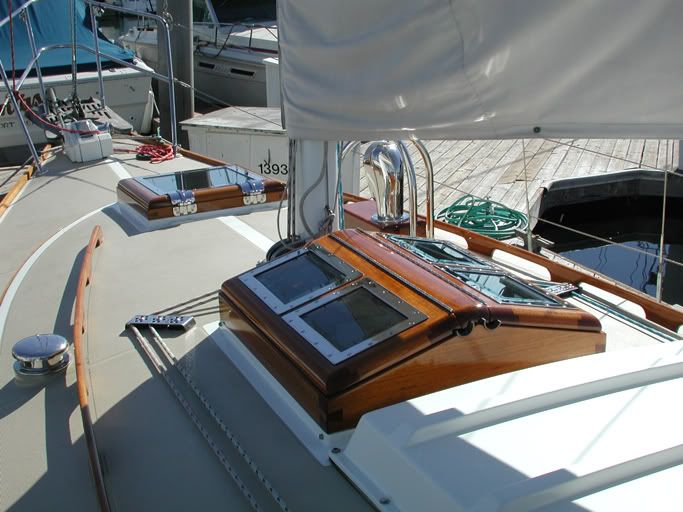
This thing has been desperately needed as the 30 year old original
had all but given up the ghost and was leaking at the joints. I finally
got it finished and installed on our beater Ericson we're rehabbing before
we got much rain.
fwdhatch.jpg


Here's a pic of the old factory part with the replacement.
hatcholdandnew.jpg


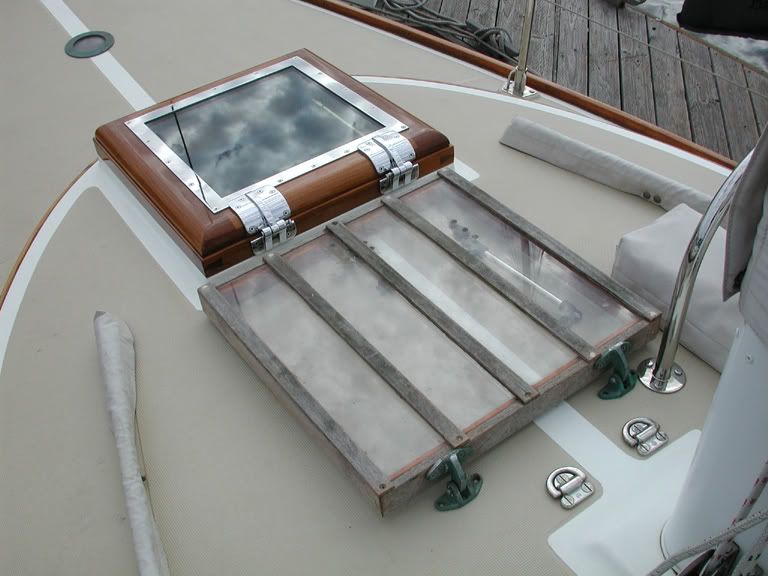
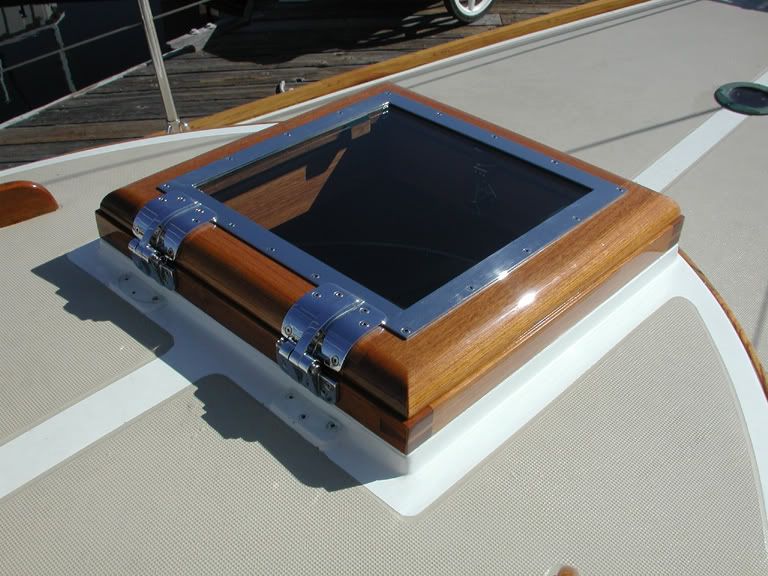
Rather than replace what was there originally, I wanted this piece
to complement the skylight I built last year which meant fabricating
all new hinges and hardware from scratch.
hingedetail2.jpg


Lots of work but the results were worth it. The new stuff looks right
at home on a boat that was designed to look turn of the century and
no more leaks! At least from the hatches....

And so it's on to the next item on a very long list of things to do...will
it ever end?
skylightandhatch.jpg
 
Last edited:

Sven

Seglare
Beautiful

Martin,

Your earlier pictures of the skylight was what inspired me to try my hand at a dovetail joint for our hatch.

How did you get the SS custom work done ? I'm drooling !


-Sven
 

Martin King

Sustaining Member
Blogs Author
Martin,

Your earlier pictures of the skylight was what inspired me to try my hand at a dovetail joint for our hatch.

How did you get the SS custom work done ? I'm drooling
-Sven

Hi Sven,
Shop drawings, waterjet, bending brake, and a cnc milling machine
is all it takes!


Absolutely gorgeous.
And will it end? Why would we want it to? :egrin:
Hi David,
I know it won't end anytime soon 'cause they aren't through
punishing me!

Martin
 
Last edited:

JMS

Member II
Martin, that looks terrific.

Gotta question -> is that the original nonskid? The pattern looks like new in the photos.
 

jkenan

Member III
Martin-

Great Work!! Your first post of the skylight inspired me to learn cabinetmaking techniques and take a stab at this myself.

I am in the process of rebuilding my hatches as well. After practicing with cheap wood, I have built the final hatches out of teak. All joints are Dado and Rabbet, clamped and glued, and then fastened in countersunk holes and plugged. All outside top edges radiused 1/2", and bottom edges radiused 1/4". Maybe next time I'll learn dovetail, but these are defintely solid. Like yours, mine abandoned the lens covering the entire top and inset them in the frame. Much sturdier and aesthetically pleasing than the original design. Unlike yours, mine utilize stock hinges and no other stainless. The lens will be 3/8" grey acrylic and fastened into a dado groove sealed with black lifeseal. Since the dado is only 1/4" deep, I will radius the edges of the lens with a 1/8" router bit.

Question - What finish did you use, and how many coats? I'm considering Cetol, but since you've been there and done it (and shown it), that's what I want.

Hope to post pictures soon.

Thanks (and thanks again for the inspirtation!)
 

Martin King

Sustaining Member
Blogs Author
Martin, that looks terrific.

Gotta question -> is that the original nonskid? The pattern looks like new in the photos.

The pattern is original, I repainted the decks using LP salted with
Interlux polymeric non skid particles. This provides enough traction
without screwing up the waffle pattern and doesn't turn the deck
into sandpaper.

Martin
 

Martin King

Sustaining Member
Blogs Author
Your own equipment or do you take it to a custom shop (that I will have to get the name of :) ?

It is beautiful.

Sven,
Because I don't do much metalworking, I had to rely on friends with
the right equipment. In the case of the hinges, 4 different specialty
shops were involved. I had looked at casting them and had even
built a pattern but after shopping it around to a couple foundries,
concluded that it was cost prohibitive for a one off part like this.
So I did the drawings, ordered up some bronze plate, and took
it over to OC waterjet, and they cut out my parts. The bases
then went over to a local fab shop and they bent them to the
correct radius. Then the ribs were silver soldered to the bases
and sent over to a local machinist for drilling and countersinking.
After knocking off the sharp edges with a file, I sent them
over to Southbay for finishing and chrome. The frame was
much easier-again cut on the waterjet out of plate 316,
sent over for drilling on the cnc mill, and then out for polishing.
The glass is the same stuff used in the skylight, 1/2 " safety
without the bevel this time and made by a local supplier.The
square drive #8 fasteners in 316 were a lucky find. Pacific fastener
had them custom made for a customer and had a bunch left
over which I snapped up. Guess that's it in a nutshell. Ping
me back channel if you need more info.
Martin
 
Last edited:

Jeff Asbury

Principal Partner
Awesome craftsmanship Martin!

Absolutely Beautiful. It adds so much classic boat design elements to already a classically designed boat. The 31C has to be my favorite of all the Ericson designs anyway.

Awesome craftsmanship Martin!

:egrin: :egrin: :egrin: :egrin: :egrin: :egrin: :egrin: :hail: :hail: :hail: :hail: :hail:

Jeff
 

Martin King

Sustaining Member
Blogs Author
Martin-

Great Work!! Your first post of the skylight inspired me to learn cabinetmaking techniques and take a stab at this myself.


Question - What finish did you use, and how many coats? I'm considering Cetol, but since you've been there and done it (and shown it), that's what I want.

Hope to post pictures soon.

Thanks (and thanks again for the inspirtation!)

John,
Glad to hear I've inspired some people to learn some joinery skills.
Looking forward to see your pictures. Regarding the finish on
my hatch, it's 10 or so build coats of a standard oil based
varnish (Epifanes, Crystal) take your pick, a week or two
dry time and topcoated with a couple coats of Bristol
Amber Finish (sprayed). I really like the Bristol amber,
You can brush it, spray it, stack multiple coats in a day
if you like, wet sand it and buff it. It is 10 times more
abrasion resistant then regular varnish and best of all
looks like varnish, not all plasticky (is that a real word?)
like clear LP. I would never use Cetol on any wood,
especially not on some showpiece I had spent hours
laboring over but that's just my opinion.

Martin

I guess I should add that Bristol is catalyzed with isocyanate
and if you are messing around with it you should treat it
like LP. THis means respirators, gloves, etc.
 
Last edited:

jkenan

Member III
Thanks for the advice Martin on the LP and I will stay away from Cetol. That's why I value this forum so much. I'm learning...

Speaking of, I'm also building some cabinet inserts to replace the storage compartments just inside on either side of the companionway (the starboard side will house the 1DIN stereo and VHF, Port side will house spices, teas, etc.). The shape viewed from the side is a polygon, which has forced me to revisit all the trigonometry I ignored in high school. I must say, trig IS fun when you're applying it to something fun. Why couldn't they teach this stuff hands on when I was in school...:confused:
 

Martin King

Sustaining Member
Blogs Author
, trig IS fun when you're applying it to something fun. Why couldn't they teach this stuff hands on when I was in school...:confused:

Funny you mentioned that because my dad dropped out of college
(physics major) to go pursue yacht design. To him, boats were and
are a real world application of physics.

Martin
 

jkenan

Member III
John,
I guess I should add that Bristol is catalyzed with isocyanate
and if you are messing around with it you should treat it
like LP. THis means respirators, gloves, etc.

Martin-

Please let me know your thoughts on this: a positive pressure respirator would only be necessary if I sprayed the LP, since the isocyanate gets atomoized in the spray nozzle. If it is brushed on, a facemask is definitely in order but a posititive pressure respirator is not.

Thanks.
 

Martin King

Sustaining Member
Blogs Author
Safety first

I just use a charcoal respirator when brushing outdoors with fresh
filters installed. If spraying, you are supposed to have a supplied air
hood or facemask.

Martin
 
Top