• Untitled Document

    Join us on April 26th, 7pm EST

    for the CBEC Virtual Meeting

    All EYO members and followers are welcome to join the fun and get to know the guest speaker!

    See the link below for login credentials and join us!

    April Meeting Info

    (dismiss this notice by hitting 'X', upper right)

Do I need to sail to a muffler shop ?

ron7546

Member II
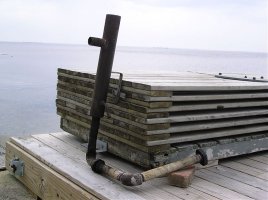
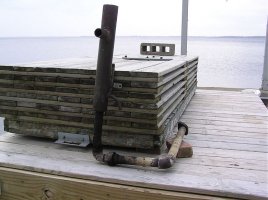
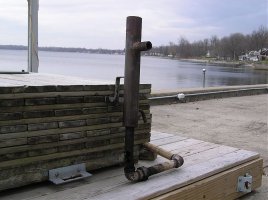
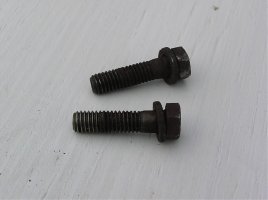
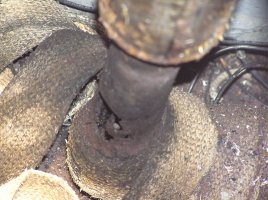
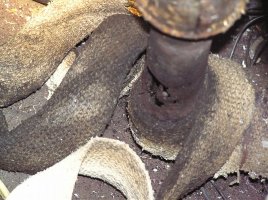
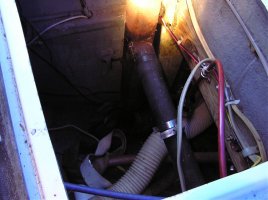
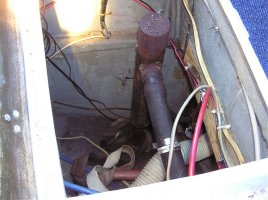
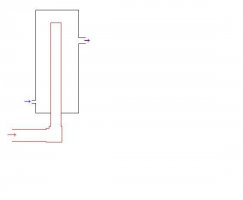
I have had fumes in my E27 since buying the boat last fall even though the previous owner installed a crankcase ventilator.The boat being wrapped and the weather being in the 50`s-60`s in northern N.Y. I just dug into the muffler system. If I can get the photos to take,perhaps someone can tell me what I have here other than a hole in the pipe leading from the manifold to the very bottom of the muffler.Does this look original ? ? ( 1976 ) In anticipation of spring disassembly I have been soaking all fasteners with that"blaster" stuff about once a week.Don Moyer tells me one option is,If I can get the system out in one piece,to take it to a welding-fabrication shop and have it repaired.Any input would be greatly appreciated.
Thanks,
Ron
'Bluenote"
 

Attachments

  • muffler 004.jpg
    muffler 004.jpg
    108.4 KB · Views: 79
  • muffler 002.jpg
    muffler 002.jpg
    131.2 KB · Views: 75
  • muffler 003.jpg
    muffler 003.jpg
    72.3 KB · Views: 79
  • muffler 005.jpg
    muffler 005.jpg
    90 KB · Views: 80

Loren Beach

O34 - Portland, OR
Senior Moderator
Blogs Author
Seek & Ye shall Find (hopefully)

If you do a Search on this site (see the Search word, above and to right of center in the blue band?) use words like 'water lift muffler' or 'A4 muffler' or just 'muffler'........
There is a LOT of information concerning engine exhaust systems from your production era.

Cheers,

Loren
 

SAILSHIGH

Member III
Take it out

I just wanted to drop my two cents in. I would definatly take it out. On my E29 all you do is undo the two bolts on the back of the manifold and the hoses. Then turning it one side and the other pull the assembly through the hatch(Cover). It takes time to get it to come out. I cut a little fiberglass away with my recipricating saw and made the hole bigger. It looks like the problem is on the pipes attached to the muffler and not the muffler itself. If thats the case take the assembly home and replace the plumbing. A real problem with this type of muffler is that it clogs at the low point. This will cause the rusting away of the pipe and poor engine performance. So make sure it is free of gunk before final assembly.

Hope this helps,

Good Luck:egrin: :egrin:
 

Randy Rutledge

Sustaining Member
Be careful with the nuts holding the flange on the manifold and don’t break the studs, if they back out of the manifold that works well but that is luck not planning. Do not destroy the flange trying to get the pipe out, Dom Moyer or this site has a photo layout of how you saw the pipe off flush with the flange and then saw linear through the pile in two places (be careful not to cut into the threads of the flange) and the two pieces should pop out.

I am a little confused as I do not see a water hose connected to the system though there is a black hose at the lower end of the muffler but I can’t tell if it is connected. On my E29 with an A4 there is a pipe like this but it has a water hose from the top of the manifold to the top of the tube where your muffler is. If there is a water hose this is not a muffler but an exhaust cooler (don’t recall the proper name) there is an internal pipe that goes to the top of the chamber and the exhaust and the water ext the tube on the side of the chamber.

A picture is worth a thousand words so see the drawing attached.
Red arrow = exhaust in
Blue arrow = water in
Red and blue arrow = water and exhaust out.
 

HGSail

Member III
Ron,

I have the system on my E29, It was rusted thru out. Chances are that if it is rusted there it is rusted on the inside. I would definetly replace the whole unit. I got mine from Pacific Seacraft ($385), But I understand that they are no longer supporting Ericson.
 

rgoff

Member III
I've had my E27 for around 23 years and have replaced the vertical "exhaust riser" 3 times. It gets clogged up and creates too much back pressure for the engine to run.

I also got my replacement risers from Pacific Seacraft. If you can't get one from them, then it shouldn't be too hard for a welding shop to make a replacement. Pretty simple construction, as the drawing in this post shows.

I've crawled down inside the cockpit locker several times working on these. No fun. I feel your pain. :)

Good luck,
 

S Ellis

Member I
Hi,
I did the same project on my '69 E32 last winter. As Loren says there's a ton of info out there on water lift mufflers. I replaced my stainless one similar to yours that had developed a pinhole leak, and rotted out the pipe right back to the manifold. I put in a fibreglass waterlift that worked out really well. Therewas a bit of head scratching to figure it out ,but there
's tons of good info out there,with diagrams!
Good luck.....my back's hurting just thinking of the contortions I had to perform!!! Steve
 

ron7546

Member II
E27 muffler

Thanks Everyone,
You all agree one one thing - - - - My back will ache! - - - Well, we will know tomorrow.I`ll start disassembly - - Hopfully 2 weeks of soaking with "blaster" will help. Perhaps another photo or two to follow and we can nail down what I have.
Ron
"Bluenote":confused:
 

Bob in Va

Member III
Nuts

I learned the hard way that when you want to remove an exhaust component that involves a screwed in stud and a nut, it is best to think of the nut as a sacrificial part. Unless it comes off pretty easily, I am always ready to cut it off using a high-speed Dremel-type tool with a fiberglass reinforced cutting disc. The cost of the tool and some discs for even one job is less than the time lost fighting a broken off stud. You can cut the nut across one flat, then spread it with a chisel, or cut two flats on opposite sides and pop it off. Generally the threads on the stud will be fairly well preserved and a new nut will screw on with little effort. If the threads are somewhat damaged, you can make your own thread chaser by cutting a nut into two halves, clamping the halves below the damaged area with vice-grips (not too tight!), and backing the resulting "chaser" off the stud. Repeat this a couple of times, oiling the threads each time, and generally the threads will be quite useable. This is usually better than trying to restore threads from the top down, as the die will often get cross-threaded and try to cut new threads rather than chase the originals. Key word when working with rusted threads is PATIENCE. Much quicker to take your time, not forcing anything, than to move faster and wring off something that will then have to be driled out, re-threaded, etc.
 

Randy Rutledge

Sustaining Member
I like the thread chaser idea. I have had the crossthread to no thread situation before.
If you look hard enough you can find nuts that are thicker than normal giving more turns of thread and that makes up for weak threads on a stud. a thich washer or spacer can move you back to good threads if the stud is long enough.
 

ron7546

Member II
E27 muffler is out

Nothing to it,Ha,Ha,Ha
OK - - it`s out and I have new photos.Took about 4 Hrs. ,can of blaster,18 inch breaker bar,12 inch hunk of black iron pipe(extension for breaker bar) 8 point socket is a must and time and patients ,more time and more patients.Was surprised to find bolts instead of studs,and also more "rust thru" at the very bottom of the piping.I must have been pumping water into the bilges while under power and taking some on while undersail with a following sea.
When it seemed I might need to pull the manifold and I was looking it over,it occured to me - - - that it is an exhaust manifold,an intake manifold and has a water jacket in it. Am I correct ? ?
Might there be a coil or any other "guts" in that 3 inch verticle 'Tower" in this system? Outwardly it is in fine shape and I am leaning towards replacing only the section from the bottom of it to the engine.
Double left click the photos to enlarge and look carfully for the inlet pipe where the water,which comes off the top of the manifold,enters the system.

Ron
"Bluenote"
 

Attachments

  • muffler # 2 005.jpg
    muffler # 2 005.jpg
    85.4 KB · Views: 112
  • muffler # 2 004.jpg
    muffler # 2 004.jpg
    92.2 KB · Views: 88
  • muffler # 2 006.jpg
    muffler # 2 006.jpg
    87.5 KB · Views: 94
  • muffler # 2 002.jpg
    muffler # 2 002.jpg
    47 KB · Views: 81

Randy Rutledge

Sustaining Member
The inside should be just like the sketch I attached earlier. If the inner stand pipe is good you can reuse the riser.
You could plug the small water inlet and fill the outer chamber (through the exhaust port at the top) until water runs out or the bottom where the exhaust enters. Let it sit for a couple of days supported in the vertical position and watch for water leaking through the inner stand pipe. There would be the dripping of the overflow from filling for a few minutes, after that it should be dry and when sure it is not leaking add water and see if the chamber is still full as a backup check.

The other way would be have a welding shop cut the bottom out and check the inner stand pipe and re-weld.

I like the union that is in the pipe below the riser that would allow you to separate the engine compartment section from the rest. I will add that when I take this path.
 

Walter Pearson

Member III
You apparently have enough of the old muffler to give you the dimensions to have another made. I do have some additional drawings if you are interested. I modified the old design somewhat by adding a drain port as far down as possible. This gives me a way to completely drain the jacket and see if there is evidence of rusting going on and also helps me winterize by starting the antifreeze procedure with as little residual water as possible.
The other change was to slightly angle the outlet so the hose hugs the inboard side of the compartment instead of going right down the middle like it did originally. This gives a little better access to the storage space.

Somewhat confusing can be the references to waterlift mufflers - which this one is not. I guess it goes by several names - the one I like best is standpipe muffler.

The pipe union really helps to get this thing installed and I also added a flexible section near the engine. I had the idea that the rigidity of the whole apparatus contributed to the failure of mine. The other really helpful thing is that I had to cut an access section out of my quarterberth to do a prop strut job and that opening now allows me to get back there without having to do the contortionist thing entering from the cockpit.

Are the rubber flex mounts still in good shape where the bracket attaches to the bulkhead? I think I have some info for replacements if you need them.

Walter Pearson
'76 E27 "Mejagay"
 

rgoff

Member III
Those pics bring back memories of being scrunched up in the compartment working on mine and my muscles are starting to ache. :)

As I mentioned before, I had problems with the exhaust system getting clogged up and creating too much back pressure for the engine to run. The last time I took this mess apart, there was carbon and rust piled up in the elbow of the piping leading into the riser almost completely blocking it.

I also have a union in my piping. However, I'm not sure it would be very easy to get it apart after being in use for a few years. Not much room to get good leverage on breaking things apart where it's located.

Glad you got it out. At least you won't need big lever arms to put it back together. And sounds like you'll have a safer boat, too.
 

footrope

Contributing Partner
Blogs Author
I just can't picture how all that fits in the back end of a 27' boat. Congratulations on getting it out and I hope the repair isn't too expensive.
 

Jim Mobley

Member II
Muffler Drawing in the E29 Manual

Nobody's mentioned it yet, so I will, there's a dimensioned drawing of the muffler in the E29 manual in the Specs and Documents section of this site.
 

Dave Hussey

Member III
reinventing the wheel

I am embarking on this same path, on my E27 which has a Volvo MD6B 10 hp diesel. The engine ran poorly last season and seemed unreliable. Began going through likely causes. Injectors tested OK. Fuel lift pump worked, but was original so I rebuilt it with a new diaphragm. Changed fuel/water separator filter.Still running poorly, decided to check the exhaust system (a determining factor was an exhaust note which sounded "off") A puff of compressed air into the exhaust line revealed that it was almost completely plugged. I used an oxy-acetylene torch and cut off the top cap of the stand pipe, and as suspected, carbon plugged the entire pipe. I plan to try and clean it, and then weld a 'cleanout' plug to the top so that I can inspect it and clean it in future seasons. Also, I plan to add a flex coupling between the manifold and the plumbing. I am surprised that all that iron mounted rigidly to the cast manifold didnt crack the manifold from diesel vibration! :rolleyes:
 

Randy Rutledge

Sustaining Member
What type flex are you using. Remember that there is extreme heat and there should be no leaks as this would KILL you if below when the engine is running.
 

Dave Hussey

Member III
>What type flex are you using. Remember that there is extreme heat and there should be no leaks as this would KILL you if below when the engine is running<

Hmmmm....that is a good question. I haven't gotten to that point yet. I was envisioning the type of flexible exhaust pipe seen on older Harley Davidson motor cycles. I would think something similar exists for marine applications...
 
Top