• Untitled Document

    Join us on April 26th, 7pm EST

    for the CBEC Virtual Meeting

    All EYO members and followers are welcome to join the fun and get to know the guest speaker!

    See the link below for login credentials and join us!

    April Meeting Info

    (dismiss this notice by hitting 'X', upper right)

Shore Power upgrade

Loren Beach

O34 - Portland, OR
Senior Moderator
Blogs Author
In an earlier thread, John M referenced an ABYC requirement that the pair of circuit breakers for the incoming shore power AC wiring be within a certain maximum distance of the inlet fitting. The actual thread was called:
"E35-II AC/DC Panel-Wiring Upgrade".
This spring I spoke with a well-regarded local surveyor about any need to make this upgrade for our boat, and she confirmed that such electrical issues have no "grandfather clause" in case of a future survey (such as a mandated insurance survey).
John quoted a current ABYC guideline that 3 meters was the max. distance nowadays, if I am correctly quoting him.

When our boat was constructed in 1988, such rules were likely different or perhaps not adherred to completely(?). In any case, by actualy wire measurement, when I pulled the old wire out two days ago, it was 15 feet long. The wire itself was the "proper" type, being Boat Cable, tinned, 3/10. OTOH, it was stretched too tight for a really proper installation, at both ends. I also found a small cut in the outer sheath while installing those stanchion reinforcement plates under the deck this spring. I decided that since electrical fires are the number one risk on boats in general, it was time to be proactive and modernize this system. :)

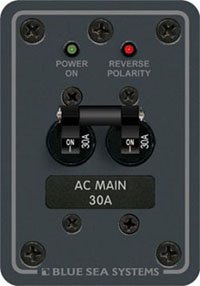
While I might wish that Ericson had done a more tidy job of installing it in the first place, I was nice to see that my boat had, right from the git-go, the proper spec. cable leading to a double pole breaker on the AC panel.

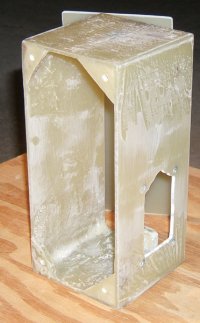
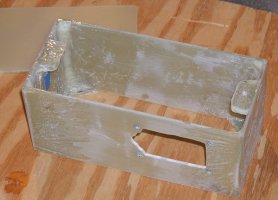
Getting ready for this upgrade, I built a FRP box with a removeable cover a couple weeks ago. I used 3/16 inch "G10/FR4" panels, and made it 4 X 4 X 9 inches. Corners were joined with fillets and I wrapped some light cloth around each outside edge. It looked at bit rough, so I sprayed it with white paint -- well, it's still a bit rough... but now blends in with the factory white gel coat in the lazerett area, sort of. :rolleyes:

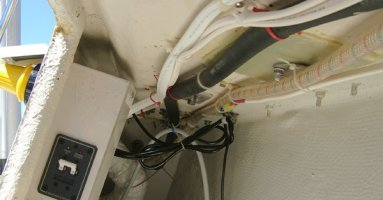
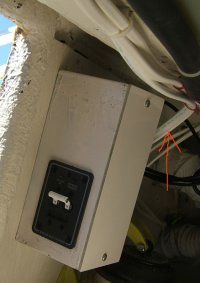
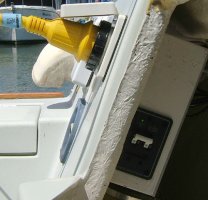
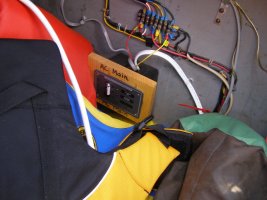
Imitating other late model production boats, I put the new box on the backside of the shore power inlet connector, which on our model is beside the cockpit laz. seat hatch. Now I open the hatch, look to the left, and there is the Blue Seas breaker in its little panel. The actual wire length from the plug inlet connection to the breakers is about 8 inches.
:nerd:

I even managed to install some extra plastic wire ties along the way to make the wire run more secure. It all looks quite workman-like now, if I do say so. :D

Admittedly this was rather a small project, but it was so satisfying to flip on that new breaker yesterday evening! Beside, after two days without shore power, the fridge had drawn down the house bank to 12.4 volts. Ninety degrees (f) here yesterday, and handy bottles of cold water were sure appreciated! ;)

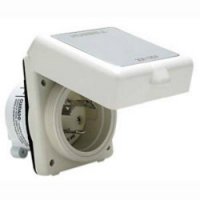
I will try to get some photos of the new box to add. Here is the inlet that came with the boat (and was re sealed as a part of this work) and the new Blue Seas panel.

Best,
Loren in PDX
(Ericson) Olson 34 Fresh Air
 

Attachments

  • Hubel inlet.jpg
    Hubel inlet.jpg
    28.9 KB · Views: 1,017
  • small BlueSeas panel.jpg
    small BlueSeas panel.jpg
    33.6 KB · Views: 940
Last edited:

wurzner

Member III
Loren,

No bragging about the quality of workmanship without photos! Being the lazy person and uncreative person that I am, I'd really like to see some shots of what you did. I have the breaker setup you showed in the thread, but it too is in my main panel so it is well beyong the 3m requirements. Looks like something to add to the list. By the way, looks like my repower is going to run 12~14k. My out of pocket will be 1800 plus depreciation on the engine which will likely be 30% of around 8500. When all is said and done, looks like 5 to 6 boat bucks from the kitty! Oh well, should be a much nicer ride since it will have 4 mounts instead of 3 and the new engines are smoother running. I'm putting in an M35 in place of the M40, but going from 32hp to 35hp.

Shaun
 

Loren Beach

O34 - Portland, OR
Senior Moderator
Blogs Author
Project photos

Here are some project photos. The new box is shown after being constructed out of epoxy plate and after holes for mounting were all drilled. Note that a little template is needed for the cutout for the breaker panel. I got some info from a pdf on Blue Seas web site and also measured the back of the breaker assembly. One of the photos shows the AC cable dissappearing around to the back of the box -- all that's there is a standard 3/4" hole for a strain relief clamp... all 20 cents worth.

Also, I have included a shot of more of the underside of the deck in case anyone is interested in seeing one of the G10 backup plates epoxied in, in this case under the forward leg of the stern pulpit.

Loren

:cool:
 

Attachments

  • box and lid before paint.jpg
    box and lid before paint.jpg
    90.7 KB · Views: 329
  • box alone.jpg
    box alone.jpg
    97.4 KB · Views: 341
  • box and underside of deck.jpg
    box and underside of deck.jpg
    78.5 KB · Views: 378
  • Inside view with arrow.jpg
    Inside view with arrow.jpg
    83.1 KB · Views: 360
  • Inside and outside view.jpg
    Inside and outside view.jpg
    98.6 KB · Views: 339

bigtyme805

Member III
Hey Loren:

I made the same upgrade this spring. Very close to your setup but I constrcucted a different box, much smaller. Although, I very much like yours. Nice job. I wish I had some pictures, but will take some when I am down on the 4th.
 

Sven

Seglare
Nice !

Do you want to do La Petite's electrical systems ? Adding 110 service would be nice. How much time do you need ?

:)


-Sven
 

Loren Beach

O34 - Portland, OR
Senior Moderator
Blogs Author
Thanks, guys

Sven, How much time, you ask? At the pace I work, wayyyy too much! OTOH, if you are paying my transportation and per diem... Hmmm... "let's make a deal!"
:)

Don, If I were to do this again, I would reduce the height a half inch (i.e. closer to the mounting surface) and make the whole box an inch shorter (8 inches instead of 9). The width would stay at 4" because the screws that go into the surface need some room around the back of the shore power fitting which protrudes into the upper part of the box when it is in place. I would not want to too-far-dimmish the amount of "comfort room" inside for all those fat #10 wires... I even went to a ground post on the inside of the back because there was not room under the little screw at the top of the Blue Seas panel for two added #10 lugs where their ground sense wire is placed.

I would fair the outside surfaces better, too! It is plenty strong, but not very pretty.

Trouble is, and it's true with all these boat projects, that you never do the exact same one again, so your new skills/knowledge never get further refined.
:rolleyes:

Loren
 
Last edited:

bigtyme805

Member III
Loren I finally got a chance to take a picture. Really only did this for insurance purposes. Surveyor dinged me for the 10ft rule. Not anymore, he cleared me. I used the blue seas also.
 

Attachments

  • mainbreaker2.jpg
    mainbreaker2.jpg
    112.8 KB · Views: 723

Loren Beach

O34 - Portland, OR
Senior Moderator
Blogs Author
Don, That looks great, and the other wiring visible in the photo also looks very professional.
Since you live closer to him, have you considered working on Sven's Ericson?
:egrin:

Cheers,
Loren
 

bigtyme805

Member III
That's a laugher... I am sure Sven can do his own. I figured it out by reading Nigel Calder's book. At $90 per hour for a marine electrician I learned fast.
 

CaptnNero

Accelerant
Nice job !

Loren, nice work and thanks for the details on this ABYC upgrade. I was not aware of the 3 meter rule. I'm still trying to figure out the 12 meter rule ;) . I know from the front of KOKOMO's lazarette to the midship's distribution panel, it's a tad more than 10 feet.

FYIY, something to consider is instead of G10, there is a fire retardant version, FR4.
 
Last edited:

Loren Beach

O34 - Portland, OR
Senior Moderator
Blogs Author
FR4 it is

You are right, Neal. Actually I just have a habit of calling it by the former industrial name... what I used is in fact FR4. The vendor answers to either request with the same material -- and would sometimes correct my nomenclature and sometimes not.

Loren
 

CaptnNero

Accelerant
Terrific, so your box is the best it can be. The FR4 would make a good battery box too.

Indeed, as I do some web surfing I see that some sell G10 and FR4 separately, and others just sell a product called G10/FR4. I found different milspec numbers for the two products but of course the fire retardant characteristic is the difference.

Do you have to order it or can you get it locally ?

FYIW - for less demanding projects Home Depot sells something called FRP that's about 1/8", meant for shower stalls. It's smooth on one side and bumpy on the other. It's only about $30 per 4'x8' sheet.

Loren Beach said:
You are right, Neal. Actually I just have a habit of calling it by the former industrial name... what I used is in fact FR4. The vendor answers to either request with the same material -- and would sometimes correct my nomenclature and sometimes not.

Loren
 

Loren Beach

O34 - Portland, OR
Senior Moderator
Blogs Author
"Plastics, my boy! Plastics" That's the future....

I made some phone calls when I started the stanchion/pulpit project and needed a bunch of pre-cut backing plate material. (I have laid up laminates in the past and know just how much time and money, at retail prices, would be involved in making my own using epoxy and cloth. :rolleyes: )

TAP is and has been my go-to source for many materials, but in this case another local plastics supplier, Port Plastics, http://www.portplastics.com/ , with a warehouse a few miles from my house, was less expensive. They have a will call desk and no showroom -- that's probably why they can be cheaper.

As you may know, "FRP" (and GRP) are just standard acronyms for Fiber Reinforced Plastic (or Glass Reinforced Plastic). The stuff you get on the cheap is likely laid up with a chopper gun and would not have nearly the strength for my purposes.
It is all descriptive of glass fibers held in a predetermined matrix by plastic resin... and, the strength and integrity of the cloth is the whole key... and of course having just enough resin to bind it tightly. With the chopper gun you get short fiber bits and more (often lots more) resin.

This opinion worth $.02, of course.
:)
Loren in PDX
 

CaptnNero

Accelerant
Loren, thanks for the source info. I'll call around here since I see your suppliers are left coast.

I think the FRP might be a nice short cut for cosmetic work where full strength and fire retardant characteristics aren't in play. If FRP is really CSM, then that puts it squarely into the cosmetic area like the stuff over the hull roving.

Loren Beach said:
...
As you may know, "FRP" (and GRP) are just standard acronyms for Fiber Reinforced Plastic (or Glass Reinforced Plastic). The stuff you get on the cheap is likely laid up with a chopper gun and would not have nearly the strength for my purposes.
It is all descriptive of glass fibers held in a predetermined matrix by plastic resin... and, the strength and integrity of the cloth is the whole key... and of course having just enough resin to bind it tightly. With the chopper gun you get short fiber bits and more (often lots more) resin.

This opinion worth $.02, of course.
:)
Loren in PDX
 
Last edited:

southofvictor

Member III
Blogs Author
Loren I finally got a chance to take a picture. Really only did this for insurance purposes. Surveyor dinged me for the 10ft rule. Not anymore, he cleared me. I used the blue seas also.
Where did you source the premade box you mounted this in? I love Loren’s handiwork but not sure I have the space. Yours looks smaller and probably quicker to build.
 

Loren Beach

O34 - Portland, OR
Senior Moderator
Blogs Author
Where did you source the premade box you mounted this in? I love Loren’s handiwork but not sure I have the space. Yours looks smaller and probably quicker to build.
One thing about fabricating it from scratch is that you can choose the dimensions. I was allowing for the room inside for the back of the plug and wiring, and also enough room on one side for the Blue Seas two pole breaker. With hindsight the box could have been shorter.
I was trying to be lazy, and looked around for a ready made quality box, but could not find one.
Once you start making your own project with G10 plate and thickened West System, it's kind of fun. Actually.
I always make a ply or cardboard mockup first, tho, because I am not smart enough to fully imagine stuff well in 3D, just from a drawing. :(
 

southofvictor

Member III
Blogs Author
Thanks Loren. I have some coosa board left over from another project. I think I’ll give the box a try. I like the idea of custom fitting it to enclose the shore power inlet as well. my galvanic isolator is right next door so I’ll need to work around it as well. Custom is probably the better way to go.

Looks like you mounted it four through-bolts in corner gussets and then have a cover plate with two mounting screws?
 

Loren Beach

O34 - Portland, OR
Senior Moderator
Blogs Author
Thanks Loren. I have some coosa board left over from another project. I think I’ll give the box a try. I like the idea of custom fitting it to enclose the shore power inlet as well. my galvanic isolator is right next door so I’ll need to work around it as well. Custom is probably the better way to go.

Looks like you mounted it four through-bolts in corner gussets and then have a cover plate with two mounting screws?
Will epoxy adhere to "coosa" ? Hope so.

Yes I did do the corners and the cover the way it is in the pictures.

Note also that those four screws attaching the box to the inside of the lazaret go into a factory plywood backer and not into the cockpit frp molding.
 
Last edited:

southofvictor

Member III
Blogs Author
Yes coosa is a fiberglass reinforced foam core material. It’s engineered to use in place
of plywood when you want lighter weight and no water absorption. Quite a bit less money than g10 if you don’t need the rigidity and strength.
 

southofvictor

Member III
Blogs Author
I'm thinking if I can find the right spot to mount a B/S 3116 panel enclosure it could allow me to split my water heater from my nav station AC panel so that it can only run from shore power and everything at the nav is OK to run from the inverter. I saw one post on PKYS where they recommended installing in a place where you'll always see the LEDs to make sure you don't have reverse polarity. Have any of you with your main breakers in the lazarette found this to be a concern?

 
Top