• Untitled Document

    Join us on April 26th, 7pm EST

    for the CBEC Virtual Meeting

    All EYO members and followers are welcome to join the fun and get to know the guest speaker!

    See the link below for login credentials and join us!

    April Meeting Info

    (dismiss this notice by hitting 'X', upper right)

E-25 Wide Berth

Rob Hessenius

Inactive Member
Does anyone have plans for the starboard berth extension. I kinda saw one on a E-25 on Craigs list today. Im really tired of trying to sleep up in the v-berth. I have drawn up some plans from "Good Old Boat" on a berth that you sleep across the cabin using a blow up mattress. I would like to compare ideas before I go about construction. Rob Hessenius
 

Glyn Judson

Moderator
Moderator
Rob, If your E25 starboard settee is anything like the one in the E25+, it shouldn't be too much of a job making up one on your own. Years ago I added that slide out section to our 25+ from a paper template borrowed from the local Ericson dealer (many, many years ago). After making it according to that pattern I saw how easy it would have been to do it without the pattern at all. Essentally it's just a piece of plywood laid over the existing one when stowed. I held mine in place with two 1/4" pins made from stainless steel bolts. I added ring cotters to the ends for something to grab on to. The teak fiddle on the front edge of the existing plywood has to be removed and reinstalled on the edge of the added sliding plywood. Any mounting holed in the vertical fiberglass will obviously be covered by the reinstalled fiddle. Some shaping of the outboard edge might be necessary so as to make it conform to the curve of the hull there. With it in the stowed position, match drill a 1/4" clearance hole in each outboard corner through both thicknesses. Then slide it out so there's a 1" overlap and use the same two holes in the top piece to drill two matching holes in the bottom plywood. If you really want to get fancy and avoid that slight step between the two pieces, trim 1" off the leading edge of the fixed piece so the movable one can slide out and drop down flush with the bottom one. The sliding piece will then be supported by the settee structure. The same trick for match drilling can be done in any convenient frame member, so if you choose to do it the latter way, consider match drilling it in the deployed position first and then in the stowed. I added a 1"X1" teak piece, say 12" long across the front bulkhead as a sort of track for the extended piece, thereby avoiding the need for a leg there. The aft corner of the berth rested conveniently on the bottom step of the engine cover so yours might be slightly different in that respect. the width of the berth will be the width of the back and seat cushion laid flat side by side. Email me back channel at glynjudson@adelphia.net and I'll send you several images of this same method that I recently used in the pull-out berths of our 1969 Airstream Caravel. My guess is that the existing plywood in your boat is either 1/2" or 3/4". The Airstream ply was 3/8" and sagged under the weight of any but a small child so I made both pieces (fixed and sliding) from 3/4" birch plywood. Go for it, Glyn
 

Rob Hessenius

Inactive Member
Glyn- Thanks for the responce. The E-25 CB or at least mine has no aft, starboard settee. What I really would like is pics of this installed option stowed and set up. Again thank you. Rob Hessenius
 

rwpajak

Member I
Rob,
I have an E26 and added 4" to the width of the starboard berth with almost no effort and it sure made a big improvement for two sleeping. Can give details if interrested.
 

rwpajak

Member I
Ericson26 Starboard Berth Improvement

Just in case the text document got lost!


:confused:Ericson Port Berth Improvement text.doc

Ericson 26 Port Berth Improvement
S/V Its About Time
rwpajak@comcast.net


My wife and I didn’t like the somewhat small V-berth for sleeping and the larger starboard side salon pullout was also a little narrow, so I made a small cut at one corner of the plywood pullout berth support and substituted two slightly larger seat cushions and made the berth wider for more comfort. Not bad for a zero cost improvement. Te only tools needed were a hand saw and a drill with a 3/8” bit.
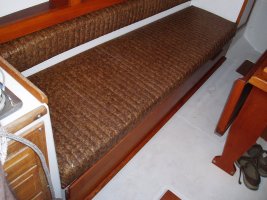
The figure 1 below shows the opened berth with a mattress pad over the seat cushions – a nice extra bit of padding over the buttons on the cushions. The mattress pad was cut down from a full size cover and my wife did the sewing. Note the extension of the mattress beyond the mast support post is about 4” greater than original design.

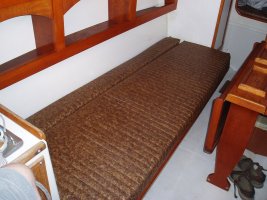
Next photo 2 shows the modified berth using the original port seat bottom cushions and a second pair which are not from the port side seat backs (can’t remember but I sized the pulled out dimension to fit the wider cushions.

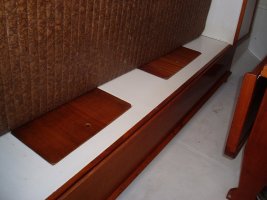
Photo 3. The slideout plywood berth support required only an additional 4” (square piece) cut out to allow it to pull further to the left of the mast support post. Note that there is a small “v-shaped” area to the right of the locking bolt where the plywood fails to meet the seat structure. This never seemed to be a problem once the cushions were in place, especially since it is at the end of the bed where little load is ever placed.

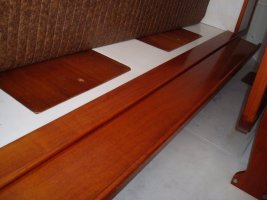
Photo 4. A closer view of the deeper cut into the plywood support panel is shown below. A new hole needed to be drilled in the bulkhead for the nextended locking bolt position. Not shown is a pair of roughly 12’ high Tees made out of 2x4s, just high enough to extend from to floor and support the left edge of the plywood base to prevent it from tipping when someone sits on the edge of the berth.
 

John Cyr

Member II
I dont know if this thread is still active or not but attached are some snaps of my main cabin berth extensions. these are the port side but the starboard side are just mirror images. As much as I would love to take credit for the design, fabrication and installation, I cannot as they were professionally installed by a custom yard in Tampa when the boat was new.
 

Attachments

  • P1010011.jpg
    P1010011.jpg
    111.5 KB · Views: 73
  • P1010012.jpg
    P1010012.jpg
    78.9 KB · Views: 65
  • P1010013.jpg
    P1010013.jpg
    76.2 KB · Views: 61
  • P1010014.jpg
    P1010014.jpg
    48.8 KB · Views: 65
  • P1010015.jpg
    P1010015.jpg
    103.8 KB · Views: 70
Top