• Untitled Document

    Join us on April 26th, 7pm EST

    for the CBEC Virtual Meeting

    All EYO members and followers are welcome to join the fun and get to know the guest speaker!

    See the link below for login credentials and join us!

    April Meeting Info

    (dismiss this notice by hitting 'X', upper right)

Damp wood under bow lights

hcpookie

Member III
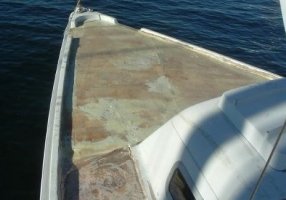
I removed my bow running lights on my E27 to repair the wires and noticed that both holes drilled into the bow section for the lights are damp. The reside is rusty brown and has a consistency of light syrup - not just "wet wood". The lights were caked with silicone and water has crept into the fixtures and down the holes. I've temporarily caulked with butyl rubber to block further water ingress until it dries out around here enough to effect a proper repair.

After a bit of research it appears this will require drying, then resealing the wood with epoxy. I'm looking very hard at this Git Rot epoxy which has been recommended by others on this forum.

After the last rain, it looks like a few of the pulpit rail holes are weeping water as well, which are just a few inches from the lights. The topside of the puplit mounting bases had a rusty ring that has stained the fiberglass.

Long-term, I intend to mount an anchor roller extension and relocate the running lights to the pulpit rail.

Question: What is the best way to dry the wood in this cramped area?

I'm thinking about this solution when we have a dry spell:

- Spray an evaporative water-displacing spray liberally into all of the holes. Something that leaves no residue such as denatured alcohol (which I have read works for this type of water problem).
- Place a (thermostat-controlled) space heater up in the V-berth and removing the lights and bow pulpit.
- Run this for a few days to heat up the area and dry the wood. How long should it run?
- Run Git Rot (or another penetrating epoxy) through the holes.
- Reattach the hardware with 4200.

I'm not comfortable drilling a bunch of holes in this area... just doesn't seem like a good idea. It would seem that the 6x holes for the bow pulpit mounts, the large hole for the anchor line, and the two large holes for the existing lights would be enough surface area?

TIA,
- Jerry
 
Last edited:

gareth harris

Sustaining Member
Jerry - you need to find out how much of the core is wet. Your description of syrup suggests it might be fairly extensive.

If you can get the boat somewhere dry, by leaving the holes open, you can see if they dry out over a day or two - a space heater would help. However, I suspect you may find the wetness extends some distance, in which case the core will never dry out completely through the holes, and you will need to start cutting either the top or bottom layer of glass off the deck to expose the core. If the wetness is fairly local, a heat gun can be fairly effective at drying it out quickly, and then you can reinforce it with epoxy and glass it down. If the wetness is extensive, you will need to replace the coring over the rotten section, which is a big job.

The book I always recommend for this work is 'Hull and Deck Repair' by Don Casey. It is cheap and covers all the basics very well. West System also have a pamphlet you can buy at West Marine for $3 which talks about some deck repair techniques.

Good luck, Gareth
Freyja E35 #241 1972
 

Steve Swann

Member III
Wet Core - I feel your pain!

Jerry,

I was hoping someone else would write you a treatise on this fix. I've waited long enough, so I guess I'd better take up the task!

My bow core was damp on my Ericson 25 when I went to install a custom made anchor plate in the same area you are describing. And yes, drilling a lot of holes in a boat doesn't seem to be very sane, but other than reskinning the area, how else can an effective repair be completed? Your core sounds like it might really be completely "gone: (read, unsafe) and you may have to reskin the area. I don't envy you this task, but I have heard that it is not as difficult as it might sound.

I drilled a number of holes in the affected area to ascertain the extent of dampness; it was surprisingly widespread. I "opened" up the core to breathe with about 10 drilled 5/16" holes each spaced about an inch apart. It took about 6 weeks of hot summer sun for my core to dry completely. I also drilled out my nav light holes quite a bit larger to remove the worst of the damage, and then I "recessed" more of my core material with a large, bent nail on a cordless drill. I then taped off the underside of each hole, squirted in "Git Rot" to absorb into the dried core wood as much as possible, let cure, then filled with Marine Tex in a two stage operation. I first delivered through a large syringe from the underside to plug the bottoms of each hole and let cure(the anchor locker is such a lovely place to twist into on an E25!!). I then applied the top layer under pressure to assure a complete fill. Marine Tex can be smoothed with water and can be cleaned up with water as well; just do it immediately. I sanded smooth and then installed my stainless anchor plate with liberal amounts of 5200 and painted my anchor locker overhead.

My nav light wire holes were drilled oversize with a 9/16" bit, core removed with the nail, and then pressure filled with Marine Tex. I then re-drilled through the cured Marine Tex with a 1/4" hole for my wires. My new nav lights are now bedded with a thin layer of 4200 around the deck gaskets. Now, even if water does seep down, it cannot reach the wood core because of the layer of Marine Tex protecting it. I did this with the four through bolts holding down the anchor plate as well. This project took about 10 hours total time spread out over a week. Cost was under $20.

I am sure there are other ways of completing your project and maybe a better professional way do do it. But, I feel confident that I have sealed mine off completely and I cannot see how it will ever leak again.

Yours for safe decks,

Steve
 

hcpookie

Member III
Steve,

Thanks for that info! I've been reading both online and at BN about core repair and your method sounds like the textbook way of dealing with the issue. I've seen a PDF (can't find the link now) where a re-core was performed on a small racing boat. The photos helped me get my brain around the idea, and now it does seem relatively simple - cut one side of the laminate, remove the bad wood, replace with new, reglue, refinish. Simple, yet time consuming :(

The folks at the local WM shop are of the opinion that the "drill hole repair method" will need a Winter's worth of drying to do the trick. I'm going to work with a heat gun and space heater to accelerate the process. He did say that Git-Rot wasn't the only one to use, and that "any" quick-running epoxy could be used to fill the holes.

A fiberglass repair book (and the guys at WM) stated the best way to gauge the drying progress is by using a plastic sheet draped over the holes, and then apply the heat gun to cause condensation on the plastic. This will confirm if there is a substantial amount of moisture still present.

Should be a fun Winter project! :p
 

Steve Swann

Member III
Good Luck

Jerry,

Sounds like you have the right plan laid out in front of you. Like you, I have to get my brain around a project before commencing. Myself, I can't believe how many projects and repairs have needed attention on my boat. I like to sail rather than do projects, but I am beginning to find balance, and the completed projects are beginning to make the boat look loved and cared for. So, maybe someday I'll come to believe that projects like wet core repair is FUN! :egrin:

In my humble opinion, I think these Ericsons are worth the effort to restore and enhance - and you'll continue to find great advice for your needs from this site. Keep us posted with your progress and enjoy that boat!

Steve Swann
s/v Seahorse
Boise, ID
 

JORGE

Member III
watch for core penetration

The attachment shows my foredeck after a major recoring. All inlets for water need to be dried, cleaned out, and refilled with epoxy/silica mix, then rebedded with 4200 chalk or other similar type sealant. The rest of my deck(yes), and part of the cabin top have also been restored.

Good luck and be thorough.
 

Attachments

  • foredeck32.jpg
    foredeck32.jpg
    28.6 KB · Views: 196

gareth harris

Sustaining Member
Jerry - something I forgot to mention. If you end up recoring, do an internet search for divinycell. The H60 version is the best coring material I have found, unless it is for an area that has loaded deck hardware, in which case the renicell (made by the same company) has much higher stress and compression tolerances. The only problem is finding it - Diab do not sell direct to the customer, so you will have to ask around local boatyards for it, most likely at a large mark up.

There are a number of ways to work with wet coring. Having had to replace entire sections of deck, I find it easier just to rip up the top layer, and then coring, leaving the bottom layer of glass as intact as possible, and lay down anew on top. The hard part of doing it that way is to match the new deck to the old, and is the reason why various methods for drying out the old deck are used, even if they take weeks - or attacking from below, which is possible, but is a lot harder due to gravity.

Once you figure out what you are dealing with, let us know - several list members have been through it.

Gareth
Freyja E35 #241 1972
 

Brisdon

Inactive Member
I have only one thing to say about rotten core: SEAFIT PENETRATING EPOXY. It works really well. If you remove the fittings where the water got in and add the holes you are going to use to install the epoxy (at a higher point on the deck) you can bake the core dry with out making giant holes in the boat, I try to make the holes that I do make in the white gell areas and not the waffle patern because it's easier to fix the holes on a smooth white surface than on a colored embosed surface. Once the deck is dry, you can glue a section of pvc pipe to the surface of the deck over the holes you are going to use to install the penetrating epoxy. If you fill the reservoir with the resin and stand on the effected deck area moving your weight back and forth you can actually watch the resin being worked in to the decks as the level in the pipe goes up and down and gradually settles into the deck. The penetrating resin is thin and it will want to drip from openings in the under glass of the deck that you probably didn't even know were there. You will have to watch for these and seal them with tape, sponges wedged up on sticks etc. until the resin cures. I have had very good luck with this procedure. Basically it's entirely successfull every time I do it. It takes finess though. It's a lot better than tearing the decks off or tearing the glass off the underside of the decks. It's the difference between picking the lock or blowing down the door. This proccess works well with dry delaminated core, but not with wet core. You would have to get the water out. In Southern California where I live, it's easy to bake the decks dry in this unpleasant f...ing hot sun that we get most of the year. I'm not sure how you would achieve a dry core in a place like, let's say, Vancouver.
 

hcpookie

Member III
Thanks all for the good advice - very helpful to hear how others have tackled the same problems.

I found another source of water ingress - there's a vent hole cut in the ceiling of the V-berth that fits a (broken) solar vent. The "waterproof" winter cover let rain water ingress during last week's storm. SO it would appear I have more than the very tip to address. The vent is about 2-3 feet aft of the lights and anchor hatch.

I certainly hope the entire area isn't saturated but we shall see. The more I read about penetrating epoxy the more I like it! How long can you work it? Does it dry in say 5 minutes vs. 30 minutes? I'll know when I read the label, but I was just curious.
 
Top