• Untitled Document

    Join us on March 29rd, 7pm EST

    for the CBEC Virtual Meeting

    All EYO members and followers are welcome to join the fun and get to know the guest speaker!

    See the link below for login credentials and join us!

    March Meeting Info

    (dismiss this notice by hitting 'X', upper right)

Replacing sidewall teak

Tin Kicker

Sustaining Member
Moderator
Adding some photos as a resource to point other threads to so other owners understand what they are getting into.

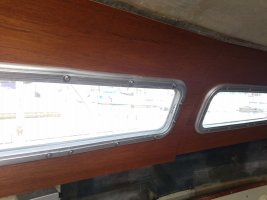
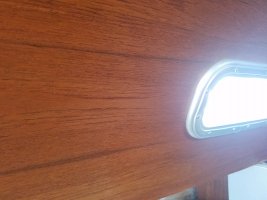
Leaking ports (fixed and opening) are the subjects of other threads to search for, but when the teak is bubbled this extensively it's past putting another layer over it and time to strip and replace the veneer. Note the black mold where leaks had been between the aluminum and sidewall.
20190208_170432-L.jpg


For those thinking to just seal the glass to the rubber, it won't last and here is the result. The new silicone doesn't like to stick to the black silicone rubber seals.
20190208_165730-L.jpg


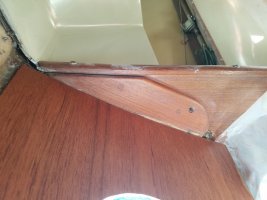
With a port light out and before cleaning off the leaking old caulk, you can see that the structure is solid. From 0 - 1/4" is structure and 1/4" to 1/2" is teak. (There's a blue tarp outside)
20190310_164022-L.jpg


Newspaper test (simply put water on the window) showed how bad these fixed frames leaked to the glass. There are threads discussing the options of glass vs plastic for window material and bedding the glass with either sealant (Life Caulk or others) or new rubber sold for Catalina 30s.
20190218_093229-L.jpg


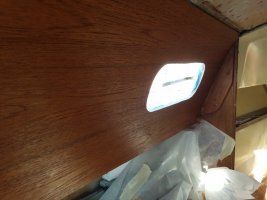
The opening BOMARs had leaked so long the metal had eroded so those needed to be replaced. Christian Williams and others have posted threads about what is needed to replace them with the slightly larger Lewmars.

Cutting out the teak and replacing it is a major job of cutting the edges of the material to be replaced and grinding teak off fiberglass. You will find that the fiberglass is very uneven beneath the teak with large voids.
20190316_143335-L.jpg


The headliner is stapled to to the teak so I cut along the edge and this transition can be hidden by the wood trim strip which comes off.
20190316_143254-L.jpg


Glue on the new veneer and install the new port lights.
 
Last edited:

Alan Gomes

Sustaining Partner
In January a friend of mine and I plan to do it on my boat, but we are going to replace it with an off-white Formica. This should help brighten the cabin, which has too much dark teak.
 
Last edited:

Equanimity

Member II
In January a friend of mine and I plan to do it on my boat, but we are going to replace it with an off-white Formica. This should help brighten the cabin, which has too much dark teak.

Formica sounds like a great material to use. Would you have to CNC machine the material in order to get the profile needed to accommodate the port frames?
 

Alan Gomes

Sustaining Partner
Formica sounds like a great material to use. Would you have to CNC machine the material in order to get the profile needed to accommodate the port frames?
We don't plan to. My friend has experience working with Formica, so I'm going to follow his lead on cutting it.

We're going to use the stick-and-glue method to make the template needed. We will only remove the interior trim rings from the windows (which I've recently rebedded and don't want to remove). Once the Formica is cut to the template, it should just go over the windows and then the frames will hide whatever gaps there might be around the window perimeter. The teak battens that run fore and aft and on the sides will hold the panel around the edges. We are still contemplating what, if anything, we might use to glue the Formica to the cabin side. It's conceivable the battens themselves would hold it sufficiently, but we're not convinced of that. One possibility is applying a heat activated glue to the inside of the panel before securing it with the battens. Then, we could always heat up the Formica to activate the glue later. This is all theory, mind you, because we'd first have to do some tests with scrap Formica to see the effectiveness of the glue and what sort of effect heating it enough to kick the glue would have on the panel. I'll turn my attention to it later this year and we plan to do the actual work in January.
 

Tin Kicker

Sustaining Member
Moderator
For interior use, it's hard to beat good old Gorilla Ultimate construction adhesive which is waterproof. Make sure to get this black wrapper.
71QKSNLmX-L._SL1024_.jpg


Spread it with a cheap plastic trowel/spreader and be quick. Hold the part in place for 5 minutes and it's not coming off.

Have your parts really ready to go up the first time. In other words practice.

I know the purists don't like it but I wanted to avoid anything which could degrade and got Acacia luxury vinyl floor planks at Home Depot. They match the teak incredibly well. This is one laid against the bulkhead. Since the sidewall is a different orientation and there are so many shades of teak, the slight different is not noticed.
20190707_203147-L.jpg
 
Last edited:

Alan Gomes

Sustaining Partner
For interior use, it's hard to beat good old Gorilla Construction adhesive which is waterproof.
1174e993ec0242ac110006.JPG]1174e993ec0242ac110006.JPG


Spread it with a cheap plastic trowel/spreader and be quick. Hold the part in place for 5 minutes and it's not coming off.

Have your parts really ready to go up the first time. In other words practice.
Right. We're sure there's no lack of glue we can use to affix it. But the kicker, as it were, is the part about getting it positioned right the first time. If we can remove the drama involved in positioning it, all the better. The beauty of the heat activated glue is that we can fiddle with placement, getting it exactly the way we want it, before making it permanent. Indeed, if the battens and trim rings were sufficient to hold the panel in mechanically without bubbling and so forth, this would make the installation cake. A heat activated glue would allow us to see if the mechanical method of fastening it is sufficient, and if it isn't then we wouldn't have to remove it but just "iron it" in place. But again, while there is a heat activated glue for use with this stuff, we have no experience with it and would want to be quite sure of it before we committed to it. That would involve some minor experimentation.
 

Loren Beach

O34 - Portland, OR
Senior Moderator
Blogs Author
Placing Formica (R) laminate

I have used epoxy for this specifically because I needed to slightly move around the new laminate surface before the "glue" was allowed to cure. This was on the galley counter and also on the hull ceilings. Worked well. In this situation it was not practical to use the industry-normal contact cement.
 

Alan Gomes

Sustaining Partner
I have used epoxy for this specifically because I needed to slightly move around the new laminate surface before the "glue" was allowed to cure. This was on the galley counter and also on the hull ceilings. Worked well. In this situation it was not practical to use the industry-normal contact cement.
I hear ya, Loren. And especially with a choice of hardeners, you have plenty of time to work the material.

One issue in the case of the cabin sides is that I will be working with the panel in a vertical orientation, which might be more challenging. Plus, the panel is going to be pretty large. That's why if we could eliminate the gluing aspect of it it might simplify an already challenging enough job. But I agree that epoxy would probably be the way to go if we do need to apply glue right off the bat.

You mentioned not only the galley counter but the "hull ceilings." What did you glue to the hull ceilings? Any pictures? This sounds similar to what we are planning to do to the sides.

Any other words of wisdom are appreciated.

Also, to Tin Kicker (the original poster), we're looking forward to additional pictures as your work progresses.
 

Loren Beach

O34 - Portland, OR
Senior Moderator
Blogs Author
I hear ya, Loren. And especially with a choice of hardeners, you have plenty of time to work the material.

One issue in the case of the cabin sides is that I will be working with the panel in a vertical orientation, which might be more challenging. Plus, the panel is going to be pretty large. That's why if we could eliminate the gluing aspect of it it might simplify an already challenging enough job. But I agree that epoxy would probably be the way to go if we do need to apply glue right off the bat.

You mentioned not only the galley counter but the "hull ceilings." What did you glue to the hull ceilings? Any pictures? This sounds similar to what we are planning to do to the sides.

Any other words of wisdom are appreciated.

Also, to Tin Kicker (the original poster), we're looking forward to additional pictures as your work progresses.

No wisdom, just experiences.....
:)
http://www.ericsonyachts.org/infoexchange/entry.php?530-Forepeak-Hull-Ceilings-More-Pix

And look at the blog entry before this one. It turned into more of a project than I had imagined when originally planning to "cover the hull inside where we had removed the old fabric".

And this entry and the one before it.
http://www.ericsonyachts.org/infoexchange/entry.php?413-Hull-Ceiling-Replacement-Finish-Pix
 
Last edited:

Alan Gomes

Sustaining Partner
No wisdom, just experiences.....
:)
http://www.ericsonyachts.org/infoexchange/entry.php?530-Forepeak-Hull-Ceilings-More-Pix

And look at the blog entry before this one. It turned into more of a project than I had imagined when originally planning to "cover the hull inside where we had removed the old fabric".

And this entry and the one before it.
http://www.ericsonyachts.org/infoexchange/entry.php?413-Hull-Ceiling-Replacement-Finish-Pix
Wow! Quite a project. But it came out terrific.
 

jengels

Member II
Looks great.

Thanks for the pics. I'm in the midst of the same project. Replacing the overhead as well.

John E.
 

Rocinante33

Contributing Partner

Nick J

Sustaining Member
Moderator
Blogs Author
I went down the same path. I'm not done yet. I used a bunch of clamps through the port light holes to hold the marine grade mahogany plywood to the cabin walls while the thickened epoxy cured. I Still need to cut the bottom and add trim (That's usually what happens to my projects when they reach the point where I can sail the boat again). I was also able to clean up and reseal the original port lights with a kit from the Catalina website. I'm happy with the result, but hind site does make Christian's idea of painting look even better. I'ts been 2 years and I still do not have any water coming in.

One important thing to pay attention to is staining above the port lights. I've seen way to many boats where people repair or replace the port lights and trim, but ignore stains above. Water doesn't drip up, so work from the top down. It would be a shame to go through all that work only to have an unaddressed cabin top leak start the process on the new wood.
 

Attachments

  • 20170904_125019.jpg
    20170904_125019.jpg
    60 KB · Views: 17
  • 20170904_100151.jpg
    20170904_100151.jpg
    66.2 KB · Views: 14
  • 20170830_180548.jpg
    20170830_180548.jpg
    66.1 KB · Views: 17
  • 20170830_180552.jpg
    20170830_180552.jpg
    69.6 KB · Views: 15

Alan Gomes

Sustaining Partner
When I think of Formica, I am envisioning a heavy backed laminate which may be too bulky for that job. How about this stuff which is used in RVs?

https://www.homedepot.com/p/Glaslin...{glasliner}:br+dln:{547831}+qu:{glasliner}:qu
Not the same stuff. What we'll be using is Formica from Wilsonart. It's maybe 1/16" thick, perhaps even a bit less. Not only is it not heavy but we'll have to take special care transporting it so as not to break it. (Will probably support it in a plywood "envelope" for transport.)
 

Tin Kicker

Sustaining Member
Moderator
I'd check carefully to make sure the substrate is waterproof because like trickdhat wrote, water can come from overhead. Consider putting the end of a sample in water for a couple of days to see if it swells.
 

Alan Gomes

Sustaining Partner
I'd check carefully to make sure the substrate is waterproof because like trickdhat wrote, water can come from overhead. Consider putting the end of a sample in water for a couple of days to see if it swells.
Thanks for this. A few quick thoughts in reply: (1) Formica is waterproof. (2) The Formica is not the "substrate." I'd be gluing it (or otherwise affixing it) to the existing "sidewall," as this thread refers to it--the teak. The teak clearly is not waterproof; hence the damage. If I were to epoxy the Formica in place, that would also serve to make teak substrate more water resistant than it was before. (3) More to the point, the best solution to water coming in from overhead (or anywhere else) would be to keep on the leaks and fix them right away rather than letting them continue to drip. I have rebedded all 5 of my windows to prevent this and I keep on them. The damage I'm trying to cover is from the previous owner's failure to do so.
 

Nick J

Sustaining Member
Moderator
Blogs Author
The majority of my damage was from the leaky portlights, but I also had significant stains caused from a leaks in the cabin top. A few of the leaks were from hardware added, but there was some water coming from the strips of teak retaining the companion way hatch which was installed at the factory with screws that went to the core. Both leaks resulted in complete core failure in the cabin top and presented as the little stains above the portlights.

If you don't have water coming from above, perfect! Replace as desired and enjoy sailing. Just check first so you're not just fixing a symptom instead of one of the causes.

Nick
 
Last edited:

Alan Gomes

Sustaining Partner
The majority of my damage was from the leaky portlights, but I also had significant stains caused from a leaks in the cabin top. A few of the leaks were from hardware added, but there was some water coming from the strips of teak retaining the companion way hatch which was installed at the factory with screws that went to the core. Both leaks resulted in complete core failure in the cabin top and presented as the little stains above the portlights.

If you don't have water coming from above, perfect! Replace as desired and enjoy sailing. Just check first so your not just fixing a symptom instead of one of the causes.

Nick
Sometimes leaks can be beastly hard to trace. They can be maddening at times.
 
Top