You are using an out of date browser. It may not display this or other websites correctly.
You should upgrade or use an alternative browser.
You should upgrade or use an alternative browser.
What ELSE can you do with the wine rack?
- Thread starter Geoff W.
- Start date
Thanks everyone, that's some super helpful info especially about cutting the bungs and varnish.
I like the acrylic idea, too. If not a swinging door (agree that would end badly for my galley and sanity) then what sort of fasteners would allow both easy on/off functionality AND security while under way? I'm sure there's a "duh" option but eyy I'm new at this
I like the acrylic idea, too. If not a swinging door (agree that would end badly for my galley and sanity) then what sort of fasteners would allow both easy on/off functionality AND security while under way? I'm sure there's a "duh" option but eyy I'm new at this
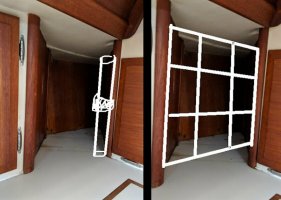
The acrylic is just to contain things while under way, so like you drew with your webbing, it doesn't need to be full height. So how about this? Cut the acrylic with tabbed corners and use a dremel to route 4 inverted "L" slots into the existing moldings as shown by the blue. A little wood stain and clear coat to touch up the slots and you're done. When the cubby is open the acrylic can slide along it's side wall.

As Christian wrote, it's fun and easy to redesign things on other people's boats.
As Christian wrote, it's fun and easy to redesign things on other people's boats.
Attachments
-
 webbing.jpg67.4 KB · Views: 93
markvone
Sustaining Member
Geoff,
When I saw your webbing design for a closure, I thought about a piece of marine canvas (Sunbrella) held up with twist studs along the parameter. Roll or fold it up and stow it most of the time. Install for underway. Full height would keep small items from flying out in rough conditions. The solid (vs webbing) closure will also keep small items in the cubby.
I have a solid black curtain, hung with Velcro along the top, instead of a door for v-berth privacy. It's folded up 99% of the time. No door to deal with.
An oscillating tool with a saw attachment will cut off bungs nicely. I've used my cheap Harbor Freight version to cleanly cut off the protruding end of dowels that I have glued into existing bolt holes to plug them. I did this in the engine compartment in teak veneer plywood and this method did not markup the surrounding veneer.
Mark
Last edited:
I think before designing a keeper, you need to figure out what's going to be kept. For a small appliance, I'd think just an inch-high or so curb across the bottom with a keeper bungie across the middle might do. I really hate "remove and store" covers. Maybe they get some of my ire left over from the hatch boards...
That might be a good place for a tambour door (like a roll-top desk). Especially if you needed it to curve out front in an arc. (e.g. for something that doesn't quite fit within.) When open, it would lay invisibly against the side and maybe the back. I always thought that it would be fun to make one from scratch, but as in all things wood, you can buy the stuff ready-made from Rockler and just cut it to fit your application. Even Amazon has it. (A friend just gave me an old home entertainment center with large tambour panels - I'm using it to make a concealed minibar for the AirBnB / Guest room.)
https://www.amazon.com/Omega-Nation...coding=UTF8&psc=1&refRID=5PK7K863DYZ9SA4CGMY4
A cautionary thought: I've had bad experiences with some sliding doors that would lock-up when stuff within fell and wedged against them. However, that has never happened with the bypass doors in the galley, and that would seem like the best test-case imaginable.
Last edited:
These are all great ideas, and thank you everyone for pitching in. I think Toddster is right - there's a lot of ??? about how I will use my galley right now, so the "what will be kept" is the big question right now. For a lot of places on the boat, actually! Like the little under-cushion storage in the V-Berth, what the heck am I gonna put there. I'll have to get it a bit more lived-in and see how things flow.
I think it being a back corner will be a perfect place to start practicing basic wood repair stuff as previously mentioned. I have a friend with a Fisheries Supply discount and we're going shopping tomorrow morning...hopefully I come away with some good stuff to start working in there.
I think it being a back corner will be a perfect place to start practicing basic wood repair stuff as previously mentioned. I have a friend with a Fisheries Supply discount and we're going shopping tomorrow morning...hopefully I come away with some good stuff to start working in there.

so I was dallying around back in the wine rack yesterday, trying to install some 3/8" bungs in the screwholes, but sadly cannot get the drill back there with the bit in. Can anyone suggest another way I could drill the 3/8" holes here to repair the bungs?
Also, this back section is going to be my first foray into woodwork/brightwork of any sort, and I could use some help. As you can see in the pics, there are areas that are basically unfinished where the "U" wood slats used to be - do I need to treat these sections before I treat the entire area? I got the Interlux satin varnish, sandpapers of appropriate grain, tack cloths, and such - but do I need to strip the finish that's on the wood already? And to those with trained eyes, is the finish here likely some sort of teak oil or is this also old varnish? If the former, should I just teak oil it again? I think the whole area has almost a 0% possibility of taking UV damage, so may not need the staying power of proper varnishing...
And brief update on "what to be stored back there", my coffee maker fits almost perfectly...but of course, my freshwater tanks are dry and Seattle Yacht Club has the water turned off...no coffee on board for me yet. I move onto the boat permanently this weekend, then move from SYC to Bainbridge on 3/17.
Dunno - round rasp? Turn the bit by hand with pliers or vice grips as a handle? You could try to find some really short bits on the interwebz but you could have done it by hand in the time it takes to order. I think my laziness exceeds my OCD when it comes to concealing screws in the back of a cabinet.
Hmm.. btw, does anybody make a coffee-maker with a positively-retained carafe? I suppose a bungee could do that. I've reverted to using a stove-top percolator on board, and a thermos bottle to keep the product warm (and portable) all morning.
Hmm.. btw, does anybody make a coffee-maker with a positively-retained carafe? I suppose a bungee could do that. I've reverted to using a stove-top percolator on board, and a thermos bottle to keep the product warm (and portable) all morning.
I think my laziness exceeds my OCD when it comes to concealing screws in the back of a cabinet.
I'm actually not trying to conceal screws, just fill the two screwholes from the pieces of wood I pulled out. Maybe just some wood filler instead of worrying about bungs?
If theyʻre just little screw holes, Iʻd fill them with Plastic Wood or anything similar. Or sometimes I just drive a new screw in and leave it there.
there are areas that are basically unfinished where the "U" wood slats used to be - do I need to treat these sections before I treat the entire area?
Try a very light touch of experimental Minwood stain. (Walnut is to dark, Mahogany is too red, as youʻll discover). Try colored pens or markers. Try furniture nick kits from a hardware store. Whatever works to blend the tones. Varnish coat will help blend.
I got the Interlux satin varnish, sandpapers of appropriate grain, tack cloths, and such - but do I need to strip the finish that's on the wood already? And to those with trained eyes, is the finish here likely some sort of teak oil or is this also old varnish?
No need to strip unless itʻs peeling or something. Iʻd clean it first with household cleaner. Then a quick sanding to get any loose stuff off and slightly roughen the surface. Five-minute job. Then a coat or two of satin, which is very forgiving and will make the compartment uniform in color.
When I revised my wine compartment on the 38, I discovered that the finish had been applied with a rag. The varnish was very dark, suggesting it had stain in it. The back sides of the rack components were not finished at all. Ericson was a quality builder, but hidden interior parts got the down and dirty treatment. Thatʻs my attitude, too.
Hey, the coffee maker is gonna cover most of this anyhow.
Last edited:
View attachment 26250
// sadly cannot get the drill back there with the bit in. Can anyone suggest another way I could drill the 3/8" holes here to repair the bungs? //
would this work? (there are several variations on this theme):
https://www.homedepot.com/p/DEWALT-Right-Angle-Drill-Adapter-DWARA50/203867866
Wine Rack Ideas
I don't have a picture but the four wine bottle holders that are integrated into the nav station desk on the 30+ each hold a one quart home depot paint bucket or yogurt container. These provide a convenient spot to capture all those little items you don't want flying around the cabin.
I don't have a picture but the four wine bottle holders that are integrated into the nav station desk on the 30+ each hold a one quart home depot paint bucket or yogurt container. These provide a convenient spot to capture all those little items you don't want flying around the cabin.
Kevin A Wright
Member III
For drilling the holes for bungs there are lots of options. The right angle attachment is a good tool to have, you'll only use it half a dozen times in your life, but it's really handy when you need it. Personally I keep a very small hand crank drill on board. Fits into small areas and doesn't need to be charged up to work.
Other options would be:
Take cut the drill bit shorter (score it with a dremmel cut off wheel, put it in the vice and snap it off.
Make a bow drill. Make a small bow out of a piece of wood and a line. Drill a shallow hole in a scrap of hardwood the same diameter as the drill and put some grease in it. Take a wrap or two of the string around the drill bit, put the butt of the bit into the wood scrap and start sawing back and forth like you had to do to make a fire in the old days.
Carve the plugs to fit the existing hole. Glue and tap in and cut off flush.
As far as the finish goes, that is always the trickiest part of any refurbish job - getting finish to match. First off, whether the old finish is varnish or teak oil, new varnish will go on fine. Only time there is a problem with varnish over oil is if the oil is fresh and hasn't hardened yet. No issue here. You might want to wash or wipe the surface with acetone or a TSP solution first to degrease though.
Other tip is to get some scraps of the wood you are planning to use and try your various stains and finishes on them first, so they have a chance to dry before you match them against the old finish. Colors and gloss are always different before it dries. Once you get the best 'formula' worked out you can do your piece.
Good luck!
Kevin Wright
E35 Hydro Therapy
You should be able to push the drill bit with a scrap of wood and twist the drill bit with your fingers. If you want to get fancy, first drill a divot into the wood where the butt end of the drill bit will go, so the butt end doesn't wander as you twist the bit.
Drill bits are very brittle, so you can probably snap one off to any length you choose using a hammer and a vise. Any size up to 3/8 should still fit into your 3/8 drill chuck with the shank snapped off.
I've used Minwax "Gunstock" stain to match some of my teak. It's pretty close. Darkens with multiple coats and with the time you leave it on before wiping or brushing it off.
I've used Minwax "Gunstock" stain to match some of my teak. It's pretty close. Darkens with multiple coats and with the time you leave it on before wiping or brushing it off.
markvone
Sustaining Member
I'm actually not trying to conceal screws, just fill the two screwholes from the pieces of wood I pulled out. Maybe just some wood filler instead of worrying about bungs?
Geoff,
I used a selection of (pine) dowels to fill bolt holes drilled through teak plywood where bilge pumps formerly were mounted. Cut dowel longer than the plywood thickness and glued with wood glue. Clean off glue excess and cut off flush with oscillating tool. Stain to match to cover white ends. Minnwax Red Chestnut #232 (slightly redder than Gunstock #231) matched my aged 1981 teak pretty well
Mark
Last edited: