Diesel High Pressure Fuel Line Disconnect Question

markvone

Sustaining Member
Universal 5424 Diesel High Pressure Fuel Line Disconnect Question

Hi,

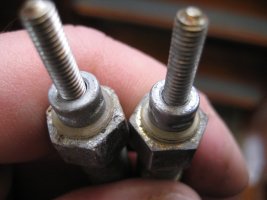
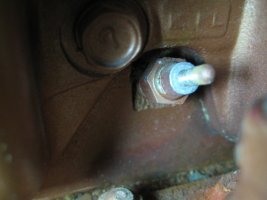
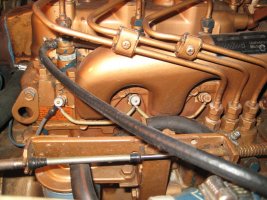
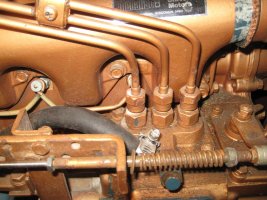
I need to disconnect one high pressure fuel line, between the mechanical pump and the injector, to replace a glow plug (the glow plug on the right, see the pictures). I'm planning on removing the tie clamp between that fuel line and the middle line, so that the line to be disconnected is free from the other two. Then loosening the lower fitting on the line at the pump (cover with rag/expect pressure release) and swinging it out of the way.

Do I need to slightly loosen the end of the line at the injector to slightly rotate the line?

Any special re-assembly/bleeding tips?

I've never disassembled a fitting like this and I'm looking for any tips and cautions.

Thanks,

Mark
 

Attachments

  • IMG_3385.jpg
    IMG_3385.jpg
    127.8 KB · Views: 38
  • IMG_3386.jpg
    IMG_3386.jpg
    128.9 KB · Views: 21
Last edited:

supersailor

Contributing Partner
Hmm. Is this a M-25XP? I was able to wiggle them out without loosening the injector feed. A major accomplishment as my hands are a bit on the oversize side for fine work. It's now a couple of years since they were replaced but I think I used an open end wrench on the one. It might be good to try before removing the high pressure line.
 
Last edited:

markvone

Sustaining Member
1981 Universal 5424

Thanks,

I've tried and it's very sketchy getting a grip with the 12mm deep socket at the angle required to miss the feed line. I'm afraid I might get the glow plug loose with the socket, but not get it out by hand or not get the new glow plug torqued enough. I would then have to move the feed line to fix it.

I've replaced the other two glow plugs already so the engine started yesterday at 60 degrees but I don't want to get hung up with no engine start if dealing with the feed line is complicated.

Mark
 
Last edited:

supersailor

Contributing Partner
I remember now using a socket and pliers to break loose the plug then, after a single turn, removing the socket and backing the plug out with a pair of sharp nose pliers. I also had the incentive of having an engine full of salt water and I needed the plugs out immediately to be able to turn over the engine and clean out the cylinders. Your engine is a 5424 so the same technique might not work.

Removing or loosening the high pressure line should not cause any major problems but I would count on probably needing to bleed the system. That's not a problem as long as the bleed screw on the injector pump is not frozen.

Good Luck!
 

Christian Williams

E381 - Los Angeles
Senior Moderator
Blogs Author
I didn't have to remove the injector pipes, but if you do no big issues.

http://www.ericsonyachts.org/infoexchange/entry.php?157-M25-Glow-Plugs-Remove-and-Replace

Bleeding the injectors will be necessary.

Added: I found out later that I can bleed the injectors without help: Loosen the fuel lines, go to the cockpit and turn over the engine for the count of 10, then return below, wipe up the leaked fuel and re-tighten the connections. Engine started, no air.

Here's how Kubota does it: http://www.orangetractortalks.com/20...njector-lines/
 

markvone

Sustaining Member
Thanks Bob.

Christian, thanks for the link. It was helpful. I watched a couple of other videos where the feed lines were removed. Theoretically, you loosen the nuts at each end and take off the feed line. One repair which removed all three feed lines didn't even bleed the system after reassembly. They just cranked a couple of times until full fuel flow was obtained and steady running.

The good news is that the engine started at 40F on Saturday with the two new glow plugs after 15 seconds of glowing.

The bad news is that there is no way to get a socket on the fwd glow plug with the aft cylinder injector feed line attached. I loosened the injector end nut easily, There is evidence this has been done in the past. The pump end feed tube nut is stuck to the lower nut and the feed tubing. When I turned this nut the feed tubing twisted with the nut and began to deform so I stopped. I'll need some heat and PB Blaster to get these parts un-stuck. This glow plug still has copper paint, unlike the other two, so I'll bet it's original.

Since my boat lived in balmy SoCal until 2011, I believe it has only had two glow plugs changed. It has always started easily for me until late last December at 50F when it failed to start without the help of external space heaters. I suspect one of the two newer glow plugs failed then and the original glow plug has been bad for a while. If this is true, it's nice to know that the engine will start in temps close to freezing with two (of three) glow plugs. I'll bench test all three to check once I get the last one changed.

Mark
 

Attachments

  • IMG_3431.jpg
    IMG_3431.jpg
    65.3 KB · Views: 13
  • IMG_3439.jpg
    IMG_3439.jpg
    63.9 KB · Views: 20
Last edited:

Christian Williams

E381 - Los Angeles
Senior Moderator
Blogs Author
There is an argument that nothing can go wrong with glow plugs and so the plug is never the problem. I ignored that argument, but later found it somewhat more convincing when all three original plugs later lit up on the workbench.

Maybe Tom Metzger has a way to test a glow plug without removing it.

This starting stuff is theoretically straightforward but not in reality because of so many variables (engine starts fine one day, not the next).

I had a slow-start issue on this boat--very long glow times, 20 seconds x 3 or 4 sometimes.

When I yanked the injectors, the rebuild shop said they tested fine -- nothing wrong with the spray pattern, etc. They proposed only changing the heads, $50 each.

There was "nothing wrong with the injectors." But since I reinstalled them six months ago the engine has started every time with 10 seconds total glow, in all ambient temperatures.

Go figure, I guess.
 

supersailor

Contributing Partner
Twice in four years, the glow plug problem on Terra Nova has been the push contact switch at the engine panel. The first time was due to the PO using a light weight switch. The contacts welded together leaving the glow plugs on 24/7. The second time was due to the protective rubber cover failing allowing water to enter the innards of the switch. Since then, the glow plugs have been put on a relay so there is only a low amperage exciter current going through the switch, a sunbrella cover covers the panel when the boat is not in use (free from left over scraps and snaps) and there is now a led panel indicator that glows when the glow plugs are on. AS usual, once the steps are taken, Murphy steps back and there have been no incidents since.

One benefit of going to the relay on the glow plug circuit has been a big increase in the glow plug voltage. The high amperage run from the battery to the glow plugs is 3' where it used to be over 18'. The result is start with three spins of the starter after 10 seconds of glow plugs in 28 degrees ambient. Prior to that, the engine did a reluctant start after 45 seconds of activation at the same temperature. The other advantage was the elimination of the high amperage flow through the ignition switch, glow plug switch and starter switch.

For what is worth, you can buy the glow plugs through Universal for $69.99 each, Kubota for $15.99 or 1A Auto for $5.99. Same Champion plug with the same part number. I bet 1A Auto is making money on the plugs.
 

Baslin

Member III
Injectors and glow plugs

Just yesterday I replaced all 4 Injectors and glow plugs on my Universal 5432. I started and 7:45am and was done by 11:30 am. It’s fairly easy with all the right tools. I removed the intake manifold as it makes the job much much easier. I bought 4 brand new injectors from the local kubota dealer for $255 total. That also came with all new return hoses and the copper crush washer for the seat of the injector. New glow plugs from kubota for $7 bucks a piece. I highly recommend putting anti seize on the threads of the glow plugs and on the injectors. Be sure not to test your strength when tightening the glow plugs, as you can break them off.... you can check the glow plugs with an ohm meter. Should register around 1.6 ohms.....if you remove the high pressure fuel lines and have to bleed, I just set the throttle to 3/4 open while cranking and bleeding each injector one at a time.
 

Christian Williams

E381 - Los Angeles
Senior Moderator
Blogs Author
Regarding Bob's experience with buttons, I have been puzzled by their short lives. So a few years ago I attacked one with a hammer, for scientific analysis and also because it felt really, really good.

1-button broken.JPG1-button exploded.JPG

These things aren't waterproof. The plunger pushes a tiny brass bus bar against two contacts suspended on tiny springs, all of it crimped together somewhere behind a waterfall in China.

With all that stuff stuffed in a box that's underwater any time a cockpit bath sloshes salt water over the low cockpit instrument panel (Go Ericson!) and doused by any hosing off of the boat, no wonder they corrode, glom with dirt, clog with salt.

The models with rubber caps on the push-button are better, since water enters around the button.

Note also that the contact had broken off in the left photo. Each contact is secured by one small rivet also subject to, well, let's just say that's not how they do it for the space shuttle.
 
Last edited:

supersailor

Contributing Partner
A small note of caution on the button problem. Many of these buttons sold are only rated for 5 amps. If you are pushing the current supplying 3 or 4 glow plugs through the button (no relay), you are far exceeding the capacity of the switch. That's why the heavy duty ones are so expensive. My last failure was on a heavy duty switch where the rubber weatherproofing failed. None of them survive water. I'm considering moving my panel up higher so I don't get as much back strain starting the engine and attempting to read the gauges. Also, all that vulnerable stuff is off the cockpit sole.
 
Last edited:

Tom Metzger

Sustaining Partner
Maybe Tom Metzger has a way to test a glow plug without removing it.

Sure he does. So does Baslin, and he has done it. You measure them with an ohmmeter with the glow plugs cold. The wires and jumpers must be removed from the plugs to do the measurement. Put one lead of the ohmmeter on a ground point on the engine and the other lead on a second ground point to test the ground point. Having a good ground connection put the second lead on the glow plug stud. You should read a low value of resistance, Baslin says approximately1.6 ohms which is reasonable. The important thing is that all of the plugs read about the same value.

Regarding Bob's experience with buttons, I have been puzzled by their short lives. So a few years ago I attacked one with a hammer, for scientific analysis and also because it felt really, really good.

The switch in the pix is a POS in this application. It is rated at 10 amps, maybe, and not at all sealed. Use Cole-Hersee M-626 rated at 35 amps - it comes with a rubber boot. Heavy duty switches are best for high or low current circuits because the contacts "wipe" to insure a good contact and to avoid welding.
 

markvone

Sustaining Member
Follow Up - Mission Accomplished

After getting over a mild brain fart on my first attempt I was able to loosen the flare nuts for the fuel feed tube at both ends and move it out of the way to access the fwd glow plug without a problem. I had noticed on the first attempt at the fuel pump end that both the upper flare nut and a lower reducing nut were locked together and spinning when I turned the upper flare nut. This caused the upper flare nut to remain tight so that the feed tube rotated with the flare nut and distorted out of shape. A second attempt with a second wrench locking down the lower nut easily loosened the upper flare nut without turning the feed pipe. Doooh!

No fuel sprayed or even dripped out from either end of the feed tube. I don't know for sure that you would need to bleed the system either. I checked the bleed fitting on the fuel line to the mechanical pump and had fuel immediately. I didn't bleed the injectors and it took many attempts and 10 - 15 minutes to get the engine started. It may be worth the effort to bleed the injectors to get back running sooner.

I did learn, from watching the video that Christian linked to, why I see blue on any engine part that has been wrenched on. The base Kubota engine color is navy blue. Universal slapped a copper paint job on it without any sanding or prep. Just touch the copper paint and off it comes.

Mark
 
Last edited:
Top