• Untitled Document

    Join us on April 26th, 7pm EST

    for the CBEC Virtual Meeting

    All EYO members and followers are welcome to join the fun and get to know the guest speaker!

    See the link below for login credentials and join us!

    April Meeting Info

    (dismiss this notice by hitting 'X', upper right)

Pedestal Refinish

Hagar2sail

Member III
Blogs Author
Hi everyone! Very excited about this community since it was part of the reason my wife and i chose to buy a 1983 E35-3. Now on to the issues!....

Our pedestal has started to corrode, which from looking around does not appear to be a unique issue. However, we don’t currently have the option of removing or replacing the current one because part of our purchase is a holdback of some money pending a sea trial in spring. I don’t want to change anything on the boat that could cause the PO to refuse paying us if something doesn’t work right. So I am pretty much limited to cosmetic changes only, and maybe our pedestal is early enough in its corrosion disease that total replacement isn’t needed yet
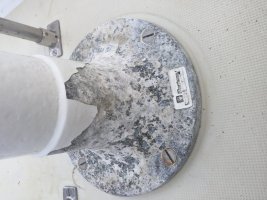
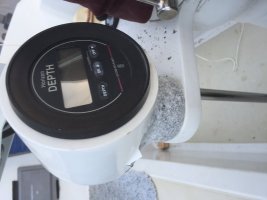
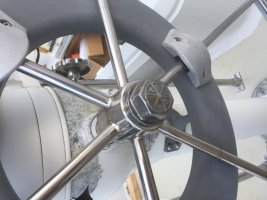
88996A43-2472-421F-A5A8-59A8F0D06783.jpg
C7518168-44A0-4D10-A24D-B4A400419CE0.jpg
09451175-D93C-4940-A1DC-FF001A604B27.jpg

Sorry about the pictures, my phone doesn’t want to rotate them....

The question I have is what are people’s opinion on several solutions:

1. Leave it alone - maybe the best thing to do is nothing until replacement?
2. Try and clean it with a wire wheel, prime and paint it?
3. Just put some paint on it to arrest the corrosion - afraid this might backfire and cause moisture to be trapped?

Let me know what’s you guys think. This is our first “big” boat, and I sure we will be doing a lot of learning.
 

supersailor

Contributing Partner
Look it all over carefully to see if there are any cracks. Pay particular attention to the base. Leaning or falling on the pedestal puts a lot of leverage on it. Christian had a pedestal break on his 32 outside of Hawaii.

Check to see if the emergency steering system is still on board and make sure you know how to use it. It is an approximate 4" tube by about 3' with two lugs on the bottom that engage the rudderpost. It has a crossbar tube (usually stored inside the big tube) for steering. The wheel has to be removed to use it. The Ericson Manual describes it. If you don't have the manual, it is available on this site.

For the moment, I would prime the bad areas and cover the wheel and pedestal with a proper waterproof cover (not a plastic tarp) that allows them to breathe. I would really want to consider replacing the pedestal considering how crucial the system is. That base is pretty corroded.
 
Last edited:

sharonov

Member II
For refinishing parts of the pedestal I got acceptable results using SEM 39683 Grey Self Etching Primer and a generic over the counter spray paint (Krylon???) . Spray paint is a bit on the soft side and is not that scratch resistant. Still, after a year it looks good. Definitely use high quality respirator, not a paper mask. Most etching primers are nasty. And, of course, prep the surface as best you can.
Refinishing in place imposes additional problems. Overspray will need to be handled one way or another. It may be better to choose products that can be brushed on instead of spraying.
Next time I think I will check with an automotive body shop - maybe they can apply more durable hard paint.
 

Christian Williams

E381 - Los Angeles
Senior Moderator
Blogs Author
Doesn't look too bad to me. After the deal is complete need to remove the pedestal, check it out for integrity, and then fix it or do a refinishing job.

I'll post below my original corroded pedestal fix. The damage will make you smile. The sleeving job is easy to have done and the flat base works fine; just have real penetration welds, not tack welds.

On the 38, because of prior experience, I took the original YS pedestal off, had it re-welded (unnecessary, mere paranoia) and then carefully refinished it myself using Interlux Brightside.

This week, two years later and a lot of miles, I am sanding and repainting the base, which shows wear and chips. The aluminum doesn't hold primer or paint well, being somewhat porous as result of years, and it gets stepped on. But touching up the paint isn;t a big deal and I see no safety issue at all.

http://www.ericsonyachts.org/infoexchange/entry.php?119-Pedestal-Rebuild

Note: one theory as to cause is stray electrical current from the compass light. I have never been able to confirm that however.
 
Last edited:

Hagar2sail

Member III
Blogs Author
Thanks for all the responses.

Sharonov- good to hear your experience. I was wondering how grey etching primer would work on the aluminum. I know that the corrosion products will make it hard to get any kind of nice finish but I am hoping that I can get it cleaned up really good.

Christian - I had previously read that post of yours and found it very entertaining. I was sorry to hear the welder had not made complete welds. When you refinished your E38’s pedestal did you use any kind of primer under the Brightside?

Stray currents seem like an odd possibility to me too. I would expect more corrosion specifically around the bolts and other attachments if it was a current....
 
Last edited:

Christian Williams

E381 - Los Angeles
Senior Moderator
Blogs Author
>>>>did you use any kind of primer under the Brightside

I used, again this week, Interlux Pre-Kote. It is more a sand-able filler and surface prep. Some years ago an Interlux rep assured me that's all bare aluminum needs before Brightside.

I'm not so sure. I have a hunch some compatible primer would be better next time.
 
Last edited:

Hagar2sail

Member III
Blogs Author
How long was it between prepping the aluminum surface and painting or priming it? I know with other aluminum things I have delt with in the past you have about 4 hours after you clean the surface mechanically before the oxides build up enough to interfere with a paint system. Not sure what alloy the pedestals are made of but I am assuming it will be similar?? This is one of the things I am worried about.
 
Last edited:

sharonov

Member II
How long was it between prepping the aluminum surface and painting or priming it? I know with other aluminum things I have delt with in the past you have about 4 hours after you clean the surface mechanically before the oxides build up enough to interfere with a paint system. Not sure what alloy the pedestals are made of but I am assuming it will be similar?? This is one of the things I am worried about.
Pretty much immediately. 2-3 light coats of primer. Let the last coat of primer to dry completely before painting.
 

Ian S

Member III
Zinc, chromate primers are the gold standard for aluminum. Think aircraft green. You need to look into aircraft suppliers. Aluminum is very problematic for coatings. conversion primers and epoxy finishes are best. For paint I would highly recommend a two part epoxy PPG coatings from a local bodywork supplier. IMO cold / brush applied enamels are just not tough enough. Very different from the original baked enamel finish. I have a set of aircraft skis that have been holding up to abuse for years with just such a system.

http://www.aircraftspruce.com/search/search.php?s=CHROMATE+PRIMER&x=0&y=0

Have fun! Capt. Ian
 

Hagar2sail

Member III
Blogs Author
Ian-

Good thinking. I totally didn’t think of that but makes sense since aircraft are almost always aluminum. I will have to check that out.
 

supersailor

Contributing Partner
Aircraft Spruce is a great site. I got my fuel gauge from them for my programmable fuel sensor. A call had them check to make it absolutely would work.

A can of their engine enamel is only about $30 cheaper than that from Universal.
 

wurzner

Member III
I used appliance enamel that I believe cost me lessthan $15 fora quart. I used this on my the boomon my ericson 32 amd it looked "brand new" 7 years later. I did sand it and etch it before puttting yellow chromate on it first. The enamel was high close, very self leveling, and super robust. It took the beating of control lines and all...it was a guess that worked out amazing. I would definitely use it again.
 

supersailor

Contributing Partner
While talking pedestals, let me throw out this source if you need parts:
Doc Freemans Pedestal Parts

206 633 1500

800 423 8641
 
Last edited:

sharonov

Member II
I used appliance enamel that I believe cost me lessthan $15 fora quart. I used this on my the boomon my ericson 32 amd it looked "brand new" 7 years later. I did sand it and etch it before puttting yellow chromate on it first. The enamel was high close, very self leveling, and super robust. It took the beating of control lines and all...it was a guess that worked out amazing. I would definitely use it again.
Wurzner,
What brand and type was that enamel? I need to touch up boom on my E32-3. Thanks.
 

Hagar2sail

Member III
Blogs Author
Thanks for all the info guys. Probably be about a month or so before we get the shrink wrap off and then I’ll post how it goes.
 

Hagar2sail

Member III
Blogs Author
Hey guys!

So we have been trying to take apart the pedestal on our boat so we can do a full repaint and make sure everything is tip top. I have gotten it down to the steering sprocket and chain, generally following Christians thread on disassembly. I hadn't removed the four bolts holding the pedestal to the deck because I was using the attachment to help me loosen bolts of the above sections. Now I need to loosen the chain and remove the master link. If I just undo the bolts I know the quadrant will now also be free, does this create slack in the cables? In his disassembly notes, Christian talks about making slack, then unhooking a cable. I thought the chain has a master link at either side? On our 35-3 I have to fold myself in half in the Stbd side lazarette and can't really see at all, just feel, so any help would be greatly appreciated. Thanks!
 

Loren Beach

O34 - Portland, OR
Senior Moderator
Blogs Author
Cable Fun...

When I repaired both sheaves at the bottom of our pedestal, I crawled back and undid the clamps that held the cable ends together inside the quadrant. Trivia: even after all these years & decades, those cables straighten out like new! Tape the cable ends so the strands will not unlay.

I have never explored the nether regions of a 35, so others will have comment on that part.

When you do have the pedestal base out of the cockpit, be sure to over-drill, epoxy in, and re-drill for those large holes. You do not want to have any moisture and rot getting into the plywood coring in the cockpit sole! :0

Link to related thread:
http://www.ericsonyachts.org/infoex...son-Olson-34-failure-of-wheel-steering-system

Link to my boat is in reply 2 in that thread.

And... here is another great link:
http://tkronaboat.com/binacle-refinish.html
 
Last edited:

Christian Williams

E381 - Los Angeles
Senior Moderator
Blogs Author
If I just undo the bolts I know the quadrant will now also be free, does this create slack in the cables?

Yes. Along with loosening the cable-end adjusters.

Also,

Some or most steering cables will not fully detach from the quadrant because the cable has a fitting at each end.

In that case it is necessary to undo the master link to remove the chain from the wheel sprocket.

The chain has to be removed in order to pull the pedestal because the chain goes over the sprocket axle.
 
Last edited:

Afrakes

Sustaining Member
Sprocket axle

After loosening the eye bolts on the quadrant to give the chain some slack, pull the sprocket axle. Loosen the set screw/screws on the sprocket and wheel brake tire and pull the axle. Keep track of the placement of the key and any spacers.
 

Hagar2sail

Member III
Blogs Author
After loosening the eye bolts on the quadrant to give the chain some slack, pull the sprocket axle. Loosen the set screw/screws on the sprocket and wheel brake tire and pull the axle. Keep track of the placement of the key and any spacers.

We did get the brake off. Just screwed right out no work on the set screw required! :esad:

I will undo the quadrant tomorrow and see how it goes. I am a little daunted about trying to retension the cables.
 
Top