• Untitled Document

    Join us on April 26th, 7pm EST

    for the CBEC Virtual Meeting

    All EYO members and followers are welcome to join the fun and get to know the guest speaker!

    See the link below for login credentials and join us!

    April Meeting Info

    (dismiss this notice by hitting 'X', upper right)

Ericson 32-3 cabin floor replacement

oldfauser

Member III
My owner is planning on having the cabin sole replaced this spring. He is wondering about how many square feet the sole is.

Maybe if someone knows how many square feet an Ericson 35-3 is, that would help. The 32-3 will be slightly smaller. My owner is looking for an estimate of the size.

any guesses?

Thanks
 
Last edited:

Tom Metzger

Sustaining Partner
Not what you asked for, but when I replaced the cabin sole on my E-34 I bought 3 4x8' sheets of plywood and the sole was about 45 sq ft.

The reason for the 50% usage was the admiral foolishly insisted the holly strips all go in the same direction and line up piece to piece. :mad: It doubled the cost and the work.
 
L

Leslie Newman

Guest
very nice job Leslie. Was that teak and holly ply or individual pieces?

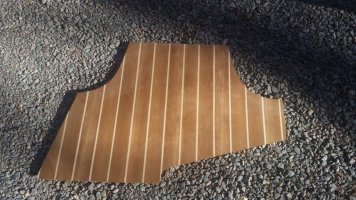
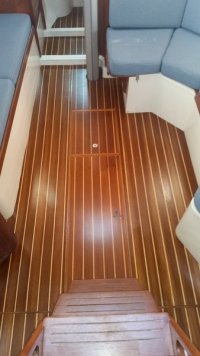
Thanks. Plywood. I went back with the original thickness of 1/2". Hind sight I would have gone a little thicker. But, 1/2" was original and fits perfect with all the various lips around the outer edges. If I had gone thicker I might have run into fit issues. Was a tough job sanding all the curves so that everything fit snug without big gaps. The yard quoted me $5000. I felt I could do the job myself. My wife and I pay ourselves pennies an hour :). About $1,000 in materials. Lost track of the hours, but it was considerable. Successfully removed all the old panels intact enough to use as a tracing template. But that just gets you close and there is a ton of sanding and fitting. Then I sealed top, bottom and edges with Smiths Clear penetrating epoxy sealer. Seven coats of Jamestown Distributors Gleam 2.0 varnish which is very easy to work with. The crazy shaped V berth piece broke up coming out and I made a paper template for that. Fitting that piece was your basic nightmare.
I did all this work 2016 winter/ 2017 spring, then this past November we sold the boat and bought our Ericson 380. I think the new sole help sell the boat. But man the work.

Vbirthfloor.jpg

Better shot of the sole before we put the table back in place.
I was able to reuse two of the center pieces and made a new piece for around the mast.
The stern sections port and starboard (each side of engine compartment) are separated from the forward sections by some teak strips. I had the supplier send me some new teak strips that I cut and glued to the plywood end of the stern pieces on each side of the engine compartment, then set those pieces in place.
SoleComplete1.jpg

PUFFIN. We're down in a wave.
She was an excellent boat. I am thinking that my wife and I will enjoy the Ericson even more.
Puffin_1.jpg
 
Last edited by a moderator:

garryh

Member III
man'o'man fussy fussy work. Nice job. I have a 35-2 and the access to the bilge and pump is horrible to non-existent; also the bilge is full of 40 years of oily crud that gives me the creeps. I am going to cut the floor out to clean it up and also make some access panels for future cleaning and access to a (to be) bilge pump. But the part about this job that scares me is laying in the floor in all the curved areas at the outer edges and also finishing the edges themselves. How did you fit the curved areas and tie into the flats..? (I don't see any but there must have been some!)
 

Christian Williams

E381 - Los Angeles
Senior Moderator
Blogs Author
If making a new sole, I'd screw it down and design in several inspection hatches.

I say that only because a permanent sole offers permanent curiosity about what's under there, especially with a water-trapping TAFG and especially after a diesel fuel leak, an overflow of bilge or just the location of hoses or limber holes.

My current factory sole was installed by the factory before the vertical trim, and probably before the deck was put on the boat (the fuel tank and its plywood cover definitely were). It was not meant to be removed, ever, which was shortsighted.

The floorboards of the 32-3 were originally glued down. But a new one was made and the teak and holly ply was screwed down. It didn't squeak and I must've had those floor sections off five times to take home to varnish or to inspect some issue at sea.

Any wood sole should be made impervious with CPES and then the finish maintained on a schedule.

Whether screwed or glued, a new sole is a big measurement, fitting and finishing job and can improve upon the production efficiencies of the Ericson factory.
 

JSM

Member III
Pattern Instructions

Will be tackling this project this spring. Recently found this on the Endeavor owners site. Looks like a good way to go.

Date: April 23, 2007
From: Pat Fitzpatrick fitzpatrickrn@gmail.com I see that these posts are rather old, but I will add my 2 cents. I worked for Endeavor in the 80’s and have installed lots of teak and holly in Irwins, Endeavors, Island Packets, etc:

  1. Use patterns! Invest in some 1/8 inch “door skin” plywood and cut them loosely (within ½ inch) to fit in the space. Cover the entire area, from stem to stern. Nail them securely in place with brads. You will be walking around on these all day or week or whatever; nail them securely.
  2. Take a pair of compass scribes and set them to 1 inch (see below). Tighten the wing nut on the scribe with a pair of pliers. It is critical that the distance does not change! Tracing the perimeter of the sole with the point of the scribes, scribe a line onto your patterns. Make the line dark, but fine. I use a #3 pencil. It keeps a point longer
  3. Find the center of the beam, hopefully, this is a line that you will be able to draw from stem to stern, i.e., it will go through doorways. It is OK if it does not. With a chalk line, mark a continuous line on the patterns down the center of the boat. This is the reference line that you will use to line up your holly centerline. That should be a holly stripe that traverses the centerline, and getting this right separates the men from the boys. If your sole is on different levels, or you cannot travel the centerline with your eyes, it is not such a big deal to have a continuous holly strip down the whole sole, but you will get style points for doing this correctly. Remember: as long as it is perfect, it will be fine.
  4. Using ¼ inch teak and holly veneered ply, lay out an outline of your sole on the floor of your shop. In areas where the sole is wider than 4 feet, take care to join the factory edge of the plywood by sanding or (light) planning. Anchor the T&H ply somehow, so that they will not slide around. Use weights, or whatever. Don’t damage the sole.
  5. Paying careful attention to the centerline, take your patterns, and place them atop the new sole. Judiciously apply a few brads to attach the patterns to the sole, avoiding the holly. If you are confident, use some lead weights to anchor them instead.
  6. REVERSE your scribes, so that the pointy end is now on the line you previously made; transfer that line to the new sole. If you do it correctly, you are transcribing the exact outline of the hull and bulkheads to your new sole. Bear in mind that the hull slopes, and the line you make represents a smaller space. You will need to either cut your soles a little larger at the hull line, or adjust your scribes a little bit wider.
  7. Carefully cut your soles. Make them a bit bigger if you’d like, and use a belt sander or jigsaw to adjust the fit. We boat carpenters traditionally use a jigsaw, and we hold it upside down. This allows direct visualization of the blade and does not tear the wood as much. It is also extremely dangerous! Be careful. The best saw is the Bosch jigsaw with T-101B blades. Spend a hundred bucks and get one. I still have the one I bought in 1985 and it works well.
  8. Bilge access covers are a little tricky. You can either measure them, or find a way to reach underneath and mark the bottom to cut out. Then, cut ½ inch off all 4 sides of the bilge cover. Using solid teak, make ¼ inch strips to trim the inside of the hole, and the outside of the bilge cover. Use your belt sander to adjust the fit. You want the cover to fit tight, but not too tight! And mind your Holly lines.
  9. Glue the soles down, using brads to hold in place while your glue dries. Finish with a good quality sealer, and then a gloss varnish. Best if you can spray it on, but just try to do a quality job and it will look fine.
  10. Remember those patterns? Save them as sole protectors. We applied a grid of rubber sticky tape to the bottom, and re-used them to protect new soles on the production line

    Feel free to email me with ?’s.


Christian Williams

E381 - Los Angeles
Senior Moderator
Blogs Author
Allow me to say gently that I don't agree it's the way to go. Ericsons have specific floor thicknesses, our TAFG permits specific inspection hatches, and glue is by no means the only or first choice.

The forum threads listed above represent Ericson experience. Anybody attempting this job should start with them and confer with those who have done it here.
 

Tom Metzger

Sustaining Partner
And DO install the new sole pieces with exposed screw heads. I have removed sections of our several times over the years.

Ditto on this one. I also have lifted sections for different jobs.

The Admiral was smart to insist on the teak and holly lining up. It makes for a much more pleasing result.

Leslie - Have you ever seen a boat with randomly installed holly strips? I suspect you're just guessing.

Ericson 32-3 cabin floor replacement My owner is planning on having the cabin sole replaced this spring. He is wondering about how many square feet the sole is.

Maybe if someone knows how many square feet an Ericson 35-3 is, that would help. The 32-3 will be slightly smaller. My owner is looking for an estimate of the size.

Well hijacked thread. Someone must know about E-32-3 or E-35-3 cabin soles.
 
L

Leslie Newman

Guest
Ditto on this one. I also have lifted sections for different jobs.


Leslie - Have you ever seen a boat with randomly installed holly strips? I suspect you're just guessing.


Well hijacked thread. Someone must know about E-32-3 or E-35-3 cabin soles.

Wasn't meaning to hijack a thread. A cabin sole job is pretty much the same type labor whatever the boat, IMO. I was just passing along an experience.
As to the 'just guessing', I have no idea what you imply there. It is personal preference, but if I had installed my flooring so as things did not line up it would have looked really bad IMO. And if the Admiral is happy, it is a happy boat.
 
Last edited by a moderator:

Tom Metzger

Sustaining Partner
Wasn't meaning to hijack a thread. A cabin sole job is pretty much the same type labor whatever the boat, IMO. I was just passing along an experience.
As to the 'just guessing', I have no idea what you imply there. It is personal preference, but if I had installed my flooring so as things did not line up it would have looked really bad IMO. And if the Admiral is happy, it is a happy boat.

Leslie - I didn't mean to imply you hijacked the thread. I was just pointing out that no one addressed the question that was asked. Very frustrating for the person asking for help. Almost every thread takes off in different directions, I was just trying to help Art.

My comment about lining up the strips was intended as humor, as no one would actually install a T & H floor with random orientation.
 
L

Leslie Newman

Guest
Leslie - I didn't mean to imply you hijacked the thread. I was just pointing out that no one addressed the question that was asked. Very frustrating for the person asking for help. Almost every thread takes off in different directions, I was just trying to help Art.

My comment about lining up the strips was intended as humor, as no one would actually install a T & H floor with random orientation.

Oh. Right. You are absolutely correct, the answer has not been given. Other than they should factor in more for keeping things lined up.

The way I did it was I laid out a 4' x 8' rectangle on the concrete floor of my shop and then I positioned the mating pieces I had pulled up in the area to see what fit the space, keeping things aligned. I came up with two full 4'x8' sheets, if I made no mistakes. If they want to order the wood before the job begins maybe make some paper templates, marking on the ends the teak and holly alignment marks and again position on a 4x8 space.

I'll share a really great wood supplier. Boulter Plywood. Fantastic shipping prices.

http://www.boulterplywood.com/
 

Loren Beach

O34 - Portland, OR
Senior Moderator
Blogs Author
Teak... and .... Holly

Speaking of keeping floor pieces in line...
Several decades ago some friends refitted an early Valiant 40. It had a heavy plywood sole with carpet over it courtesy of the first owner.
Oh my.
The new owners, being unafraid of diving right in.... cleaned up the bilge sections and then put back plywood, and then.... milled and installed a real teak and holly sole. Yup. Half inch solid wood. Very traditional and with wear it could always be sanded down and re-oiled.
They cruised that boat for a decade, full time. Two Atlantic crossings, and the Panama Canal, both ways. Later they repainted the hull and deck.

Now they are back on land and their V-40 has gone on to a new owner.
Good times!
(And we all started in small CB boats in the 70's -- time sure flies.)

:)
 

JSM

Member III
Allow me to say gently that I don't agree it's the way to go. Ericsons have specific floor thicknesses, our TAFG permits specific inspection hatches, and glue is by no means the only or first choice.

Sorry Christian, didn't mean to imply that the quoted post was "THE" way to go or that glue was the first and only choice. In reading the quoted post I got the impression that the poster was using glue and brads to attach 1/4" teak and holly ply to sub-flooring. I can't imagine 1/4" teak and holly alone would be structurally sound flooring in any boat.


The forum threads listed above represent Ericson experience. Anybody attempting this job should start with them and confer with those who have done it here.

In preparing for replacing my sole I've probably read every sole post on this forum at least 3 times! :)
I found the quoted post while doing a google search for pattern / template making. Although its not "Ericson experience" I thought it was worth sharing here as it came from someone who at one time did this on a daily basis unlike us "one time the hard way" guys.
 

Christian Williams

E381 - Los Angeles
Senior Moderator
Blogs Author
Yes, I too have just about memorized the threads here when facing typical jobs.


  1. Glue the soles down, using brads to hold in place while your glue dries. Finish with a good quality sealer, and then a gloss varnish. Best if you can spray it on, but just try to do a quality job and it will look fine.

This guy apparently worked in the factory. He is a lunatic from outer space in my opinion. Use brads to hold in place on a fiberglass boat? Glue the soles down and then seal them? So, raw wood exposed to the bilge forever? Best if you spray the varnish on? Is that best, or is that a production run?

Perhaps that morning put his shoes on the wrong feet. When I do that it makes me walk and talk funny all day.

Cheers!
 

JSM

Member III
Yes, I too have just about memorized the threads here when facing typical jobs.


  1. Glue the soles down, using brads to hold in place while your glue dries. Finish with a good quality sealer, and then a gloss varnish. Best if you can spray it on, but just try to do a quality job and it will look fine.

This guy apparently worked in the factory. He is a lunatic from outer space in my opinion. Use brads to hold in place on a fiberglass boat? Glue the soles down and then seal them? So, raw wood exposed to the bilge forever? Best if you spray the varnish on? Is that best, or is that a production run?

Perhaps that morning put his shoes on the wrong feet. When I do that it makes me walk and talk funny all day.

Cheers!

Actually this guy did work at the factory. He starts the post by stating that he worked at Endeavor Yachts.
The part about the brads jumped out at me as well but when I re read the post early on he mentions using QUARTER INCH thick teak and holey. It would have to be laminated / glued to some sort of sub flooring in order to be structurally sound. What ever Endeavor used for flooring it had to be something more substantial than 1/4" thick teak and holly plywood. Sounds like the brads were used to temporally hold the teak and holly to the subflooring and not the boat.
 
Top