• Untitled Document

    Join us on April 26th, 7pm EST

    for the CBEC Virtual Meeting

    All EYO members and followers are welcome to join the fun and get to know the guest speaker!

    See the link below for login credentials and join us!

    April Meeting Info

    (dismiss this notice by hitting 'X', upper right)

E38 Bow Chainplate

footrope

Contributing Partner
Blogs Author
After probably 37 years (the age of the boat), the bow or forestay chainplate is off for inspection. Although I got a good look at the outside and the edges in 2014, at that time there was only extremely difficult access to the backside of the screws. With the bow opened up for the windlass project, I am able to get in there and remove it relatively easily.
20160829_154939-small.jpg 20170611_152942-small.jpg

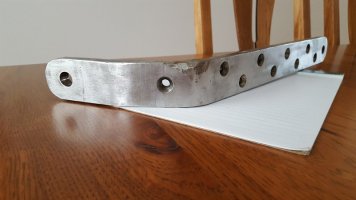
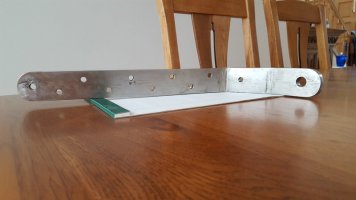
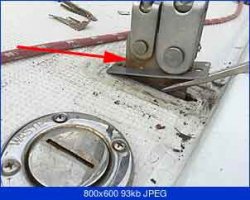
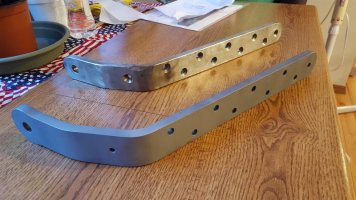
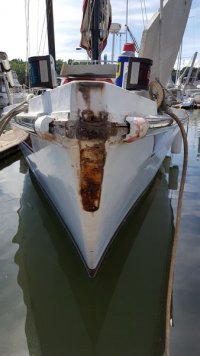
It is a 1/2-inch thick steel bar with two bends and 11 holes. It is 1-13/16 inches wide. There were nine 5/16ths slotted flat-head screws holding it on, all below the deck level on the point of the bow. All but one is 2 inches long. The top one is 1-1/4 inch long. One wood screw right between the bends was there, but not very tight. I didn't see any leakage into the bow, but the bedding was broken down as you can see in the pictures.
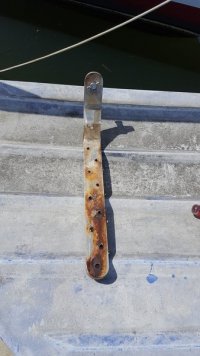
20170611_153730-small.jpg

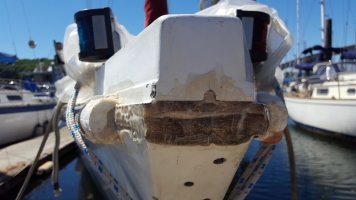
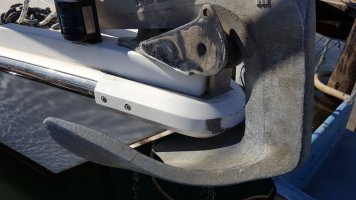
The bow cap is made of aluminum and while it was painted during the 2014 replacement of the rub rail, it shows the wear marks from the anchor chain. Newer boats have no bow cap and sport a nice narrow aluminum rub rail. I opted for a rail that is similar to the old one, but with a stainless steel insert. It covers the hull-deck joint easily and looks great (especially if I shine it up every couple years). The cap is necessary unless unless I do some cosmetic work at the point of the bow to cover that hull-deck joint. The pink filler is polyester resin which was used to provide some sealing for the ends of the rub rail and to raise a surface for the final bead of marine sealer to rest against. It wasn't too hard to break loose and we didn't do any damage to the cap.
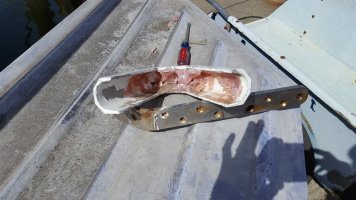
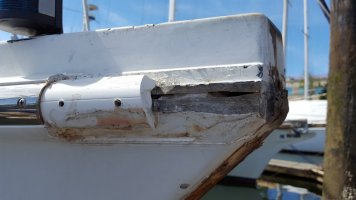
20170611_154002-small.jpg 20170611_154726-small.jpg
 

footrope

Contributing Partner
Blogs Author
Cleaned up Chainplate

The chainplate was cleaned up using a flapper wheel. I think it was 120 grit. I also used a file on a couple of the scars and divots to take the sharp edges down. I will re-use the chainplate. The surface stain was just at the surface and there is very little pitting. What is there is not very deep. I cleaned out the holes with a brass wire cone in a Dremel.

20170613_071959-small.jpg 20170613_072012-small.jpg

The grinding that was done on the left side of the front of it was completely hidden by the bow cap. I can only guess that there was some interference with the bow cap and someone decided to clear it by modifying the chainplate. I doubt that the yard did that in 2014. They would have brought that to my attention. It will remain a mystery.

I have purchased new Phillips flat head hardware and will get to work cleaning off the bow stains and sealing the ends of the rub rail next.
 

Guy Stevens

Moderator
Moderator
Crevice corrosion and Stainless Steel

Footrope!

I like you! I like your work!

So not to rain on your parade, but there is no way I would ever reinstall that chain plate on a boat. It is a false economy of the worst sort.

Those pits are most likely not pits, but the surface indicators of deep crevice corrosion. I used to have a whole box of "only surface pitted" chain plates, some re polished, (a few even electro polished), that I would cut in half for the client, clearly visible was a river like series of crystallized and corroded metal from those pits all due to crevice corrosion. There are a ton of technical reports on SS 316 corrosion in the marine environment. I can't site them for you as I have really bad internet right now. (this is the third time I have written this response).

The mast is expensive, and the crews health and safety most important. The number one cause of dismasting is CHAIN PLATES (marine insurance list of failures, every one of them has the table, Boat US published it a while ago). The major SS wire and ROD manufactures all state their products are not to be used beyond 10 years in the marine environment. Most say no more than 8 to limit their liability. This is do to cyclical work hardening and crevice corrosion effects of sea water. The rigging which needs to be replaced is made of the same material as the chain plates, why would one have to be replaced and the other not?

Those pits in your photo are not simple pits, nor is that surface corrosion on the back of that chain plate worth risking the rig and the crew on. Also that chain plate in particular being on the bow end of one of our Ericsons moves a lot more than you think it does, this work hardens it especially at the bends and where the fasteners go through it.

I would call John Franta at Colligo Marine, and then send him your existing chain plate as a pattern. He can fabiricate one for you out of Ti, bend it, and Anneal it to relieve any stresses in the bending process. It will out last the boat, no more worries about corrosion or work hardening. I have had him do the chain plates for over a dozen boats for me. He is good, fair, and the prices are great, not much more than stainless ones!)

Not to argue, just to keep a fellow Viking Safe and healthy!
Guy
:)
This photo is all I have of one of those pitted sections that we cut into the owner when I handed it back to him said "Oh F^&*".
here-for-eyo.jpg
This is a Ti Chainplate on Aiki :
ti-chainplate.jpg
 
Last edited:

footrope

Contributing Partner
Blogs Author
Guy,
You made it to the Marquesas!? How's the weather?

Thanks for the information and advice. I sent off an e-mail to Colligo. Depending on the answer, I may look for help up here in the Seattle area. The idea of titanium parts on a 37 year-old yacht is pretty exotic. But, I recall how cool it was to wear a wristwatch with a titanium case and band. I still have it albeit with a stem that has disconnected itself internally. Best quartz timepiece I've ever owned or worn. Maybe it's time to finally ask Citizen if they can fix it.

Cheers,
Craig
 

footrope

Contributing Partner
Blogs Author
Update on Titanium Inquiry

After a week of getting estimates and guess-timates and talking with machinists about the chainplate, I have accepted a bid from Colligo and will proceed with the titanium replacement. As Guy predicted, the cost wasn't all that much higher than the steel estimates. All expressed some concern about bending 1/2" thick bar, but mainly about what tool or machine would be used to make it and where they would send it. Once I have the part I'll post more about the process of getting this made. John has been great to work with.

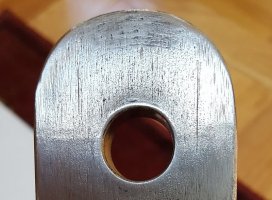
The old part is showing some working at the forestay connection, which uses a 5/8" pin. There is a bulge at the top of the hole. I found that the top screw into the hull was screwed into the structure and had no nut on it. Interesting, but not alarming. It was hard to get out, though. There were 8 others below with nuts and washers. As I thought about the need to replace it I realized that the thinnest part of the chainplate is alongside the hole for the pin. That is the weak point for the force exerted by the forestay and the weight of the furler and sail. The rest of the chainplate that extends down the front of the bow is designed to spread the load into the hull structure, which is about 1" thick in that area.

20170621_085736-crop.jpg

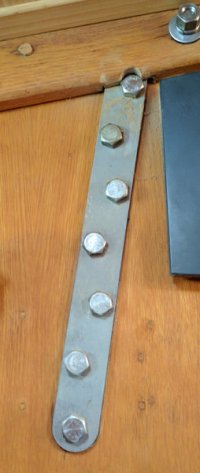
I am going to use bolts to mount the chainplate, instead of screws. That eliminates countersinking and makes future removal easier. The countersunk hole on the very front of the chainplate, between the bends, will be reduced in size to 1/4" and I will use a lag bolt there, instead of the original 1/4" wood screw. The cast aluminum bow cap will remain relatively unmolested. The old chainplate was ground away on the left side below the bend to clear the cap. I will grind a little off the lower edge of the cap to clear the new chainplate. I am thinking about leaving the gap between the cap and the chainplate open so that water can drain out. I will concentrate my sealing efforts on the ends of the rub rail extrusions and fill the gap in the hull-deck joint to prevent water from going downhill and aft into the hull-deck joint behind the rub rail. I'll use a combo of epoxy and glass and 3M 4200.
 
Last edited:

footrope

Contributing Partner
Blogs Author
The Latest

The titanium chainplate arrived last week. It looks good and I was able to fit it without too much angst by slightly adjusting the boat, so to speak. It should go on permanently this weekend. I also cleaned up the hull-deck joint at the bow and epoxied the gap closed. I'm still planning a layer of cloth over that area before installing the plate. The bulb around the 5/8" hole for the forestay pin concerned me. I wasn't expecting that. I had to adjust the location of my bow roller to starboard a little to maintain clearance. I'm glad I didn't get ahead of myself on getting the holes drilled in the base. Everything still aligns ok.

20170719_203404-small.jpg20170722_143429-small.jpg20170721_115003-small.jpg20170726_134136-crop.jpg
 

footrope

Contributing Partner
Blogs Author
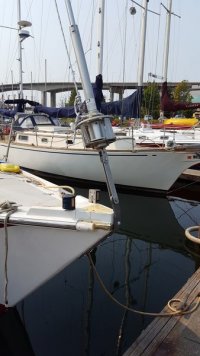
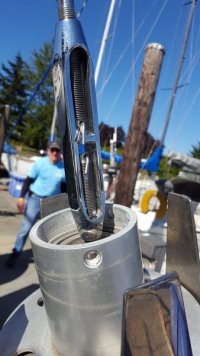
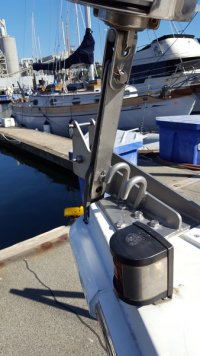
The new chainplate is installed and the forestay is attached. A couple of distant decisions have caught up with me with the new chainplate in the mix. The new chainplate sticks up ¾ of an inch higher above the bow than the old one. That makes the old back stay turnbuckle position too light in tension. It also will move the masthead aft by some amount, if I go to the old tension value of 1500 lbs. by tightening up the backstay more. That adds some aft bend at the masthead which flattens the main which reduces heel, etc. Thinking about that, I will probably call the rigger for advice. The forestay turnbuckle is bottomed out – as short as it gets - so shortening the forestay is an option only if I drop the furler and top of the stay to the dock and cut.

I recall when the stays were new, we cut some excess length off the forestay but still had to bottom out the forestay turnbuckle to get the mast straight up and down. We used Hayn fittings at the bottom of the backstay and at the top of the forestay, so I can practically make length adjustments without tools. I just have to talk to the rigger and think it through. I do not have a backstay adjuster.

20170805_161106-small.jpg
 

Loren Beach

O34 - Portland, OR
Senior Moderator
Blogs Author
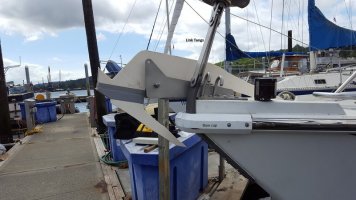
Looks like your boat uses long link plates, perhaps to give more clearance for anchor-handling?
Could you replace the existing plates with the "right size" ones in SS or Ti ?

Trivia note: by the mid-80's EY was installing integral hydraulic backstay adjusters on the model 38 and the Olson's.
We really like ours.

Loren
 

footrope

Contributing Partner
Blogs Author
The links may also be long to keep the jib off the deck for visibility. Not sure. I need to go up the mast anyway, so I will probably drop and shorten the stay. The backstay may be able to be cut an inch or so also.

I borrowed a Loos gauge today. Thanks for the suggestion.
 
Last edited:

footrope

Contributing Partner
Blogs Author
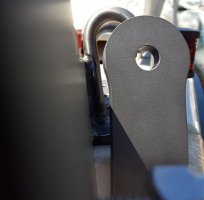
Loren, I think you suggested the best solution: to shorten the link plates or tangs. After mulling the issue over and discussions with several folks, the "easiest" solution is the correct one. The furler drum, which is higher by that 3/4 inch, would be brought back down near where it was before. The drum can come down at least an inch further without getting into a tight area of the lower pulpit rail and it won't be in the way of the anchor stock, no matter what gyrations the anchor goes through as it comes aboard. I have found link tang pairs for sale and entire toggle and plate assemblies for sale, both at prices I don't need to pay. So, I'm working on a little plan to shorten the existing ones at least an inch and a quarter, which would be the minimum to maintain the edge distances to the 5/8" pin hole. That will give me some room on the forestay turnbuckle and put the backstay turnbuckle near its old position.

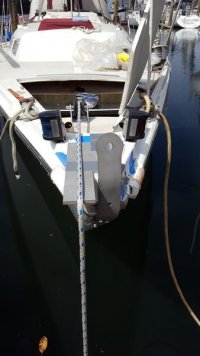
Picture of the finished chainplate installation with the bow cap in place temporarily. All the bow cap needs is some sealer before being attached properly. It has been notched in three places to accommodate the new chainplate and its hex fasteners.

20170813_123904-small-anno.jpg
 

footrope

Contributing Partner
Blogs Author
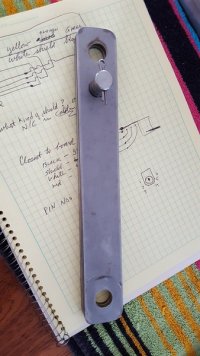
This past weekend I drilled a new 5/8 inch hole in the links that effectively shortened them by about 1.25 inches. I bought a new 5/8 inch drill bit especially for the job. That was certainly cheaper and much faster than having a machine shop do it. I left the original length of the links as they were, just in case there is a need to go back to that config. I don't anticipate any problems though.

20170817_164738-small.jpg

I let the forestay out to get the length needed to get the pin in the new holes. After tensioning the stays back to around 1500 lb with the top of the mast in column this is the result. I have some adjustment remaining on the forestay turnbuckle, as hoped/planned. And the backstay didn't get back to the old line by about 1/2" on each screw. That seems just about right.

20170821_155730-small.jpg 20170821_160650-small.jpg

The Loos gauge is pretty easy to use, of course. I watched the rigger tension the wires in 2015 when the rig was put back together and I have the numbers from that effort. Since I have the gauge I'll go through the rest of the rig to see where they are with a couple years of stretch on them. The Loos gauge has some hysteresis due to the friction so I will let it sit for a couple more days and then check it again and make a final adjustment if I think it's needed.
 
Last edited:
Top