• Untitled Document

    Join us on April 26th, 7pm EST

    for the CBEC Virtual Meeting

    All EYO members and followers are welcome to join the fun and get to know the guest speaker!

    See the link below for login credentials and join us!

    April Meeting Info

    (dismiss this notice by hitting 'X', upper right)

E30+ Headliner

gkjtexoma

Member II
Hello All,

This forum reads like great group of people! We purchased a 1985 Ericson 30+ a few months ago. In the evenings I've been avidly reading at the great information on this site . I'm presently spending my time working on our O'Day 25 getting it ready to sell, but have been thinking a lot about the many things that need doing on the E30+.

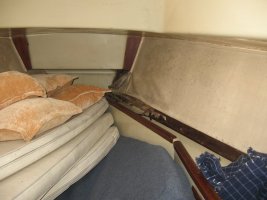
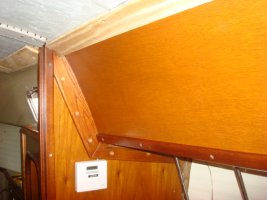
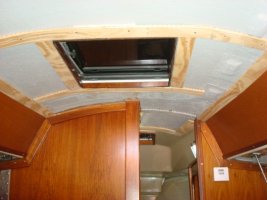
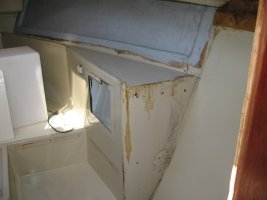
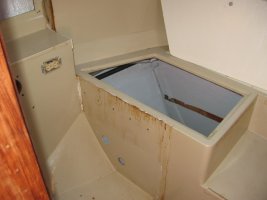
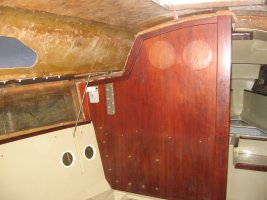
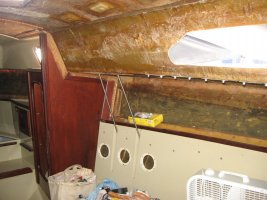
The condition of the interior headliner due to many leaks. I've fixed most of them, but all the zippers are stuck and all the staples holding the headliner are rusted and just waiting to let go. Areas of the plywood around the main portlights are delaminated. I've read all the writings on getting the zippers working again and have even bought replacement pulls. My wife suggests removing the entire headliner and simply painting the 'ceiling'. I am torn between doing that and trying to make the present headliner presentable with the plywood patched up and probably painted off-white.

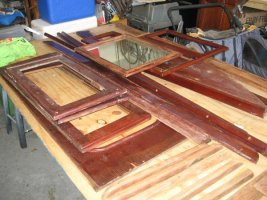
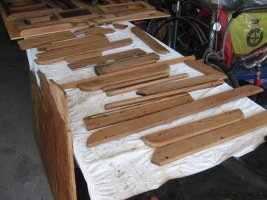
Has anyone torn the stuff out and done something like painting or creating a ceiling of laminate panels retained by teak furring strips? Or anything else along those lines?


Graham
Lake Texoma
 

eknebel

Member III
Welcome!

Welcome to the Forum, there is a wealth of knowledge and support. I have a soft spot for E30+, perhaps because I have enjoyed owning one for the last 17 years. I have read other posts where the headliner was replaced or worked on fairly easily, as vinyl (naugahyde)is stretching and forgiving. If you don't have halyards lead to the cockpit, you don't need the semi circular zippers by the companionway. The straight zippers along the sides are needed for access to stanchions, genoa track, etc. Since I am hopeful I have fixed the leaks in the anchor well(first time lasted 16 years), I am getting ready to tackle the vinyl in the v berth, and purchased a $30 pneumatic t-50 stapler. I will let you know how it goes.
You will find that the 1/4 paneling is almost 10 feet long on the starboard side, and over 9 feet on the port side. You could join 8 ft paneling together, making the seam hidden by the curtains. If there is a local lumber supplier, they can order a 5 ft by 10 ft teak laminate(1/4 inch). I was quoted $400. getting it local saves with shipping costs, if you can use the term "saves" with a $400 sheet of plywood!
As you know, the materials and labor can vary widely depending on what you chose. That is a matter of skills, time, taste,and budget. My advice is to make the appearance tolerable, make it safe, and go sailing as much as you can!
 

gkjtexoma

Member II
Welcome aboard!

This thread shows bamboo headliner and Lew Decker's solution (Post #16+):

http://www.ericsonyachts.org/infoexchange/showthread.php?4646-Talk-to-me-about-headliners

Post #22 below is Martin King's work:

http://www.ericsonyachts.org/infoex...cson-31-Cruising&p=93111&highlight=#post93111


Thanks guys,

I thought my forum searching skills were pretty good, but I followed the links that appeared in the first response and found tons of information. Also in the links provided above.

Excellent site...


Graham
 

mjsouleman

Sustaining Member
Moderator
Head liner

Welcome aboard,

I also am a 30+ owner and have been "upgrading" the last three years.

This years project is re-wring and therefore, undoing the headliner to reach those tough spots.

Looking forward to your adventure "upgrading" you boat, By The Way, what is she named?

MJS
 

sailorman37

Member II
I pulled out the old zippered headliner and replaced with off white naugahyde. Very easy to pull tight and staple with a hand held stapler. I choose to upgrade to SS or Monel staples since the previous were completely rusted. Covered the seams with simple teak strips. Also used a door skin for the wood side near the ports since I didn't want to pay $400 for the teak plywood. DSC02623.JPGDSC02544.JPGDSC02543.JPGDSC02540.JPGDSC02536.JPG
 

bolbmw

Member III
wow, your interior looks amazing sailorman37. Almost like new. What did you use to freshen up the teak on the bulkheads to make them so like new? Mine have 36 years of teak oil and maybe matte varnish and have lost their brightness.
 

Frank Langer

1984 Ericson 30+, Nanaimo, BC
Sailorman 37,
Your interior looks great! I'm wondering how you removed that inside handrail, and then reinstalled it so the vinyl could go underneath it? Also, did you sew the vinyl sections together, or how are they connected? How much vinyl did you have to buy to do the job, and did it also include the V-berth and quarterberth?
Thanks for any additional information!
Frank
 

sailorman37

Member II
I had pulled out all the teak and stripped with a heat gun and "varnished" with about 5 coats of polyurethane. Also pulled out 3 of the 4 bulkheads and replaced since they were so rotted. Fortunately what would have been the hardest to pull (aft wall of head) was decent and I stripped it in place. I was able to replace the 3 bulkheads with a single sheet of 1 sided teak plywood, so the inside of the front hanging locker and the fore side of the front head bulkhead are non-teak. Actually doesn't look badly since the wood they used is fine grained - similar to the door skin wood used on the inside couch house. I first 'varnished' the teak 4'x8' plywood before cutting. Used a roller and tipped off with a brush which made the work relatively quick.

Sanded each solid teak piece well between coats since the teak was pretty rough. After reinstalling had to add another 2-3 coats to cover the teak plug holes, but many of the pieces I just did the plug area when possible to blend. The overhead hand rail was installed after the teak was stretch as were the SS "chain plate" support rods. Just felt the bolt holes through the material and made a small hole and allowed the material to stretch around the rod.

My forepeak and qrt berth have plastic liner - no naughahyde on the ceiling. The side panels are home depot pine "wainscoat" that I sprayed with 2 part Napa Auto body paint.

I believe I bought 7 or 8 yards of 36" wide naughahyde material from a Marine surplus store in Sarasota Fl for less than $50. I did not sew it together. All four sides are stapled to scarfed plywood strips screwed to the ceiling. For the visible edge I wrapped the material underneath, stapled and then screwed it to the ceiling. Wrapped it over and now hidden plywood and stretched it across to the middle and stapled - finished by stretching the two sides out and covering with teak strips.

It was a lot of work, but I was fortunate to be able to do this while the boat was in the water behind my house and the wood in my garage.
 

Attachments

  • 751.jpg
    751.jpg
    47.8 KB · Views: 26
  • 801.jpg
    801.jpg
    78.5 KB · Views: 22
  • 797.jpg
    797.jpg
    66.2 KB · Views: 27
  • DSC02417.JPG
    DSC02417.JPG
    96.3 KB · Views: 30
  • DSC02431.JPG
    DSC02431.JPG
    94.5 KB · Views: 34

sailorman37

Member II
Pulled out some more pictures and if I remember correctly, I used the door skin material on the coach house interior because I could get it in a long enough piece where the teak plywood was unreasonably expensive for that length. However, I did use the 1 sided teak plywood at the bulkheads. Had to take off the bottom 1' of the aft head bulkhead and scarfed in wood since that too rotted. Looks like it was only the front 2 bulkheads that I replaced, not 3. Probably closer to $100, not $400 per sheet, but still expensive in my estimation.
 

Attachments

  • IMG_8062.JPG
    IMG_8062.JPG
    67.2 KB · Views: 38
  • IMG_8065.JPG
    IMG_8065.JPG
    64.9 KB · Views: 24
  • IMG_8066.jpg
    IMG_8066.jpg
    50.2 KB · Views: 50
  • IMG_4176.jpg
    IMG_4176.jpg
    90 KB · Views: 25
  • IMG_4177.jpg
    IMG_4177.jpg
    101.7 KB · Views: 40

gkjtexoma

Member II
mjsouleman: Thanks for the welcome. The boat's name as purchased is Island Time. We plan to change the name and incur the wrath of the sailing gods. The new name will be FREEFORM which a the name of a couple of previous boats we owned.

sailorman37: Wow your interior looks great. Luckily I haven't found any critical rot. Just a lid on the forward bilge access. After seeing your degree of work, I think I will take my time on a complete renovation if at all. Maybe just patch things up as nicely as possible. Your picture of what lies under the Naugahyde has discouraged me from considering painting the underlying fiberglass.


Graham


Graham
 
Last edited:

sailorman37

Member II
I was dreading doing the Naugahyde fearing I wouldn't be able to make it look nice. Even tried to get a quote for a "professional", but he never showed up at the boat. Turned out to be one of the easier jobs and much better than trying to smooth the interior glass and paint. The other projects were not that easy and hence the boat name Albatros! Hung around my neck for quite awhile, but finally flew.
 

Frank Langer

1984 Ericson 30+, Nanaimo, BC
You sure did a lot of work, but the result is outstanding! It looks great! Thanks for the detail and the pics--really good information for others planning projects like this!

Frank
 

sailorman37

Member II
You sure did a lot of work, but the result is outstanding! It looks great! Thanks for the detail and the pics--really good information for others planning projects like this!

Frank

Thanks. Sorry for hijacking the thread. Wanted to show the headliner is an easy project if you don't mind losing the zipper access.
 

gkjtexoma

Member II
Thanks. Sorry for hijacking the thread. Wanted to show the headliner is an easy project if you don't mind losing the zipper access.


I don't think that was a hijack of the thread. Your responses are spot on. You must be confident of the bedding on things behind the headliner -- did you use butyl rubber tape or something else?


Graham
 

sailorman37

Member II
I don't think that was a hijack of the thread. Your responses are spot on. You must be confident of the bedding on things behind the headliner -- did you use butyl rubber tape or something else?


Graham

I used 3M 101 which is a polysulfide sealant. don't think they offer that anymore, but butyl probably would have been a better choice since it has more elasticity than polysulfide.
 
Top