• Untitled Document

    Join us on April 26th, 7pm EST

    for the CBEC Virtual Meeting

    All EYO members and followers are welcome to join the fun and get to know the guest speaker!

    See the link below for login credentials and join us!

    April Meeting Info

    (dismiss this notice by hitting 'X', upper right)

M25xp, convert from 3 point mount to 4?

Rocinante33

Contributing Partner
Here is their spec sheet for the recommended mount:

DSATL-M55-16S.pdf

Hmmmm.... PDF file did not load. #!*+# iPad
 
Last edited:
Ian S

Member III
Thanks for posting Kieth. The guys at isoflex are great to work with and I think their products are the best in the industry! I have used them on customers boats as well as my own! I have the yellow inserts on my M-25XP. The whole design is superior to anything that I'm aware of on the market.

Capt. Ian
 

bigd14

Contributing Partner
Blogs Author
Thanks for the bracket ideas, Ken. I do have a zero-clearance issue with the engine cover at the front of the angled portion of the engine bed. But I could certainly figure out a design that is close to zero-clearance. And Keith, yes the yellow mount is the softest and the most appropriate for these light engines. I'm still waffling back and forth on the 3vs4 mount concept despite my earlier comment. I have had to have so many things fabricated already- fuel tank, strut, prop shaft, etc., the thought of more fabrication is a bit daunting right now.

I have also thought about the "barrel" nuts, like a mini version of the more modern E series chainplate attachments that Bruce mentioned earlier, or a combination of threaded inserts with a nut underneath to bear on the bottom of the beds, and also the thru bar of flat stock. So there are plenty of options, I just need to figure out which will be the best for me. Once I get the strut in place and can get the engine temporarily back on the beds I will make a final decision. Anyway, its fun to try to figure out all this stuff!
 

bigd14

Contributing Partner
Blogs Author
New Ideas

Now that the strut work is behind me I can focus on other things like the engine mounting situation. I think for the front mounts I will switch to 4 mounts. I found I do NOT have a zero clearance issue at the front mount area, so I will probably lag bolt a 3/8 steel plate over the front engine bed area and tap the plate to accept the mount bolts. Lag bolting the plate should not be a problem since the bolts will only be installed once, and I will add some epoxy to the threads for good measure.

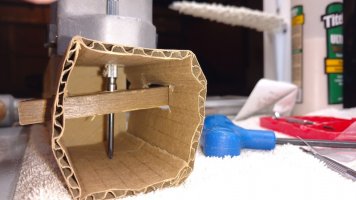
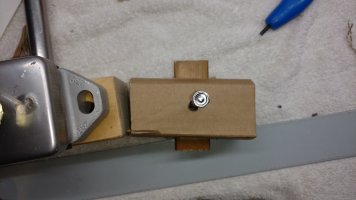
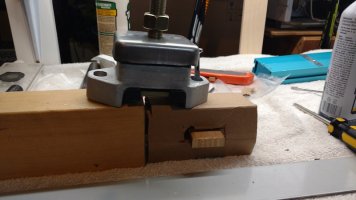
As for the rear mounts which rest on the stringers with a poor lag bolt bond to the soft wood underneath, I am going to install some drilled and tapped through-bars under each mount (4 total), as per the silly looking mock up in the photos. I will install them below the wood layer, probably about 1.5 inches below the top of the stringer where the wood ends. Should be pretty easy to notch out some openings through the stringers. This should solve the lag bolt problem once and for all.
Motor Mount- Anchor Concept 1.jpg

Motor Mount- Anchor Concept 2.jpg

Motor Mount- Anchor Concept 3.jpg
 

bigd14

Contributing Partner
Blogs Author
I've yet to find a sailboat project that does not suffer from the "snowball effect." In fact, boats are the very definition of the term.
 

JSM

Member III
I have a lot of snowballs going this spring and was going to put this project off until next year , then today I discovered a stripped lag screw in the rear of the forward mount.
After removing the mount I moved it to the side and installed it in the "ear" of the motor mount bracket.
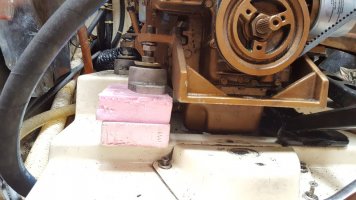
Plan as of now is to glass in two solid oak blocks, lag the mounts in and call it a day.
What could possibly go wrong?
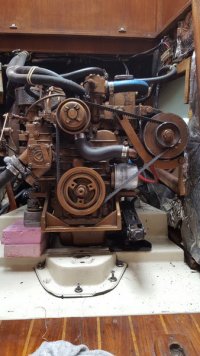
4mt 2.jpg4mt 1.jpg
 

JSM

Member III
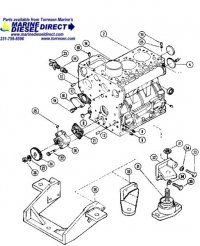
Absolutely will be installing a 4th mount ! Just don't have it yet. Originally I was afraid that there was not enough room for the mounts using the existing bracket (#29 on the drawing) and that I would have to have brackets fabricated.
As of yesterday my intention was to just repair the stripped lag in the front mount but once I got the mount out I discovered that getting to the rear lag hole presented more work than anticipated due to a large phillips head screw hidden under the mount. Can't get the screw out without removing the bracket.
At this point I figured why go thru all this and still have a 3 point mount system when I can build up the engine beds and add a 4th mount using the existing bracket.
Will work some more on mocking this up today.
Any tips for glassing in the beds ?


1-crankcasegroup.jpg
 

bigd14

Contributing Partner
Blogs Author
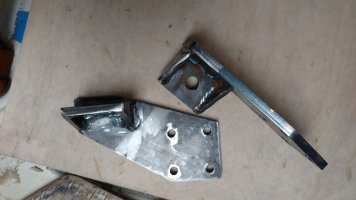
I'm going with 4 mounts. Iso Flex mounts are in hand, and brackets are being fabricated. Materials in hand to convert from lag screws to something more durable. Making this up as I go along...


Engine Bracket 2.jpg
 

JSM

Member III
Looks like a good plan. What will you be using to anchor your mounts ?
At this point I'm still on the fence about jumping into this project this spring as I have to put on a new bottom and re glass and install my rudder.
Ideally I would like to install 4 new Isoflex mounts, however last year I installed replacement mounts form Universal and am afraid that the rear lag holes won't take another in/out trip.
If I go ahead this season the plan would be to build out the stringers and add a matching mount to my existing three. If that solves the vibration issues I'll leave well enough alone.
Plan B would be to wait until haul out in Oct. and pull the engine so I have room (and time) to work. Then I could properly solve the lag bolt issue in the rear and install Isoflex mounts.
Hopefully the weather here will cooperate and this weekend I can start rolling epoxy primer on to my bottom.
If not I'll probably have to find a way to deal with repairing the lag on my front mount.
 
Last edited:

bigd14

Contributing Partner
Blogs Author
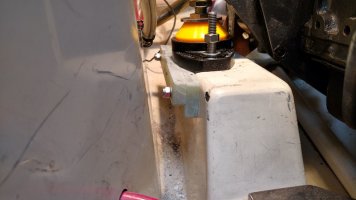
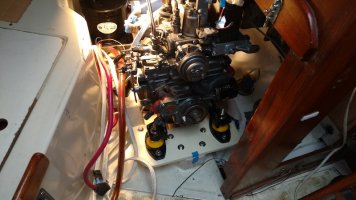
Engine mounts are sorted and engine is back in place but not fully installed. I went with hanger bolts for the rear mounts. Exploration revealed reasonably sound wood below, unlike the single front mount. I will set them in place with thickened epoxy. The mounts hung over the edge of the engine beds, necessitating the addition of an inch of G10 so they could be fully supported.

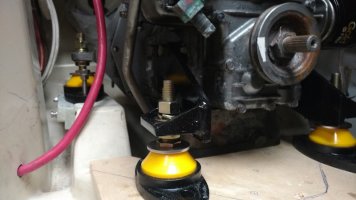
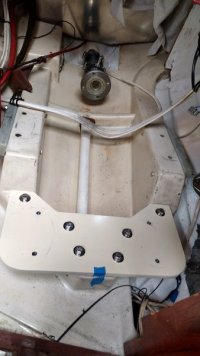
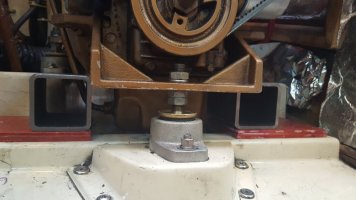
For the front mounts the custom brackets turned out really nice. I could have raised them .5 inches for a little more clearance, but I should be able to squeak by. I also had a .5 inch steel plate manufactured that is lag bolted onto the front engine bed below with 6 3/8 bolts. Solid. These lag bolts will never need to be removed. I tapped four holes in the plate to accept 3/8 bolts. Hopefully I can get it all adjusted to spec.


Bed Extensions.jpg
Engine bed extensions

Engine Brackets.jpg
Brackets before paint

Brackets On.jpg
Mounts painted and installed

Engine Bed Plate.jpg
Forward engine bed plate, painted.

Engine In.jpg
Engine back in!
 

Frank Langer

1984 Ericson 30+, Nanaimo, BC
You have done a lot of work, and it looks as if it turned out really well. Once you get your boat running again, I'd really appreciate it if you could report on how much difference the four vs. three motor mounts make in engine vibration. I know it might be quite subjective, but it would be helpful nevertheless for anyone considering replicating your work to minimize vibration.

Also, any comments you might have on how you would do this project differently if you had to do it again, would be helpful.

Thanks!

Frank
 
Last edited:

bigd14

Contributing Partner
Blogs Author
Hi Frank, absolutely I will report back. It will be quite a few months though! Nothing I would have done differently at this point with the exception of raising the new front mounts about .5 inches to allow more adjustment room.
 

JSM

Member III
Nice job Bigd14! anxious to hear how it works out for you. I have run out of time this spring and will be tackling this project in October.
I also used the hanger bolts and epoxy to repair the stripped mount in the front.
Be sure to keep us posted.
 

JSM

Member III
Pulled the boat for the season this past weekend and am continuing with my plan to convert to 4 mounts. As my engine beds don't come far enough forward I will be using 3" x 3" X 1/4" thick square steel tubing mounted on 1/2" of gpo3 fiberglass board as beds for the front mounts. The tubing will be drilled and taped to accept the motor mounts. Lag bolts or hanger bolts and epoxy will be used to hold everything in place.
Am planning on using Trelleborg Cushy float mounts from http://www.missionsupplyonline.com/
4 pt mount.jpg
 

Ian S

Member III
Hi JSM. you should really consider the iso-flex mounts. Same as in the previous posters pics. I have used a ton of different mounts over the years and I think if you had a set side by side you would recognize the value / quality of the iso-flex products. just my .02

I also would like to hear a report on vibration reduction from bigd14.

Capt. Ian
 
Last edited:

bigd14

Contributing Partner
Blogs Author
And I would like to report on it but the boat is still on the hard. I’m the victim of “while you are in there” syndrome and life has been full of non boat related stuff.
 
Top