• Untitled Document

    Join us on April 26th, 7pm EST

    for the CBEC Virtual Meeting

    All EYO members and followers are welcome to join the fun and get to know the guest speaker!

    See the link below for login credentials and join us!

    April Meeting Info

    (dismiss this notice by hitting 'X', upper right)

companionway trim removal

Wolfemusic

Bettina
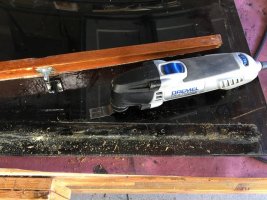
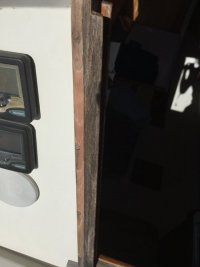
Hello all, new member here. Just acquired a 73' E32 about a month ago and have started the long list of repairs to get her to a happy place. The companionway trim has been weathered and broken and I would like to replace it. My grandfather is an excellent wood worker and would like to replace the trim for me but is too old to get up to the boat these days. So i was trying to remove it to bring to him so he could use it as a template. I drilled out the small circular wooden plugs revealing screws of which i removed. It appears as tho some form of epoxy or sealant was used between the wood and the fiberglass tho and it seems too tight to get a putty knife in there (especially on the back side inside the cabin to help break it loose. any ideas that would allow me to get the trim off somewhat intact? also I only tried it on the port side in and out. perhaps i need to remove more screws? Thanks for the help.
attachment.php
 

Attachments

  • IMG_3959.jpg
    IMG_3959.jpg
    28.8 KB · Views: 507
Last edited:

Shelman

Member III
Blogs Author
Mine were bedded with what looked to me like a polysulfide or polyurethane. I was able to remove them using a steel putty knife that I had sanded smooth to remove the sharp edges. What ever you do don't use silicone when you replace them. It has poor holding and leaves behind silicone contamination, to which neither silicone nor anything else will stick to.
Don't ask how I know LOL.:egrin:

Here is some reading if you so desire.
http://www.boatus.com/magazine/2013/April/how-to-pick-the-right-sealant.asp
http://www.goodoldboat.com/reader_services/articles/sealant.php

Welcome to the forum!
 

Wolfemusic

Bettina
Mine were bedded with what looked to me like a polysulfide or polyurethane. I was able to remove them using a steel putty knife that I had sanded smooth to remove the sharp edges. What ever you do don't use silicone when you replace them. It has poor holding and leaves behind silicone contamination, to which neither silicone nor anything else will stick to.
Don't ask how I know LOL.:egrin:

Here is some reading if you so desire.
http://www.boatus.com/magazine/2013/April/how-to-pick-the-right-sealant.asp
http://www.goodoldboat.com/reader_services/articles/sealant.php

Welcome to the forum!

Thank you. I was trying to figure out how to get my knife on this inside edge (red arrow), especially up higher than where the photo shows.. also couldn't see if it is attached in any way at the bottom (green arrow) or if it is just resting on the horizontal bottom piece. Ill give it a shot later today.
Attachment-1.jpg
 
Last edited:

Rocinante33

Contributing Partner
Maybe try to gently heat it with a heat gun on low. You don't want to burn the gel coat, so be gentle. It may soften up the adhesive.
 

Christian Williams

E381 - Los Angeles
Senior Moderator
Blogs Author
A Dremel saw ( "Multi-Max Wood Flush Cut Blade" ) makes short work when a putty knife doesn't. The oscillation action cuts without much damage to the bonded surfaces.
 

Attachments

  • 1-IMG_0160-001.JPG
    1-IMG_0160-001.JPG
    139.7 KB · Views: 216
Last edited:

Wolfemusic

Bettina
So I still have not found success with removing the companionway trim. I used a heatgun, and dremel with a fine saw blade and its just too tight of an angle to get results. The inside is impossible to access accept at the very bottom. Perhaps there is a 90 degree angle putty knife out there that I haven't seen yet. Im now thinking along the lines of trying to repair the trim in some way vrs replacing it. I still have the broken off pieces that could theoretically be glued back in place but I would need to strengthen the whole arrangement in some fashion. Ideas?
 

Loren Beach

O34 - Portland, OR
Senior Moderator
Blogs Author
So I still have not found success with removing the companionway trim. I used a heatgun, and dremel with a fine saw blade and its just too tight of an angle to get results. The inside is impossible to access accept at the very bottom. Perhaps there is a 90 degree angle putty knife out there that I haven't seen yet. Im now thinking along the lines of trying to repair the trim in some way vrs replacing it. I still have the broken off pieces that could theoretically be glued back in place but I would need to strengthen the whole arrangement in some fashion. Ideas?

When I took my galley sink out, with a teak fiddle about an inch away from it on three sides..... I had to break the old sealant bond under the edge flange of the ss sink. I took a putty knife with a 1" blade and bent it 90 degrees about 3/4" up. Then I tapped it firmly with my little 2# hammer on the side and drove it along to break the edge seal. Slow, but no harm to the sink. Admittedly I was planning to replace that plastic laminate counter top anyway so a few scratches were not a problem, and I could have put some tape on that old counter material to protect it if I had wanted to do so.

Loren
 

Christian Williams

E381 - Los Angeles
Senior Moderator
Blogs Author
If Loren's idea doesn't work, I guess I would take measurements and then attack and remove (destroy) the original wood to get back to the original surfaces.

Since I'm not a real woodworker, this has usually meant a lot of "fittings" of the new parts. Meaning, the plan isn't to get it right the first time.

I have found it challenging to repair such trim-- mating and matching existing surfaces is difficult to get right, and the results haven't justified the time spent.

If it's cosmetic, maybe it can wait till winter....
 
Top