You are using an out of date browser. It may not display this or other websites correctly.
You should upgrade or use an alternative browser.
You should upgrade or use an alternative browser.
28. 2 Cabin Sole replacement
- Thread starter bayhoss
- Start date
bayhoss
Member III
Frank,
Is any of the old floor salvageable and available? I'm looking for an approximate 15 x 10 inch piece of original teak and holly. Actually, all I need is the top veneer.
Thanks,
Mark
Hi Mark, I may very well have a piece that will work for you. Let me get the old home and cut the new. If there is a usable piece, then its yours.
Best,
Frank
Sure, post the pictures. We need all the X-rays we can get at this boat hospital.
bayhoss
Member III
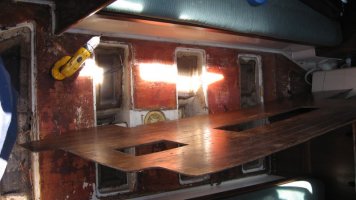
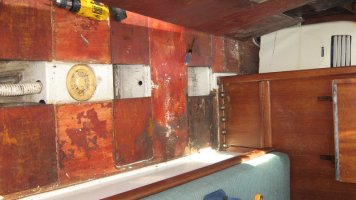
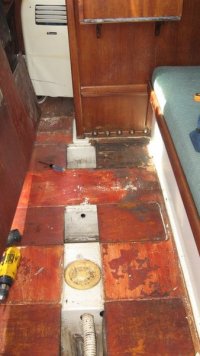
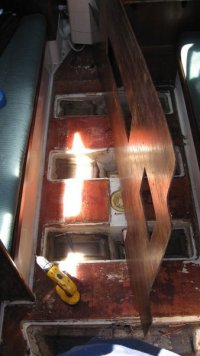
Sole removed, first with the plywood covers still in place the second with them removed. Whatever is under there is glassed in with many layers. If anyone knows what lies beneath all that fiberglass (other than the Chesapeake Bay) I would love to know!Sure, post the pictures. We need all the X-rays we can get at this boat hospital.
Don't know why the pictures are coming out sideways. They're vertical in my storage - maybe I was lying down ;-)
Frank
Attachments
-
 IMG_0014.jpg73 KB · Views: 48
 -
 IMG_0011.jpg85.5 KB · Views: 48
Last edited:
Thanks for fixing the photos. They're no use to anybody sideways.
[h=2]Adding Photos to a Forum Message[/h]
 Attached Thumbnails</legend>

 </fieldset>
[h=2]Adding Photos to a Forum Message[/h]
1. Initiate "Post New Thread" or "Reply to Thread"
2. Scroll down beneath the message block to "Manage Attachments"
(This opens the File Upload Manager. Notice that any photos you have uploaded previously remain stored here)
3. Select "Add Files" to choose a new photo from your computer.
4. Select "Select File".
(This accesses all the photo files on your personal computer)
5. Double click on the chosen photo. Its name will appear in the "File Upload Manager" pane.
6. Select "Upload File."
The uploaded photo will appear as "Insert Online". Repeat for as many as five photos per message, then select "Done".
7. Select "Preview" to check the result (box is at the lower right-hand corner).
Photos can be repositioned like text in the Editing Pane, by dragging (but not in the Preview Pane).
To remove photos from a post, or substitute them, return to the File Upload Manager. Check the photo displayed and delete it.
The value of the forum photo system is that the site hosts its own pictures--permanently. There are no "dead" photo links after a few years, a shortcoming of colleague sites.
Troubleshooting:
Many uploading issues--sideways pix, pix too large--result from the use of photo-collection organizers like Picasa, which are designed to leave the original photo unchanged. Therefore, "Save" or "Save As" after editing any photo, or the uncorrected original may upload.
Before uploading, locate the chosen photo on your computer. Crop, enhance, and confirm that it is less than 800 pixels and oriented correctly.
A simple way to confirm that the correct photo version uploads is to save it to the desktop and upload from there.
Regarding size: the measurement is in pixels, not KB. For example, 717 x 553. The larger number must be 800 or less. Re-sizing should be easy but can be confounding. In Picasa 3, "resize" is hidden within the Exporting function. In Windows Live Photo Gallery it's Edit/Resize. In iPhoto it's File/Export/Resize.
<fieldset class="postcontent" style="margin: 5px 0px; padding: 0px; border: 0px; word-wrap: break-word;"><legend style="margin: 0px; padding: 0px; color: rgb(0, 0, 0); font-family: Tahoma, Calibri, Verdana, Geneva, sans-serif;">
2. Scroll down beneath the message block to "Manage Attachments"
(This opens the File Upload Manager. Notice that any photos you have uploaded previously remain stored here)
3. Select "Add Files" to choose a new photo from your computer.
4. Select "Select File".
(This accesses all the photo files on your personal computer)
5. Double click on the chosen photo. Its name will appear in the "File Upload Manager" pane.
6. Select "Upload File."
The uploaded photo will appear as "Insert Online". Repeat for as many as five photos per message, then select "Done".
7. Select "Preview" to check the result (box is at the lower right-hand corner).
Photos can be repositioned like text in the Editing Pane, by dragging (but not in the Preview Pane).
To remove photos from a post, or substitute them, return to the File Upload Manager. Check the photo displayed and delete it.
The value of the forum photo system is that the site hosts its own pictures--permanently. There are no "dead" photo links after a few years, a shortcoming of colleague sites.
Troubleshooting:
Many uploading issues--sideways pix, pix too large--result from the use of photo-collection organizers like Picasa, which are designed to leave the original photo unchanged. Therefore, "Save" or "Save As" after editing any photo, or the uncorrected original may upload.
Before uploading, locate the chosen photo on your computer. Crop, enhance, and confirm that it is less than 800 pixels and oriented correctly.
A simple way to confirm that the correct photo version uploads is to save it to the desktop and upload from there.
Regarding size: the measurement is in pixels, not KB. For example, 717 x 553. The larger number must be 800 or less. Re-sizing should be easy but can be confounding. In Picasa 3, "resize" is hidden within the Exporting function. In Windows Live Photo Gallery it's Edit/Resize. In iPhoto it's File/Export/Resize.
markvone
Sustaining Member
Hi Frank,
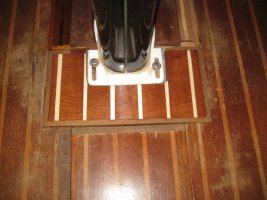
Thanks! Looks like you got your complete sole out in one piece and can use it as a template for the new one. If you are going to dispose of the old sole, I'd be willing to take the entire old sole and store it for anybody else that may need a small(ish) piece of old teak and holly for a partial repair. I just need the small piece to build "Mast Board III" - see this thread for more details:
http://www.ericsonyachts.org/infoexchange/showthread.php?13847-Varnished-Cabin-Sole-(again)-Pictures
All the newer teak and holly plywood that I've found has different dimensions and spacing for the teak and holly than my old 1981 T & H sole. I'll post the dimensions of my old T & H sole here when I get home. Here is "Mast Board II" partially finished. I'm hoping for an exact match using older T & H for the next version.
Thanks again,
Mark
Attachments
-
 IMG_1462.jpg106.1 KB · Views: 213
Frank,
I rotated your pictures for you. I moved them to my desktop, saved them in the correct orientation, and posted them.
I have no problem doing that once for new members, or for members who ask for help. Generally a few re-tries following the instructions and you get the idea.
It is not too much to ask. And we do ask it.
Attachments
-
 frank 1.jpg46.1 KB · Views: 35
 -
 frank 2.jpg40.8 KB · Views: 40
Last edited:
Take a deep breath...
Ahem. No one is getting "removed."
As to rotated photos... (Big Sigh...) it's an on going frustration with this iteration of the site software. I have reoriented some photos myself for other members.
Please try to not look for a slight where none was really intended.
Thank you,
Loren
Senior Moderator
Mr. Williams, my posting was:
For the benefit of others and not myself, I reflected regret for the orientation of the photographs, and at no time did I ask you for your help.
Look at yourself for a poor attitude and feel free to remove me from this group at any time.
Ahem. No one is getting "removed."
As to rotated photos... (Big Sigh...) it's an on going frustration with this iteration of the site software. I have reoriented some photos myself for other members.
Please try to not look for a slight where none was really intended.
Thank you,
Loren
Senior Moderator
bayhoss
Member III
markvone;99 My old teak and holly sole has 3/8 inch wide holly and 2 1/4 inch wide teak. All the new T & H plywood I've seen is 1/4 inch wide holly and 2 3/8 inch wide teak. Mark[/QUOTE said:Mark, looks like I'm no help to you, the teak measures 2 3/8" and the holly is 1/4".
Best,
Frank
markvone
Sustaining Member
Thanks Frank!
Darn. I see your E28 is an 1986. There must have been a change at the International Standards Organization for teak and holly between 1981 and 1986. Well I now know I need to get an old piece of T & H from closer to 1981.
Thanks again for checking it out.
Mark
Darn. I see your E28 is an 1986. There must have been a change at the International Standards Organization for teak and holly between 1981 and 1986. Well I now know I need to get an old piece of T & H from closer to 1981.
Thanks again for checking it out.
Mark
bayhoss
Member III
Hi Mark, I"m not sure if the teak and holly in my boat if the original or not. The method of installation (glue only) is not in keeping with how Ericson built them. I frequently hang out in the "dead bone" section of the marina. I'll keep you in mind and if I see a suitable piece of T&H I'll get with you.
Best,
Frank
Best,
Frank