• Untitled Document

    Join us on April 26th, 7pm EST

    for the CBEC Virtual Meeting

    All EYO members and followers are welcome to join the fun and get to know the guest speaker!

    See the link below for login credentials and join us!

    April Meeting Info

    (dismiss this notice by hitting 'X', upper right)

e35-3 "Epiphany" project thread

timelesschs

Junior Member
hello everyone i have decided to create a thread to document the rebuilding/refit of my mid 80's Ericson 35-3. i bought the boat and officially got started back in october, but due to a crazy work schedule and lots of work related traveling im not quite where i hoped i would be. part of the purpose of this thread will be to help keep me focused and motivate me as well as run my plans past this knowledgeable group. i introduced myself in the raft up forum but in case anyone missed it my name is Ryan and i am 26 years old and live in charleston. i am a general contractor/ carpenter/ woodworker/ furniture builder, although not necessarily in that order. I have quite the arsenal of tools and have experience with small engines and electronics, although not diesels, as well as advanced woodworking skills. This is important because i will be doing pretty much all the work on the boat myself, and hope to learn some new skills as well as save money and gain an intimate knowledge of my boat. speaking of money i was wondering if people would be interested in me keeping some general records of the costs associated with the project?
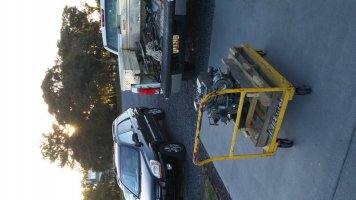
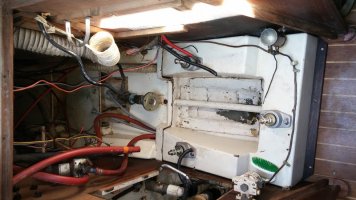
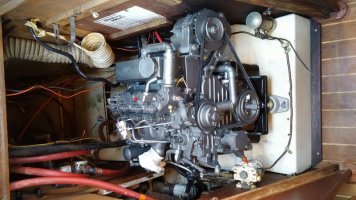
Enough about me, let me give you the background on the boat. The previous owners (partners) found it sitting neglected in a marina down in hilton head, or maybe it was Savannah. The boat was called "Chillin" during this period and the home port was listed as gray TN. i am told it had leaky hatches and ports, and that theory is certainly supported by the widespread water stains in the cabin. they were down there looking at another boat but instead saw this one and had her towed back to charleston. they then removed the engine, gutted most of the electronics, removed the head and disconnected and removed quite a bit of plumbing. as well as most of the headliner. i think their idea was to remove pretty much everything but interior woodwork and start from scratch. however the deck seemed to be in good condition, with a few cracks in the gelcoat but no OBVIOUS soft spots (more on that later). after about a year or so of working (or not working) on the boat the previous owners partnership soured and they offered the boat for sale, as is where is. it did include boxes and boxes of misc new parts as well as a freshly painted and fully rebuilt universal m25xp and transmission, new wiring harness and gauge panel/ignition still in the crate. the mainsail was in good shape but the genoa had been left on the furler without proper uv covers and had disintegrated where exposed. i will continue this post with pictures after work as well as outline the goals and objectives of my project after work today, just wanted to get a start.
 

Loren Beach

O34 - Portland, OR
Senior Moderator
Blogs Author
Welcome, again. You have a good-sized project list. On the Plus side, you are young and skilled. As one of our members here once observed: there are three things needed to own a boat: time, talent, and money.... you must always have two of the three!
:)

If I may sort of 'cherry pick' your list -- if you have bad wood veneer on the inside cabin walls by your ports, Christian's solution of paint is a viable alternative (not my personal choice, but then our veneer was only water stained by prior owner neglect and not degraded physically.
The other suggestion, having seen more than one friend struggle to re-create a head liner in an aging sailboat, is to do what Ericson did with heavy vinyl cloth material. Ours is in excellent condition, but I do have to pull a lot of staples any time I want to get at the underside of the cabin top. I have an upcoming project to replace our original clutches and this will require that I tackle this tedious project once more.

If you visualize how Ericson did the original head liner, they made a pattern about two inches wider than the whole thing when stretched and stapled. Then their upholsterer laid it out on a table and did all of the stitchery and put in all those handy zippers. There are some "fins" sewn in to the back side where a couple of sections were stapled to glassed-in battens clear across the cabin top -- these are the sewn seems we see going across the expanse of material and that's why the stock had liner does not sag.

Zippers.... put some long ones wherever you need access to the underside of winches and clutches. Don't be stingy on this. You will need some extra hands when installing the new liner. Do the 'fin' support parts first, and then the edges.

If you want expert help, seek out an upholsterer that works on custom cars (!). Some friends of our did this when sourcing new cushions for their boat, and that type of shop was already used to working on things that were not square in almost any dimension! :rolleyes:

Of course, this advise is like telling you about a great icing recipe before you've baked the cake! You have some rather major work to do before worrying about the headliner. But just work on it one bite at a time, like the old fable about 'how to eat an elephant'.

A full restoration like this is how us Regular Folks buy a fixer-upper high-end 35 foot sailboat for peanuts and end up with a 200K performance cruiser.
Almost forgot: keep your insurance company informed as major projects are checked off. You'll want a replacement-value policy and the final Agreed On Value will end up at 60K to 70K.

Regards,
Loren
 

timelesschs

Junior Member
basic rundown of elecronics and electrical system on the boat

ok guys i took a few pictures over the weekend and made a general list of upcoming tasks and projects on the boat. the current order of importance centers around getting the boats engine running so i can get it out of the marina and go sailing!! secondary to that i would like to get some of the more major work done so i can keep it on a free mooring and stop shelling out 535$ a month in slip fees... first and foremost is getting the electrical back together, i replaced the 1/0 cable going from the house batteries to the engine and to the selector switch/ 12v panel. some of the previous wire was not tinned and all of it sounded pretty crunchy when articulated. i also found a 6 inch split in the insulation of the 1/0 cable going to the positive terminal. although i had planned to hook up the new engine to my new batteries with the existing wiring, at least temporarily, the finding of the split in the insulation moved this project to the top of my list. so far i have run most of the wire and just need to come up with a way to adapt the larger 1/0 terminal to the factory ground bus, but i dont think that will be a huge problem. i have gone back and fourth on this but i am starting to think i may wire my two 150ah trojan batteries together to form a single bank and get a seperate engine starting battery, wired directly to the starter. with this setup i would probably still wire the house batteries to the 1 and 2 position on my selector switch but leave it on both most of the time. i decided to go this route after reading about the benefits of a larger bank in the "boatowners mechanical and electrical manual". i know i will need some sort of switch that allows the alternator to charge the house batteries the starting battery has been replenished. what sort of safety shut off switch or fuse is needed between the starting battery and the starter, if any? i have been having quite a time chasing down wiring from old electronics that the po either removed or cut the wires. ideally i would like to get most of this stuff working again, as marine electronics are not cheap.
Electronics i have:

Signet system 1000 multifuntion display- looks like mostly boatspeed and depth, with some log features. this has the transducer and paddlewheel but i tried to hook some 12v leads and power up the unit but no luck. in the shallow water around charleston, a depth sounder is a must. i will probably end up getting a used fishfinder gps combo off craigslist. seems like there are some pretty good deals. i know a guy who removed a raymarine c80 multifunction display with transducer from his fishing boat he would probably sell cheap.

Signet system 1500- this instrument shows wind speed and direction and i would really like it if this worked. i have the display and called the folks at signet, they said they will give me a free quote to repair it if i send it to them, but that it is 100% repairable. it looked like pretty simple electronics from what i saw so it would probably be pretty reliable once repaired. it is missing a cup from the anemometer wheel so hopefully they have a cheap replacement for that as well. looks like a new raymarine i60 would cost about 900$ for just the wind instruments. what are the advantages and disadvantages to the newer vs older system? if replacement with a newer system became the most viable option, i would probably wait a season or two before doing it as that money could be more wisely spent in the short term.

Autohelm st4000
i have the display, the fluxgate compass, a box of wires and no wheel unit that i am aware of. having the autopilot working would be really nice and is second only to a depthsounder on my list of electronic desires. from what i have heard it may be worth saving up the 1400-1600 for a raymarine ev-100 or similar new autopilot as replacement wheel drive units are hard to find and fairly expensive.

Vhf radios- I have several working vhf radios from previous boats and i plan to install one on epiphany soon. it seems like i have 2 coax cables running up the mast and back to the nav table that i believe are for the vhf.

Refridgeration- i have adler barbour 12v refridgeration that seems to be working, although it dosent seem to get as cold as i thought i might. could be just because it is such a small system. still i jumped for joy the first time i heard that thing kick on. i have some basic hvac testing equipment and will trouble shoot this further in the future but it is not a very high priority item at least untill i get the boat sailing.

Lighting- some of the cabin lights work but it dosent seem like any of my navigation lights, anchor light, spreader lights work. i havent tried just replacing the bulb yet and that is probably what i will do for now. however in the future i would like to replace these with led's

pumps ect- the only currently connected and verified operation pump in the boat it a rule bilge pump wired directly to the battery with a toggle switch in the bigle. it has a float switch but it seems to be disconnected or not working. there are several other pumps scattered around but none of them have intact wiring and i think a few went to some sort of hydronic cabin heating system long since removed. the factory hot water heater was removed by the PO but i did get a replacement when i first got the boat. i think one of the pumps is the pressure water pump, but again that is something i can work on once i get the boat wired, engine running, and me sailing.
Here is a picture of the boat pretty much as i bought her last fall. im not familiar with this picture uploader so hopefully the picture is larger when i actually post this.
attachment.php

more pictures and info to follow
 

timelesschs

Junior Member
more pictures

attachment.php
attachment.php
attachment.php
attachment.php

here are a few shots of the day we dropped the engine in. we wheeled it down the floating dock to the finger pier and then hoised it into position with the boom.its my buddy dave in the 3rd picture. wish i had wrapped up some loose ends in the engine compartment before it went it, but everything went according to plan. this is in roughly november of last year
 

Attachments

  • 2015-11-14 16.34.04.jpg
    2015-11-14 16.34.04.jpg
    73.1 KB · Views: 329
  • 2015-11-16 14.13.47.jpg
    2015-11-16 14.13.47.jpg
    83 KB · Views: 347
  • 2015-11-16 17.11.14-2.jpg
    2015-11-16 17.11.14-2.jpg
    33.2 KB · Views: 304
  • 2015-11-20 16.01.00.jpg
    2015-11-20 16.01.00.jpg
    95.5 KB · Views: 395

Loren Beach

O34 - Portland, OR
Senior Moderator
Blogs Author
In two of your pix I see a white ribbed bilge hose, towards the rear and looking as though it passes under the engine bed.
That might be your main 1.5" hose from bilge strainer all the way back to your Whale hand pump mounted on the cockpit combing. Ericson put this "offshore category one" gear in all of their larger boats in the 80's.
Time passes and stuff gets 'old'... I just pulled out about 23' of very similar hose through several tight passages thru structural plywood and frp sections beneath the aft cabin. Bit of a hassle, but it had been there since 1988, and was abraded and generally pretty tired looking is some visible sections. Our original hand pump needs a rebuild this year, too.
I used Shields #149. Smooth bore and smooth exterior for easy clamping.

.... Not like you needed anything else on your "list"... :rolleyes:

Anyhow, just an observation from up here in the third balcony.

Regards,
Loren
 

Christian Williams

E381 - Los Angeles
Senior Moderator
Blogs Author
Timeless,

Please rotate your pictures (by editing your Post #4, above).

Adding Photos to a Forum Message[/h]
1. Initiate "Post New Thread" or "Reply to Thread"

2. Scroll down beneath the message block to "Manage Attachments"
(This opens the File Upload Manager. Notice that any photos you have uploaded previously remain stored here)

3. Select "Add Files" to choose a new photo from your computer.

4. Select "Select File".
(This accesses all the photo files on your personal computer)

5. Double click on the chosen photo. Its name will appear in the "File Upload Manager" pane.

6. Select "Upload File."
The uploaded photo will appear as "Insert Online". Repeat for as many as five photos per message, then select "Done".

7. Select "Preview" to check the result (box is at the lower right-hand corner).

Photos can be repositioned like text in the Editing Pane, by dragging (but not in the Preview Pane).

To remove photos from a post, or substitute them, return to the File Upload Manager. Check the photo displayed and delete it.

The value of the forum photo system is that the site hosts its own pictures--permanently. There are no "dead" photo links after a few years, a shortcoming of colleague sites.

Troubleshooting:

Many uploading issues--sideways pix, pix too large--result from the use of photo-collection organizers like Picasa, which are designed to leave the original photo unchanged. Therefore, "Save" or "Save As" after editing any photo, or the uncorrected original may upload.

Before uploading, locate the chosen photo on your computer. Crop, enhance, and confirm that it is less than 800 pixels and oriented correctly.

A simple way to confirm that the correct photo version uploads is to save it to the desktop and upload from there.

Regarding size: the measurement is in pixels, not KB. For example, 717 x 553. The larger number must be 800 or less. Re-sizing should be easy but can be confounding. In Picasa 3, "resize" is hidden within the Exporting function. In Windows Live Photo Gallery it's Edit/Resize. In iPhoto it's File/Export/Resize.​
<fieldset class="postcontent" style="margin: 5px 0px; padding: 0px; border: 0px; word-wrap: break-word;"><legend style="margin: 0px; padding: 0px; color: rgb(0, 0, 0); font-family: Tahoma, Calibri, Verdana, Geneva, sans-serif;">
paperclip.png
Attached Thumbnails</legend> </fieldset>
 
Last edited:

timelesschs

Junior Member
i will work rotating those pictures later, thanks for the tutorial.
loren, as far as those hoses they are for the manual bilge pump, and i would love to find a rebuild kit for that pump. i guess i havent gotten to the goals section of my thread yet but one of my main reasons for getting the boat is to go for an extended cruise to the Caribbean and beyond and redundant safety features like the manual bilge pump are important to me. the pump in the cockpit didnt seem to work very well but i am not sure if its the diaphram or the hose itsself.
 

timelesschs

Junior Member
almost there

So it has been a busy summer, between my largest contracting project to date (stabilizing, lifting and leveling an 1850's mansion in dt Charleston that was leaning over so far the city was going to step in to fix it if the owner didnt) getting my furniture business off the ground (Check out the june issue of house beautiful!) and lots and lots of work on my boat. What started as a simple bottom job turned into grinding out a bunch of blisters, letting it dry, laying glass, fairing, barrier coat ect. but she is finally back in the water and 95 percent sailing ready. there are just a few little hangups. the previous owner lost the 4" inspection port cover for the fuel tank so i need to either find a replacement or a suitable way to cover it. also the cable for the gearshift to the pedestal seems to be missing the piece on the transmission that holds it. also the piece for the engine shutoff has nothing on the end of the cable, just a piece of wire going into the jacketed cable. could anyone post a picture or refer me to a link of what these pieces are supposed to look like? i will post some pictures later but i am running behind for a meeting! Thanks all
 

alcodiesel

Bill McLean
Christian, is that you in a previous life? Or, maybe it's me?
<fieldset class="postcontent" style="margin: 5px 0px; padding: 0px; border: 0px; word-wrap: break-word;"> </fieldset>
[/QUOTE]
 

Christian Williams

E381 - Los Angeles
Senior Moderator
Blogs Author
>>>>the cable for the gearshift to the pedestal seems to be missing the piece on the transmission that holds it. also the piece for the engine shutoff has nothing on the end of the cable, just a piece of wire going into the jacketed cable. could anyone post a picture

attachment.php


The clamp that holds the cable is important--there is a ridge on the concave side (not visible) designed to fit into the groove of the cable and lock it in place.

If your engine has a kill cable, they are manufactured specifically for the purpose. Lighter then a standard control cable, says "engine off" of similar on the knob. I remember searching wide for that part, but eventually found it somewhere. Try Google Images "diesel shutoff cable" and similar.

Please rotate your photographs (above) by using the edit function. Try using a desktop rather than mobile device.
 

Attachments

  • shifter cable clamp.jpg
    shifter cable clamp.jpg
    96 KB · Views: 215
  • shifter terminal.jpg
    shifter terminal.jpg
    62.3 KB · Views: 45
Last edited:
Top