• Untitled Document

    Join us on April 26th, 7pm EST

    for the CBEC Virtual Meeting

    All EYO members and followers are welcome to join the fun and get to know the guest speaker!

    See the link below for login credentials and join us!

    April Meeting Info

    (dismiss this notice by hitting 'X', upper right)

mysterious leaks in cabinets beside galley/chart table

cooper999

Member II
Hi everyone:

First time poster here. My wife and I just bought a lovely 1985 30+, and we've had a blast with her so far spare some dirty fuel issues causing our diesel to quit (getting that attended to now).

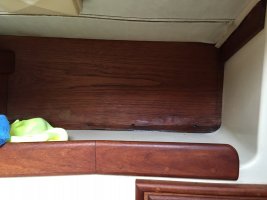
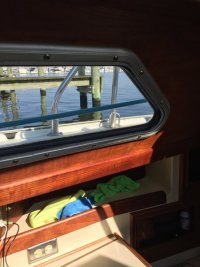
While our survey indicated a dry deck, there are a few minor leaks here and there mainly associated with the port lights, which we know need rebedding. What has me scratching my head are two leaks: one that appears to be behind the galley cabinet behind the stove (the wood paneling on the bottom of the recessed cabinet is in poor shape and damp after rain), and another essentially on the opposite side in the cabinet beside the chart table.

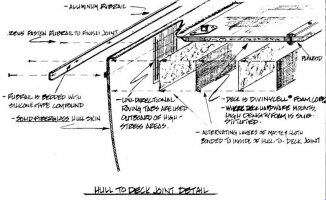
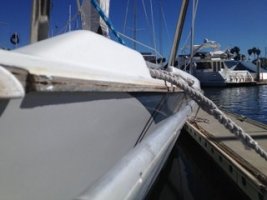
Looking under the headliner, I can't identify a conspicuously leaking piece of deck hardware (life line stanchion, etc.). Could it be that the leak may be coming from under the aluminum rub rails? I've read that these are typically cosmetic, so dare I say the hull/deck seal?

Just curious if others have experienced this. Any/all input welcome-thanks!
 

Christian Williams

E381 - Los Angeles
Senior Moderator
Blogs Author
Congrats on the boat and welcome aboard.

If the portlights are in need of rebedding, it is quite possible they are the culprit of remote water damage. If you have veneer around the openings, water can run invisibly behind it. Might be deck hardware. I doubt the rub rail leaks in any way.

We have all gone through this troubleshooting. Photos really help the experts here recognize the sneaky tricks our boats have.

Let me suggest using Settings/Edit Signature tab to display boat, year and engine with posts. It makes for informed responses.

More boilerplate: lots of info here to "search". Use Google (not the forum search box), with a phrase such as "Leaking portlights Ericson Yacht Forum".

Cheers,
Christian

Scan this to see if it applies: http://www.ericsonyachts.org/infoexchange/entry.php?121-Portlights-and-Veneer
 
Last edited:

Frank Langer

1984 Ericson 30+, Nanaimo, BC
Hi,
It's unlikely that the deck/hull joint is leaking as they are reinforced by a fiberglass coating on the inside of the hull. Most likely is water traveling to those areas from leaking ports, next possibility on that boat is the traveler mount which is above that general area and after that check the toe rail screws as they have been known to permeate the hull. After that check all stanchions as there is one on either side about where your leaks are and being at the lifeline gate they may have had extra wear and tear as people hoist themselves into the boat.
The E30+ is a great boat so I'm sure you'll love it once you find those pesky leaks.
Frank
1984 E30+
 

Frank Langer

1984 Ericson 30+, Nanaimo, BC
Another possibility might be the jib track which is just above both of those areas on either side. The bolts that secure the jib tracks are visible from inside the boat if you unzip the headliner in those areas. It would be easy to see if any of the bolts are leaking/rusty/salt encrusted, etc.
Let us know if you find the leak!
Frank
 

toddster

Curator of Broken Parts
Blogs Author
The hull-deck joint is not necessarily excluded, since after sealing it up nicely, the Ericson guys then drilled a bunch of holes in it, to attach the aluminum rub rail, with wood screws. Many of them penetrate all the way through on my boat, and many are loose/stripped. I'm undecided on the best fix - squirt epoxy into each hole to "refresh" the seal, and/or change to through-bolts. Maybe get rid of the rub rail entirely?
 

cooper999

Member II
Wow, already several helpful replies-much obliged!

We're heading over to the boat this afternoon to attend to various things and I'll take some photos (and populate my settings with more info, settings per Christian's post). There is a pretty clear drip signature on the teak below a few of the fixed aluminum edged port lights-clearly water has gotten in around them at some point-we just haven't seen it yet but haven't gotten a gullywasher of a rain since we got her.

Frank-the jib car rail occurred to me as well.

I also noticed the wood screws for the rub rail, toddster-one of the few inelegant design elements on an otherwise really sweet boat.

Thanks again folks.
 

Christian Williams

E381 - Los Angeles
Senior Moderator
Blogs Author
Todd, this has come up before and always confuses me. The plan for the hull deck joint shows a lot of roving and an out-overlapping joint:

attachment.php


On the '85 32-3, the rub rail is attached to the out-facing flanges ("finish joint" in the diagram ) with only 1 1/4 screws, which could not possibly penetrate the interior.

attachment.php


And yet, your experience is incontrovertible--and loss of integrity in that joint is unacceptable.

Is your hull-joint the same as above?
 

Attachments

  • rub rail design.jpg
    rub rail design.jpg
    84.9 KB · Views: 718
  • rub rail reduced.JPG
    rub rail reduced.JPG
    16.9 KB · Views: 536
Last edited:

EGregerson

Member III
leak

congratulations on your new boat. They're incredible, these Ericson's. After leaks have annoyed me, and procrastinating because i couldn't figure out where the leaks were coming from, i finally concluded; the leaks are coming from everywhere. So I started rebedding wherever there is a hole. Over the last month, rebedded 5 port stanchions. The leaks in the rear berth dried up that flowed from the gate stanchions, the leaks into the pantry dried up after bedding the deck water fill, the leaks that ruined the corn flakes were from mid ship stanchions. Once u start, u see immediate progress is what I'm saying. I wish I had started a plan to just re do them all back when. Do it over a year or whatever. The stuff i removed looked like butyl. So, 30 year old butyl, which i understand is its life expectancy. It's due. Good luck going forward.
 

cooper999

Member II
Here's a photo of the leaking recessed cabinet area beside the chart table:

attachment.php

To your point, EGregerson, I agree that we need to rebed pretty much everything as this hasn't been done by the previous owner. However, as for the photographed area, if anyone has any insight on specifically which places to look I'd appreciate it. I did some more searching under the headliner in the vicinity of the leak and it doesn't feel damp, so it's almost as if the water is coming in from behind the wood veneer (you can see the wet spot at the bottom). I see one slightly rusty bolt on one of the lifeline stanchions above it, but it has been dry in rains.

Just figured I'd put that out there-thanks again, all!
 

Attachments

  • IMG_8696.jpg
    IMG_8696.jpg
    58 KB · Views: 854

EGregerson

Member III
leak

what is directly/ approximately above the leak area up on the deck? Is there a stanchion? port? or winch? deck water tank fill?
 

toddster

Curator of Broken Parts
Blogs Author
Christian, yes that is exactly how mine was constructed. But at least half of the screws no longer hold. The gap between the out-facing lips has grown or eroded over the decades. (I had actually forgotten the detail about the cut-off flange when I typed the first message.) If I open up the chase area and run my hand along the inside of the joint, I can feel the points of some screws that have gone all the way through. Though I have not directly observed leakage at those points, I still have Mystery Leaks. In his blog, Christian Lloyd describes how, on the long beat back from Hawaii, his rub rail came entirely off, and water came in continuously through the screw holes. Of course, there are larger-through-bolts at the ends... It's possible that he was talking about those holes.

At least one member has posted a thread where they ground off the "lips" and glassed the outer side of the joint, just like the inner side. I had thought of squirting epoxy into each hole before setting the screw. But I didn't have any, and was on count-down to my appointment with the travel lift. I figured, "I can do this at the dock." Yeah. Someday...
 

cooper999

Member II
Here's a picture of the two stanchions that are about above the leak (though are a bit to port of the edge of the recessed area where water is leaking under the veneer in the previous photo):

attachment.php


Up on the deck over the cabin, there's a winch with cleat behind:

attachment.php


Not sure if these will be of any use in the internet diagnosis, but here they are regardless.

what is directly/ approximately above the leak area up on the deck? Is there a stanchion? port? or winch? deck water tank fill?
 

Attachments

  • IMG_8730.jpg
    IMG_8730.jpg
    47.6 KB · Views: 489
  • IMG_8731.jpg
    IMG_8731.jpg
    47.4 KB · Views: 467

EGregerson

Member III
gate stanchion

Does the zipper in the liner give access to the plate(s) under the stanchion base(s)? is it dry?
 

Christian Williams

E381 - Los Angeles
Senior Moderator
Blogs Author
Cooper,

Does that fixed portlight leak? Doesn't look like any veneer damage in the picture. But if it does, it's my first bet. The water travels between the veneer and the fiberglass, turns corners, does back flips, turns up who knows where.

Pull off the panel and part of the headliner and see. It's just stapled on under the trim piece.

If not that, what I would do (for what it's worth) is test each nearby likely bedded base--stanchions and winches, etc.

"Waterproof" three with duct tape or similar, then turn the hose on the fourth in a hard stream.

Work through them one by one.

But start with the fixed portlights. A jetting hose has usually usually revealed all for me.
 
Last edited:

Rocinante33

Contributing Partner
That double legged stanchion is the gate, so it is subject to extra stress & flex due to people grabbing it as they step on or off. I would try to get that re-bedded.
 

cooper999

Member II
Cooper,

Does that fixed portlight leak? Doesn't look like any veneer damage in the picture. But if it does, it's my first bet. The water travels between the veneer and the fiberglass, turns corners, does back flips, turns up who knows where.

Pull off the panel and part of the headliner and see. It's just stapled on under the trim piece.

If not that, what I would do (for what it's worth) is test each nearby likely bedded base--stanchions and winches, etc.

"Waterproof" three with duct tape or similar, then turn the hose on the fourth in a hard stream.

Work through them one by one.

But start with the fixed portlights. A jetting hose has usually usually revealed all for me.

You have a keen eye, Christian-

There are drip marks from water leakage in the front of the port light but the Admiral started going a little crazy with teak oil to freshen her up, which masked the leak evidence. Rebedding the port lights is one of our near-term projects, as is replacing the acrylic in the hatches, which your very helpful post/video will hopefully make things easier for us. I don't suppose you know of a similar step-by-step for rebedding the fixed port lights?

Thanks again to all for your helpful insight!
 

Christian Williams

E381 - Los Angeles
Senior Moderator
Blogs Author
Most of us have done it, and it's not a big deal.

One question is whether the leak is from the bedding of the frame against the cabin house, or whether from the rubber seal that holds the glass in the frame--or both.

There are many threads, and when I did this job first I searched them all (Google: leaking ports Ericson forum, rebedding ports, etc). Here's one, regarding the rubber:

http://www.ericsonyachts.org/infoexchange/showthread.php?11958-Leaking-E27-Port

The frame of the fixed ports is secured by bedding compound (caulk). The interior frame is only decorative.

To re-bed, remove interior frame. On the outside, pry the port assembly outward using putty knives, screwdriver or anything flat. If the bedding is bad, it comes off easily. If the bedding is firm, use a Dremel-style vibrating saw blade or scraper blade. No chisel or big force so as not to damage the aluminum frame. Once removed, scrape the metal clean using mechanical means and any solvent that works. Experiment: Silicon is one thing, dry caulk is another, 5200 adhesive is a nightmare.

Now place the cleaned portlight back into its opening and draw a pencil line around it on the exterior cabin house. Apply blue painters tape around that line to make cleaning up easier later.

Lay a heavy bead of Boatlife Life-Seal or other approved caulk into the frame (where the old caulk was), and replace the frame into the hole from the outside.

Caulk should ooze fully around the inside of the frame and also out over the painters tape.

Clean up and replace interior frame. Don't screw it down too hard, that's not necessary.

The hole cut by the factory may be quite irregular and sloppy but no worries. The caulk will fill gaps. There is no outward force on the portlight, and the flange prevents the window from caving in at sea.

It is possible that the veneer is rotted. If so, there're ways to fix that, too.

Cheers,
Christian

Others may have better techniques.
 
Last edited:

Shelman

Member III
Blogs Author
Most of us have done it, and it's not a big deal.

One question is whether the leak is from the bedding of the frame against the cabin house, or whether from the rubber seal that holds the glass in the frame--or both.

One more possible leak location on the fixed port-lights is where the ends of the exterior aluminum extrusion butt together. I had one that leaked at that location only in very cold weather, the aluminum shrank in the low temperatures just enough to produce a small gap, only hail and cold rain would make it leak but the relatively warm hose water wouldn't produce any leak at all. I also had the but seam on my lewmar opening hatches fail at the same outer frame location, the rubber seal had succumbed to UV degradation and had quit doing its job. Both port-lights were fixed by using sealant to re-seal the but seam, although I have since replaced the fixed port-lights with Cell Cast Acrylic.
 

markvone

Sustaining Member
Cooper,

The last photo is very helpful.
I have leaking port and stbd far outboard in your exact location. My toe rail sail track is the most likely source. I see silicone gooped on all the inside nuts from a PO. I have conclusively eliminated: anything fwd of the diesel deck fill (the Nav Ctr fwd bulkhead directs all fwd/outbd leaks to the pilot berths), diesel deck fill, fixed port lights, inboard Genoa track, hull - deck joint and the double leg stanchion (further aft and downhill on the E36).
I have a shelf at the Nav Ctr that is glassed to the hull behind the interior teak panel (directly below the toe rail track) that gets a puddle. More water runs down the inbd side of the hull, puddling on horizontal stiffeners below, near the floor and under my Nav seat.
I need to get a helper to remove all the fasteners and re-bed.

Mark
 
Last edited:
Top