• Untitled Document

    Join us on April 26th, 7pm EST

    for the CBEC Virtual Meeting

    All EYO members and followers are welcome to join the fun and get to know the guest speaker!

    See the link below for login credentials and join us!

    April Meeting Info

    (dismiss this notice by hitting 'X', upper right)

Replacing Morse Cables on Pedestal

Christian Williams

E381 - Los Angeles
Senior Moderator
Blogs Author
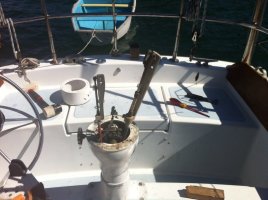
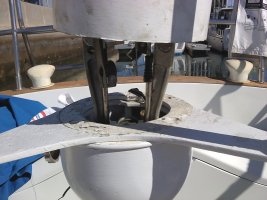
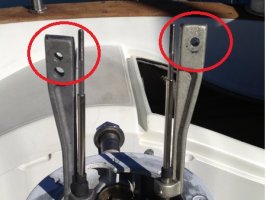
We're asked by a new member about the attachments of the Morse (Teleflex) cables for throttle and shift on Yacht Specialties pedestals.

I recall the sequence as
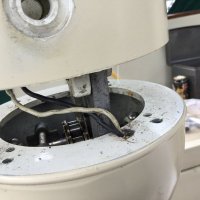
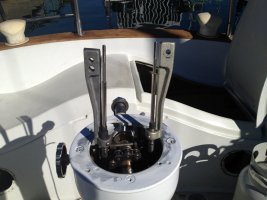
1. Remove Compass.

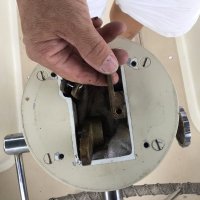
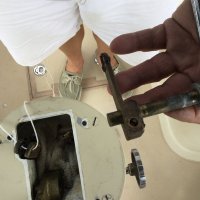
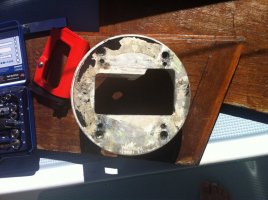
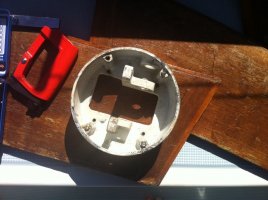
2. Remove plastic collar fixed to aluminum pedestal with stainless machine screws. "PB Blaster" (penetrating lubricant) and patience may be necessary.

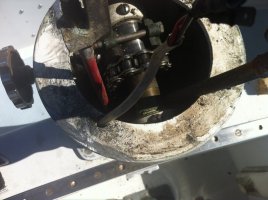
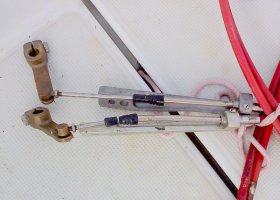
3. Pull cables up high enough to work on the end connections. Shoudl be slack in the cables for that.

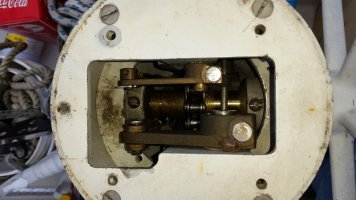
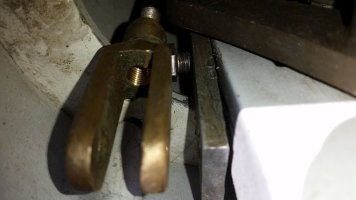
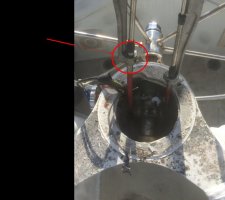
4. Remove fittings. Photograph them as you go because reassembly a week later can cause hair loss.

The cables are easiest to measure when out, and correct length is important. WM or many online suppliers.

Obey the rules about cable radius beneath the cockpit. Gentle curves only, avoid sharp turns.

Further questions, just ask here.

attachment.php
attachment.php
attachment.php
 

Attachments

  • 1201121303a.jpg
    1201121303a.jpg
    88.2 KB · Views: 639
  • ped morse cable attachment.jpg
    ped morse cable attachment.jpg
    72.3 KB · Views: 572
  • pedestal cables.jpg
    pedestal cables.jpg
    90.7 KB · Views: 566
Last edited:

Frank Langer

1984 Ericson 30+, Nanaimo, BC
Hi,
Based on my memory of having replaced my cables a few years ago, this sounds correct. However, it is really important once they are installed, to fine tune the adjustment at the transmission and at the throttle to ensure that the gear is fully forward and in reverse and that the throttle is moving the lever on the engine correctly. As I recall, there are nuts on the end that one can tighten or loosen to move the cable along in the needed direction. If not done correctly, the transmission won't stay in gear properly or the throttle won't allow the engine to run at proper speed and then shut off correctly.

Some have suggested that you need to use the old cables as a messenger to run the new cables, but I didn't find that. In fact, I ended up routing the new cables along a different path which had less bends than the way they had been installed previously. Fortunately, I had looked at this and planned for it, then measured the required cable lengths, before I went to the chandlery to buy replacements.

Frank
 

clip68

Junior Member
As I dug into the pedestal, the only thing that concerned me was the two bolts that held these (see red circles) to the casing just below the controls:
attachment.php


I can't get my fingers in there to hold the bolts which will make extracting them, and worse replacing them very difficult. Did you use a pair of needle-nose pliers or something similar to help hold the bolts for removal/installation?

Thank you in advance!
Chris
 

Attachments

  • this.jpg
    this.jpg
    48.8 KB · Views: 988

Christian Williams

E381 - Los Angeles
Senior Moderator
Blogs Author
Chris,

Do you have a collar on the pedestal, and is it off? The fittings have to pull up into the sun so there's room to work on them.

If not enough slack, unbolt the other end of the cable first?
 

Loren Beach

O34 - Portland, OR
Senior Moderator
Blogs Author
"...Like a Surgeon..."

Probably not enough help for this particular problem, but I recall that mechanics/electricians I have known over the decades all seemed to have one or more sizes of surgical clamps in their tool kit. These types of "pliers" have the advantage of clamping and holding on at a set pressure.
Matter of fact I saw a small pair of these in my dad's box of hand tools. (He designed and repaired electrical panels for furnaces, pumps, etc.)

Loren

ps: any other fans of Weird Al here?
:)
 

clip68

Junior Member
Chris,

Do you have a collar on the pedestal, and is it off? The fittings have to pull up into the sun so there's room to work on them.

If not enough slack, unbolt the other end of the cable first?

I have removed the 4 screws (after obtaining a much larger screw driver) but was not able to pull the collar off the pedestal. I got to this point (this doesn't show the screws removed):
attachment.php


It sounds to me like the trick is going to be giving some slack to pull the collar up to allow access to these bolts from below:
attachment.php


Does that sounds about right?
 

Attachments

  • 20160220_114045.jpg
    20160220_114045.jpg
    66.3 KB · Views: 556
  • 20160227_163051.jpg
    20160227_163051.jpg
    45.8 KB · Views: 522

Christian Williams

E381 - Los Angeles
Senior Moderator
Blogs Author
Hmmm. The collar may be bedded to the pedestal (unnecessarily), and a few sideways taps should get it off since the big screws are out now.

But don't the shafts for the throttle and shift go through the collar?

If you loosen the nut heads shown in the photo, the control levers will pull out horizontally.

I could be wrong, but I think with slack in the cables the whole collar/levers assembly will lift up.

While you're in there grease the chain and inspect the turning sheaves for the steering cables under the cockpit. The sheave bushings should be non-wobbly, and the cables should be firm but not drum tight. Inspect quadrant for cracks or corrosion and if the quad is aluminum, apply Tef-gel where stainless connects.

This is also a good time to check any instrument wiring, and to assure the compass light wire doesn't get tangled upon reassembly.

There is nothing in the world better than new shift and throttle cables. Old ones cannot be saved or effectively lubricated, and the change is cheap, except for the labor, which naturally means head-scratching for all of us.
 
Last edited:

clip68

Junior Member
Hmmm. The collar may be bedded to the pedestal (unnecessarily), and a few sideways taps should get it off since the big screws are out now.

But don't the shafts for the throttle and shift go through the collar?

If you loosen the nut heads shown in the photo, the control levers will pull out horizontally.

I could be wrong, but I think with slack in the cables the whole collar/levers assembly will lift up.

I will give that a shot this weekend during my next maintenance window and report back!

Thank you very much for your help/advice.

-Chris
 

Keiffer

Member II
Throtle and Transmission Cable Replacement

We just did this a couple of months ago on our E31.

Christian is correct, you need to pull the throtle and transmisison levers out horozintally.
Then after the cables have been disconnected from the engine you can pull everything up thru the pedestal where you can work on it.

attachment.php
attachment.php
attachment.php


If you look at the old cables they will have a number, and a lenght on the cable.
The hardest part for us was getting used to how easy the new cables worked!
The throttle was so smooth the first time docking the boat after the install I stalled the boat on my approach to the dock!
 

Attachments

  • IMG_0185.jpg
    IMG_0185.jpg
    54.9 KB · Views: 544
  • IMG_0186.jpg
    IMG_0186.jpg
    50.4 KB · Views: 511
  • IMG_0189.jpg
    IMG_0189.jpg
    51.1 KB · Views: 545

markvone

Sustaining Member
Removing the Four Big Collar Screws - Suggestions?

I could not loosen any of my four collar screws. I tried Liquid Wrench, a heat gun (not a torch) and an impact driver with no luck. My pedestal paint is in pretty good shape so I was afraid to use a torch but that may be the only solution.
I tried this three years ago, but gave up since I didn't have to get in there (I was trying to get at the upper chain gear cog).
Anybody have a tip that worked for them?

Thanks,

Mark
 

Christian Williams

E381 - Los Angeles
Senior Moderator
Blogs Author
I had heard about this predicted problem, big stainless screws into cast aluminum for decades.

Several days of repeated PB Blaster, that specific product, did the job.

But using the same trick I never was able to get the ss 1" guard rail separated from the pedestal holding plate. They were literally welded by corrosion.
 

Keiffer

Member II
Removing problem screws

I am pretty sure that we have removed every nut and bolt from out boat over the past 5 years. Some took about a minute, some an hour, some hours with trips to the hardware store in between, others litteraly days with time in between to consider my next step!

There have been very few that we have not been able to extracate. As mentioned P Blaster is excellent, direct heat to the top of the screw head is also good and should not affect the paint, Impact driver, screw gun set on impact for a quick jolt, and last but not least if you cannot break it free, drill it out.

Once drilled out be sure and use Tef Gel when installing the new bolt to prevent you or a future owner from having to go thru this again.
 
Last edited:

lonokai

Member III
OMG....I'm so glad I saw this....I have been "dealing" with a single screw/bolt holding my Whale Gusher pump for several days now....I'm headed to Home Depot to purchase a LARGER flat head in the hopes the extra 'weight' will do the trick.....and by the way...its ALWAYS the last screw!


I am pretty sure that we have removed every nut and bolt from out boat over the past 5 years. Some took about a minute, some an hour, some hours with trips to the hardware store in between, others litteraly days with time in between to consider my next step!

There have been very few that we have not been able to extracate. As mentioned P Blaster is excellent, direct heat to the top of the screw head is also good and should not affect the paint, Impact driver, screw gun set on impact for a quick jolt, and last but not least if you cannot break it free, drill it out.

Once drilled out be sure and use Tef Gel when installing the new bolt to prevent you or a future owner from having to go thru this again.
 

Queequeg

Junior Member
Challenges aplenty

So just to add to the thread, I tried the penetrating oil, percussion hammer, drilling heads off screws and finally - hacksawing the screws. Now to replace the cables and get the remaining threads out of the casting. :mad:
attachment.php
attachment.php
attachment.php
attachment.php
 

Attachments

  • photo 4 (1).jpg
    photo 4 (1).jpg
    98.9 KB · Views: 428
  • photo 3 (1).jpg
    photo 3 (1).jpg
    88 KB · Views: 437
  • photo 2 (2).jpg
    photo 2 (2).jpg
    87 KB · Views: 428
  • photo 1 (2).jpg
    photo 1 (2).jpg
    83.1 KB · Views: 436

bmaraglia

New Member
Remove old cbale from mouting bar

Hi guys - Great info on this thread! I have been able to disassemble (got lucky with my 4 screws that mount the collar) and access the cables

I now have a question on how to remove the old morse cable from the mounting bar? I have removed the set screw but still seems seized. I know there is a ring in this section of the morse cable, is there something holding it together here that I am not seeing?

Any advice on how to separate old cable from assembly would be much appreciated

Thanks in advance
 

Attachments

  • Removing morse cables.jpg
    Removing morse cables.jpg
    133.1 KB · Views: 341

e38 owner

Member III
I have been trying this project for years. Always give up and send more penetrating oil down the cable. With the inspiration from this thread maybe this is the year. The stainless screws and aluminum collar have become one. I must become one with the force oh pb blaster
 

Christian Williams

E381 - Los Angeles
Senior Moderator
Blogs Author
Welcome to the forum, Brandon Maraglia. Nice to bump into you at Home Depot.

Our new member has an Ericson 32-3 (1987), my favorite of all the Ericsons.

Now to business: I believe the set screw is all that is holding the cable jacket in the fitting. A soak in PB Blaster and some persuasion should free it.

Try twisting the cable with vice grips. Take care not to break the casting that holds the set screw. Our Merriman/Yacht Specialties pedestals are obsolete and parts are hard to find.
 
Last edited:

Queequeg

Junior Member
Don't give up

I have been trying this project for years. Always give up and send more penetrating oil down the cable. With the inspiration from this thread maybe this is the year. The stainless screws and aluminum collar have become one. I must become one with the force oh pb blaster

I needed to apply vast amounts of heat to the alloy housing NOT the s/s bolts. Eventually they separated. The casting holding the Morse is just a tube with the set screw clamping into the recess where the Morse clamp would normally sit. Mine required a vice, hot air gun, penetrating oil and excess force to get them apart (much like teenagers). Double check the length of the cable from Tip to Tip, Teleflex 33C.

Only scary thing now is how easy the throttle works plus I added a stop cable (Yanmar) and it works a treat, no more heart stopping engine fail due to pulling throttle back too far.
 

bmaraglia

New Member
Thanks for the info! PB Blaster is the unsung hero of this job. Got everything apart, sanding down and repainted pedestal component. Re-fed new shifting cables.... Buttery Smooth! Very glad to have project complete :)
 

Christian Williams

E381 - Los Angeles
Senior Moderator
Blogs Author
For the record:

Old Morse cables are identified by numbers on the red jacket near the end, under 30 years of grease.

Morse D32377--003--0132.0, for example, is 11 feet long (132").

A Teleflex equivalent is CCX 633 11. (The last digits are the length in feet). [typos have been corrected]

I just went through all this again, and a long pictorial record is here.
 
Last edited:
Top