• Untitled Document

    Join us on April 26th, 7pm EST

    for the CBEC Virtual Meeting

    All EYO members and followers are welcome to join the fun and get to know the guest speaker!

    See the link below for login credentials and join us!

    April Meeting Info

    (dismiss this notice by hitting 'X', upper right)

Seeking advice on E32 mast step repair

tenders

Innocent Bystander
E32 mast step deck repair: an illustrated guide

My 1969 Ericson 32, which I've owned since 1991, has a deck-stepped mast. Under the mast, just a bit to port of the centerline, is a mahogany compression post, and about 18” to the right of this is another mahogany post of somewhat less significance, as it is well offset from the mast.

Over the years the area in the cabin overhead between these two posts has gradually sagged, cracked, and leaked a few drops of water through the cracks. Outside on deck there was no perceptible deflection and no sign of a soggy/hollow core, as has affected some other areas of the deck. Last year I jacked up the overhead and slipped a piece of quarter-inch G10 between the compression posts to try to add some additional support; it sagged, too. This year I decided to bite the bullet and solve the problem. I have a drawing from what I think is a later run of Ericson 32s which was helpful, though not completely accurate, as a hint to what lay beneath the fiberglass.
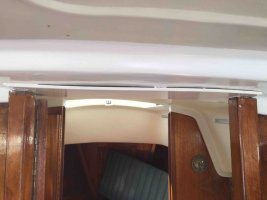
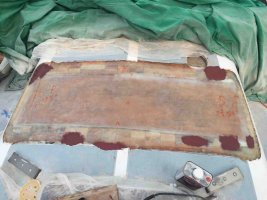
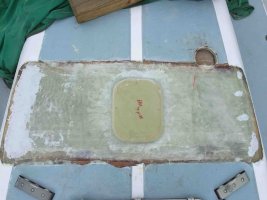
Interior Cracks-Before.jpgInterior G10-Before.jpgEricson 32 Mast Step Design.jpg

Last weekend my boat partner and I cut out a 4’ x 18” slab of deck under the mast, along the entire width of the cabin top, and found the culprit: a nearly 2”-thick beam of completely soggy plywood, slightly bent to accommodate the arch of the cabin top, and likely made wet from 46 years of rainwater sneaking into the mast and creeping along the channel drilled into the wood directly under the mast for the mast lights and electronics. It isn’t rotten but it’s close: the plies are delaminated, and seem to peel apart relatively easily with a wide chisel and a hammer. The rest of the deck fore and aft of this chunk is balsa core, insulated from the beam by quarter-inch dams of resin running the length of the plywood along the margin. This balsa looks as sound as the day it was put in, so the problem is really isolated to this 4’ x 18” x 2” plywood beam.

Deck Photo-Before.jpg

The question: how best to replace the plywood? I have a few ideas and was wondering what the real experts here might think. Each of my core repair ideas involves finishing the deck with a layer of quarter-inch G10 on top, painted to match the rest of the deck, and refabricating the slightly-elevated mast step with another pice of G10. That’s the easy part; I've done that before.

Option 1: Plywood
Laminating in 6-8 layers of quarter-inch marine plywood, with a thick coat of epoxy between them, weighing each layer down to conform to the arch of the deck, would be straightforward and inexpensive. The problem: waterlogged plywood created the original problem, and I don't want to be worrying about the effects of water incursion again. Also, the sag has been present for years, would replacement plywood be strong enough? [EDIT: this is pretty much what I ended up doing...but fit less plywood in there and a lot more epoxy/fiberglass layers than I initially thought.]

Option 2: Plywood/fiberglass roving sandwich
Alternating layers of thick roving and quarter-inch plywood, again weighing down the plywood so it conforms to the arch, would also be straightforward and inexpensive. But again, will this be strong enough?

Option 3: Plywood/fiberglass roving sandwich, with G10 beam spanning the compression posts
I could place a beam of half-inch G10 across the two compression posts, and fill in the remaining space with plywood/glass laminate layers. I’m concerned this will make the G10 under the mast, if it isn't perfectly level, act as a lever and lift up the deck at the worst possible time.

Option 4: Plywood/fiberglass roving/G10 sandwich
A layer, or even two, of half-inch G10 could be glassed in across the deck, filled in with layers of roving and/or plywood. The trick is to maintain the deck arch. Perhaps this could be accommodated with side tabs of G10 (pieces 1 and 3 in the last drawing) glassed onto the ends of a main G10 beam (piece 2 in the drawing) spanning both compression posts to starboard, and extending to port to offset the “lever” effect. This would be very strong, I think, and the high cost of the thick G10 would be offset a bit by less lamination being necessary.

How crazy are these ideas? I’m leaning towards Option 4.

Mast Step Repair Options.jpg
 
Last edited:

Loren Beach

O34 - Portland, OR
Senior Moderator
Blogs Author
If the needed thickness was under an inch I would just go with Biax layers - many layers. I would use weights to force out excess resin or use a vacuum pump.
Two inches of total coring is a lot of thickness. Plywood "filler" is certainly tempting, and as long as any required holes are epoxy sealed might work fine. After all the original wood lasted for several decades.

As far as using only G10, I would go with that in a heartbeat, but you Must have that curve and the only way to get that in G10 would be to use a thin enough layup to allow the needed bend to be done with laminations of it. Come to think of it, laminating a bunch of layers of curved 1/8" G10 might work fine.
Good luck,
Loren
 

tenders

Innocent Bystander
If the needed thickness was under an inch I would just go with Biax layers - many layers. I would use weights to force out excess resin or use a vacuum pump.
Two inches of total coring is a lot of thickness. Plywood "filler" is certainly tempting, and as long as any required holes are epoxy sealed might work fine. After all the original wood lasted for several decades.

As far as using only G10, I would go with that in a heartbeat, but you Must have that curve and the only way to get that in G10 would be to use a thin enough layup to allow the needed bend to be done with laminations of it. Come to think of it, laminating a bunch of layers of curved 1/8" G10 might work fine.
Good luck,
Loren

I really appreciate these thoughts, Loren, thank you.

Do you think 1/8" G10 would bend? The 3/16 and 1/4 that I've worked with seem so stiff. But that approach has some appeal, even if making and laying up 12-16 layers of it would take a ton of time and involve quite a bit of waste. One might use a couple of countersunk screws in each layer to keep the curve as layers are built up....

You don't think much of the idea of using three pieces of 1/2" G10 to linearly approximate the curve, with high-density filler underneath to bridge the gaps under the joints? That would be between layers of mat, and possibly plywood, that would actually be curved.
 

tenders

Innocent Bystander
Interestingly, the original plywood was 3 layers of 1/2", not glued together in any perceptible way.

I think I'm going to go with a few layers of heavy 18oz nonwoven glass cloth on the bottom, followed by three 1/2" marine plies laminated with epoxy (if I can get 1/2" to dry-bend along the radius, which I estimate to be 6-8'; if not, 1/4" all the way), followed by more glass cloth on the top, capped off with 3/8" G10 on the deck, followed by a 1/4" G10 mast step.

Photos to follow!
 

tenders

Innocent Bystander
So, the structural work on this repair is finally done and I just finished painting the mast with Perfection. Still more work to do on the wiring of the mast and mast step. Here's a summary of the structural repair.

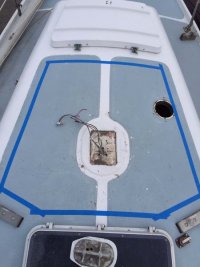
1 - BEFORE - water had leaked down the mast and found its way through the holes where the mast wiring penetrates the deck, into the nearly 2" core of slightly curved plywood directly underneath. This weakened the plywood, which stretched all the way across the cabin top, and caused the deck to sag noticeably under the mast from the inside of the cabin. It was not really visible from above. My boat partner wisely talked me out of hacking out the entire area shown by the blue tape. Most of it is perfectly sound.

image1.jpg

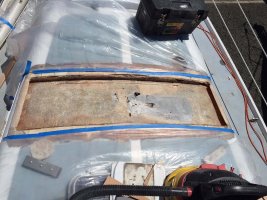
2 - POINT OF MAXIMUM DESTRUCTION - a grinder with a diamond bit cut through the top layer of fiberglass deck easily, followed by a bunch of chiseling, crowbarring, and use of an oscillating saw to get the wood out. Underneath the wood, the fiberglass had several cracks in it from the stress. These had been visible from inside the cabin, and had seeped a bit of brown, sludgy water for years. And for some reason the cabin light wiring also ran under the mast step. Not any more - a minor rewiring project will ensue.

image2.jpg

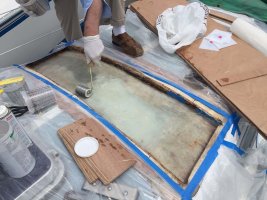
3 - REBUILDING THE BOTTOM LAYERS - after tapering the edges of the repair 4" beyond the cut-out area, then grinding and patching the cracks on the bottom of the cutout with several layers of glass, five layers of fairly heavy 12 oz fiberglass was laid down with epoxy. Each layer felt about like the thinnest cotton blanket you can imagine, but once wetted down with epoxy it didn't build up much volume. The wood shown by my foot is slabs of 1/4" and 3/8" marine plywood. We epoxied in what became 7/8" of this (2 x 1/4" + 1 x 3/8") on top of the new glass. Each layer of wood was first completely coated in neat epoxy, then laid on a bed of thickened epoxy to minimize gaps and the chances of future water intrusion. We couldn't cut each piece precisely enough, and then bend it sufficiently, to get it to fit under the edges of the cutout. So we ended up having to cut one side of each wood layer about 6" away from the edge so that both of these pieces could be jammed into the space. With each layer we alternated the cut sides so that the piece on top of one held the piece below it in the camber shape. This was all done in one afternoon, so the layers of fiberglass and wood would chemically bond to each other, and used about a gallon of epoxy.

image3.jpg

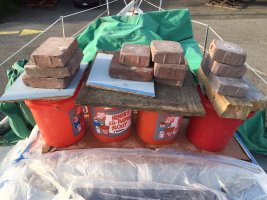
4 - WEIGHTY MATTERS - lots of different forces at work here. Because the camber in the cabin top is critical to the strength of the hull, the edges of the top layer plywood are wedged under the edge of the cabin top with scrap wood wrapped it wax paper. Then we put as much weight as we could on the repair to try to maintain that curve as the epoxy cured. There's close to 250 pounds of water, bricks, and scrap wood here - there wasn't a great way of putting more weight on top of the slippery, wet epoxy.

image4.jpg

5 - FAIR DINKUM - once the wood was cured in place, fourteen layers of progressively smaller pieces of 12oz glass were epoxied on top to bring it close to the level of the surrounding deck. The first piece was cut 4" oversize all around to cover the taper that we had ground around the repair, then 3.5" oversize, then 3" oversize, and so on. Several of the later layers were exactly the size of the repair, then one last one was 4" oversize again. Then it took three or four rounds of fairing to make it smooth(ish).

image5.jpg
 

tenders

Innocent Bystander
6 - The newly-fabricated G10 mast step plate was epoxied in, carefully situated to align with the old one, although this one is a little larger. More fairing followed, until...

image6.jpg

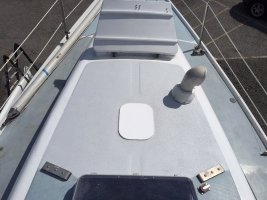
7 - SKID-NO-MORE - ...the easiest part of the job: applying the nonskid finish. This is "Kiwi Grip," a New Zealand invention that comes out of the can like yogurt, but is then rolled on with a weird, fibery roller into a stippled finish that hardens quite quickly. This took all of about fifteen minutes. Then the sides were painted white with Brightsides. I used to think Brightsides was kind of exotic, but now that I've painted the mast with Interprotect 2000, Barrierkote, and Perfection, Brightsides feels as complicated as housepaint. Eventually we'll coat the rest of the deck with Kiwi Grip but before that happens we have another core repair to do on the starboard side next year.

image7.jpg

I'm guessing this would have been a $6-10k yard job. My cost was under $700 for maybe 40 hours of work:

$300 in epoxy and fillers
$100 in plywood, with lots left over
$100 fiberglass cloth
$75 paint/Kiwi Grip and supplies
$50 G10 mast step plate
$25 in sandpaper

Tools (all of which I already had):

Grinder, with diamond cutting blade and sanding discs
Orbital sander
Oscillating saw
Table saw for cutting G10 mast step plate
Chisel and crowbar
Marker, tape measure, and scissors for cutting cloth
Plastic squeegee for fairing

In all this was a complicated project only because it required a large number of very simple steps. I'm expecting a horrific creak from it when the mast gets put back into place, but I think it's going to hold very well. If the mast crashes through the deck after all this, I'm trashing the boat, but with a clear conscience.
 

bigd14

Contributing Partner
Blogs Author
G10 Kerfed?

Just saw this- Looks like a great job! It always ends up being more involved than you think, doesn't it. I was cleaning my garage the other day and came across a sheet of 1/2 inch G10 I had leftover from my boat project. That now has me wondering what people might think about using 1/2" G10 for this situation but kerfing it every 2-3 inches to match the curve of the deck instead of the layers of marine ply? Do you think this would provide enough structural support if you used layers of biax above and below as well and filled the kerf cuts with thickened epoxy? I wonder if you could get a good enough bond with thickened epoxy in the kerfs so they would not separate under pressure. Or maybe the entire sandwich assembly would be strong enough that this would not be an issue.

Anyway, just food for thought. Congrats on a successful project.

Doug
 

tenders

Innocent Bystander
Certainly thought of that, and had hoped to put more of that miracle material into this repair somehow.

However:

(1) G10 is very stiff, and does not bend easily at any thickness. I had no confidence that I would be able to get an accurate bend in it no matter how deep the kerf was, never mind maintain that bend for as long as it takes epoxy to cure to significant strength. Maybe if I had a steel form, and with big bolts could screw the G10 into a curve along the form, then place the form with the G10 screwed onto it over the form, then...naah, badly-assembled wood lasted 45 years, and it would take me at least that long to pull this super-repair off. Wood = good, as they say.

(2) Strength was needed to bridge the gap under the mast step, and the act of kerfing cuts right through the structural benefit of the G10. I thought about just cutting blocks of G10 and laying them in along the repair like bricks, perhaps even cutting them at an angle like little keystones so they'd butt up flush against each other, but my trigonometry skills aren't that good, that approach would also negate the continuity of the material, and...

(3) ...1/2" G10 of that size is too expensive to experiment or risk failure with.
 

tenders

Innocent Bystander
I continue to think about this repair - a lot, as in, every time I tack - and it hit me as I was visiting the Steinway factory in Queens, NY a couple of years ago that there is a better and simpler way of building the cambered plywood core.

By tracing or measuring the curve of the deck at different points, I could have transferred that curve to a 4x4 beam and cut it out with a bandsaw - basically making a plug mold. It it would have been easy to clamp down and bend a layer or two at a time of epoxy-coated plywood on the ends of the plug and build up a nice thick stack of perfectly-curved, waterproof core. A bit of finishing of the edges once everything was built up and cured and it could have dropped right into the hole, on top of a bed of thickened epoxy, perhaps with a bit of foam or wood tucked into the edges against the window bulkheads.

The boat was built in 1969, the original core lasted 45 years, I expect the repair I made will also last 45 years. So I’ll update this post in 2059 when the job will need to be repeated.

This is how they make Steinway grand piano cases. A couple of guys slather glue onto each layer of what becomes a 25-foot by 18-inch sandwich of slightly overlong layers of 1/8” or 1/4” wood...an oversized, mahogany version of this mast step core. That sandwich gets set against a big male mold and the guys manually crank a dozen or more huge clamps around the mold, forcing the sandwich to conform to the grand piano shape, and allowing the plank layers to slide against each other to curve while the glue is wet and lubricative. The glue dries for a couple of weeks and when the clamps come off, the perimeter of a rough grand piano case remains, open where the keyboard eventually goes. It is a very brute-force, medieval-feeling stage of an overall extremely impressive process, and I highly recommend a Steinway factory tour if you can ever wrangle one.
 
Last edited:

kapnkd

kapnkd
My 1969 Ericson 32, which I've owned since 1991, has a deck-stepped mast. Under the mast, just a bit to port of the centerline, is a mahogany compression post, and about 18” to the right of this is another mahogany post of somewhat less significance, as it is well offset from the mast.

Over the years the area in the cabin overhead between these two posts has gradually sagged, cracked, and leaked a few drops of water through the cracks. Outside on deck there was no perceptible deflection and no sign of a soggy/hollow core, as has affected some other areas of the deck. Last year I jacked up the overhead and slipped a piece of quarter-inch G10 between the compression posts to try to add some additional support; it sagged, too. This year I decided to bite the bullet and solve the problem. I have a drawing from what I think is a later run of Ericson 32s which was helpful, though not completely accurate, as a hint to what lay beneath the fiberglass.
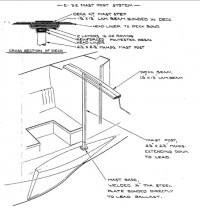
View attachment 16369View attachment 16370View attachment 16367

Last weekend my boat partner and I cut out a 4’ x 18” slab of deck under the mast, along the entire width of the cabin top, and found the culprit: a nearly 2”-thick beam of completely soggy plywood, slightly bent to accommodate the arch of the cabin top, and likely made wet from 46 years of rainwater sneaking into the mast and creeping along the channel drilled into the wood directly under the mast for the mast lights and electronics. It isn’t rotten but it’s close: the plies are delaminated, and seem to peel apart relatively easily with a wide chisel and a hammer. The rest of the deck fore and aft of this chunk is balsa core, insulated from the beam by quarter-inch dams of resin running the length of the plywood along the margin. This balsa looks as sound as the day it was put in, so the problem is really isolated to this 4’ x 18” x 2” plywood beam.
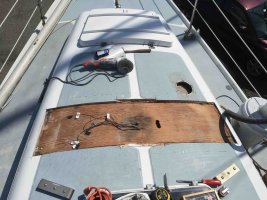
View attachment 16368

The question: how best to replace the plywood? I have a few ideas and was wondering what the real experts here might think. Each of my core repair ideas involves finishing the deck with a layer of quarter-inch G10 on top, painted to match the rest of the deck, and refabricating the slightly-elevated mast step with another pice of G10. That’s the easy part; I've done that before.

Option 1: Plywood
Laminating in 6-8 layers of quarter-inch marine plywood, with a thick coat of epoxy between them, weighing each layer down to conform to the arch of the deck, would be straightforward and inexpensive. The problem: waterlogged plywood created the original problem, and I don't want to be worrying about the effects of water incursion again. Also, the sag has been present for years, would replacement plywood be strong enough? [EDIT: this is pretty much what I ended up doing...but fit less plywood in there and a lot more epoxy/fiberglass layers than I initially thought.]

Option 2: Plywood/fiberglass roving sandwich
Alternating layers of thick roving and quarter-inch plywood, again weighing down the plywood so it conforms to the arch, would also be straightforward and inexpensive. But again, will this be strong enough?

Option 3: Plywood/fiberglass roving sandwich, with G10 beam spanning the compression posts
I could place a beam of half-inch G10 across the two compression posts, and fill in the remaining space with plywood/glass laminate layers. I’m concerned this will make the G10 under the mast, if it isn't perfectly level, act as a lever and lift up the deck at the worst possible time.

Option 4: Plywood/fiberglass roving/G10 sandwich
A layer, or even two, of half-inch G10 could be glassed in across the deck, filled in with layers of roving and/or plywood. The trick is to maintain the deck arch. Perhaps this could be accommodated with side tabs of G10 (pieces 1 and 3 in the last drawing) glassed onto the ends of a main G10 beam (piece 2 in the drawing) spanning both compression posts to starboard, and extending to port to offset the “lever” effect. This would be very strong, I think, and the high cost of the thick G10 would be offset a bit by less lamination being necessary.

How crazy are these ideas? I’m leaning towards Option 4.
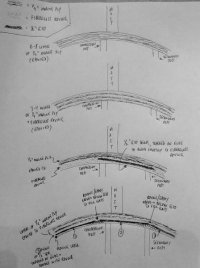
View attachment 16371


Hi "Tenders",

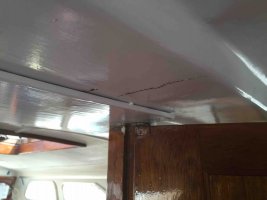
Same problem with the headliner in my '73 E-32. First major sail to the Bahamas shortly after purchasing her new from the dealer, the main brace cracked in heavy Gulf Stream seas - same spot as yours. It was repaired under warranty, but the crack was persistent over the years.

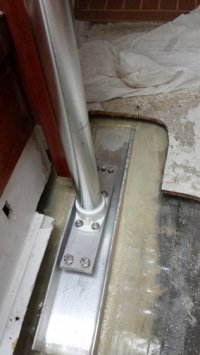
Turns out the offset allowing for more room going forward just didn't support the loads all that well - PLUS - the original interior post which was also thickened in the repair didn't rest all the way to the keel. It stopped on the cabin sole leaving an open space for flexing below the cabin sole and keel.

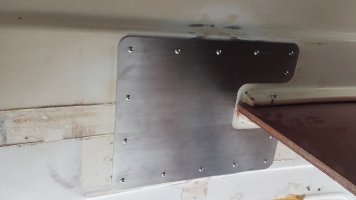
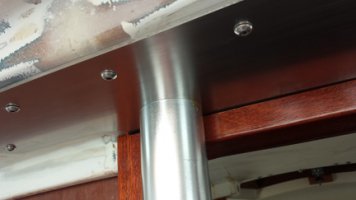
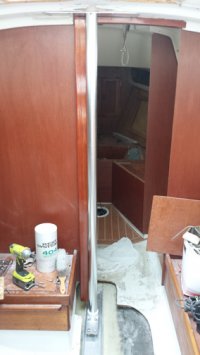
When we recently replaced all the bulkheads, we also decided to give up some doorway room and put in an aluminum post with a 1/8" thick SS plate above it. The keel area was also built up with glass and resin plus a 1/4" aluminum channel was added to further dissipate the load on the keel itself.

The above area was ground out and the crack filled with glass and resin and the SS plate then screwed in place. Of course the roof was jacked up to insert the post and get good compression to the keel area.

The post now centers the load correctly under the mast and rests firmly on the keel. DO CHECK under your cabin sole for any space between the keel and cabin sole. (In the photo of the SS plate you can see a thin line coming from the top of the plate - that is not a crack but a reference pencil line indicating the center-line of the boat.)

-kerry

SS Cabin Roof Plate.jpgComression Post to Keel Detail.jpgSS support on coach roof detail.jpgNew Comression Post Added.jpg
 

toddster

Curator of Broken Parts
Blogs Author
Bookmarking this thread! The plywood area under my mast step appears to be about 1/8" thicker than the adjoining balsa and cracks are starting at the interface. Did the plywood swell? Did the balsa shrink? So far, i've been too scared to drill exploratory cores. BTW: I enlarged the hole under the mast step for wiring a while back and it seemed to be solid glass all the way through the deck.
 

Papidoos56

1973 E32-2
th
6 - The newly-fabricated G10 mast step plate was epoxied in, carefully situated to align with the old one, although this one is a little larger. More fairing followed, until...

View attachment 17074

7 - SKID-NO-MORE - ...the easiest part of the job: applying the nonskid finish. This is "Kiwi Grip," a New Zealand invention that comes out of the can like yogurt, but is then rolled on with a weird, fibery roller into a stippled finish that hardens quite quickly. This took all of about fifteen minutes. Then the sides were painted white with Brightsides. I used to think Brightsides was kind of exotic, but now that I've painted the mast with Interprotect 2000, Barrierkote, and Perfection, Brightsides feels as complicated as housepaint. Eventually we'll coat the rest of the deck with Kiwi Grip but before that happens we have another core repair to do on the starboard side next year.

View attachment 17075

I'm guessing this would have been a $6-10k yard job. My cost was under $700 for maybe 40 hours of work:

$300 in epoxy and fillers
$100 in plywood, with lots left over
$100 fiberglass cloth
$75 paint/Kiwi Grip and supplies
$50 G10 mast step plate
$25 in sandpaper

Tools (all of which I already had):

Grinder, with diamond cutting blade and sanding discs
Orbital sander
Oscillating saw
Table saw for cutting G10 mast step plate
Chisel and crowbar
Marker, tape measure, and scissors for cutting cloth
Plastic squeegee for fairing

In all this was a complicated project only because it required a large number of very simple steps. I'm expecting a horrific creak from it when the mast gets put back into place, but I think it's going to hold very well. If the mast crashes through the deck after all this, I'm trashing the boat, but with a clear conscience.
Thank you for this. I just added the whole shebang to my do list.
 
Top